Morgen review 2026: Should you use this AI daily planner?

Some links on this page are affiliate links. If you buy something, I get a small cut, at no extra cost to you. I only recommend tools I’d genuinely tell a friend to use. Learn more.
You’re staring at your calendar. Three hours free between meetings. Fourteen tasks in Todoist. No idea if you actually have time for everything. That’s the problem with keeping tasks and a calendar in separate apps; you can’t see your real capacity.
I tested Morgen for about six weeks alongside Sunsama and Akiflow, two of the best tools that set the standard for daily planning apps. Same chaotic schedule: multiple calendars, a task manager, meetings that change every day.
The question: does Morgen actually work better than the $300/year competition?
This review shows you exactly what Morgen does differently, where it falls short, and whether it’s worth switching.
My Morgen review at a glance
In a hurry? Here’s a summary of my Morgen review:
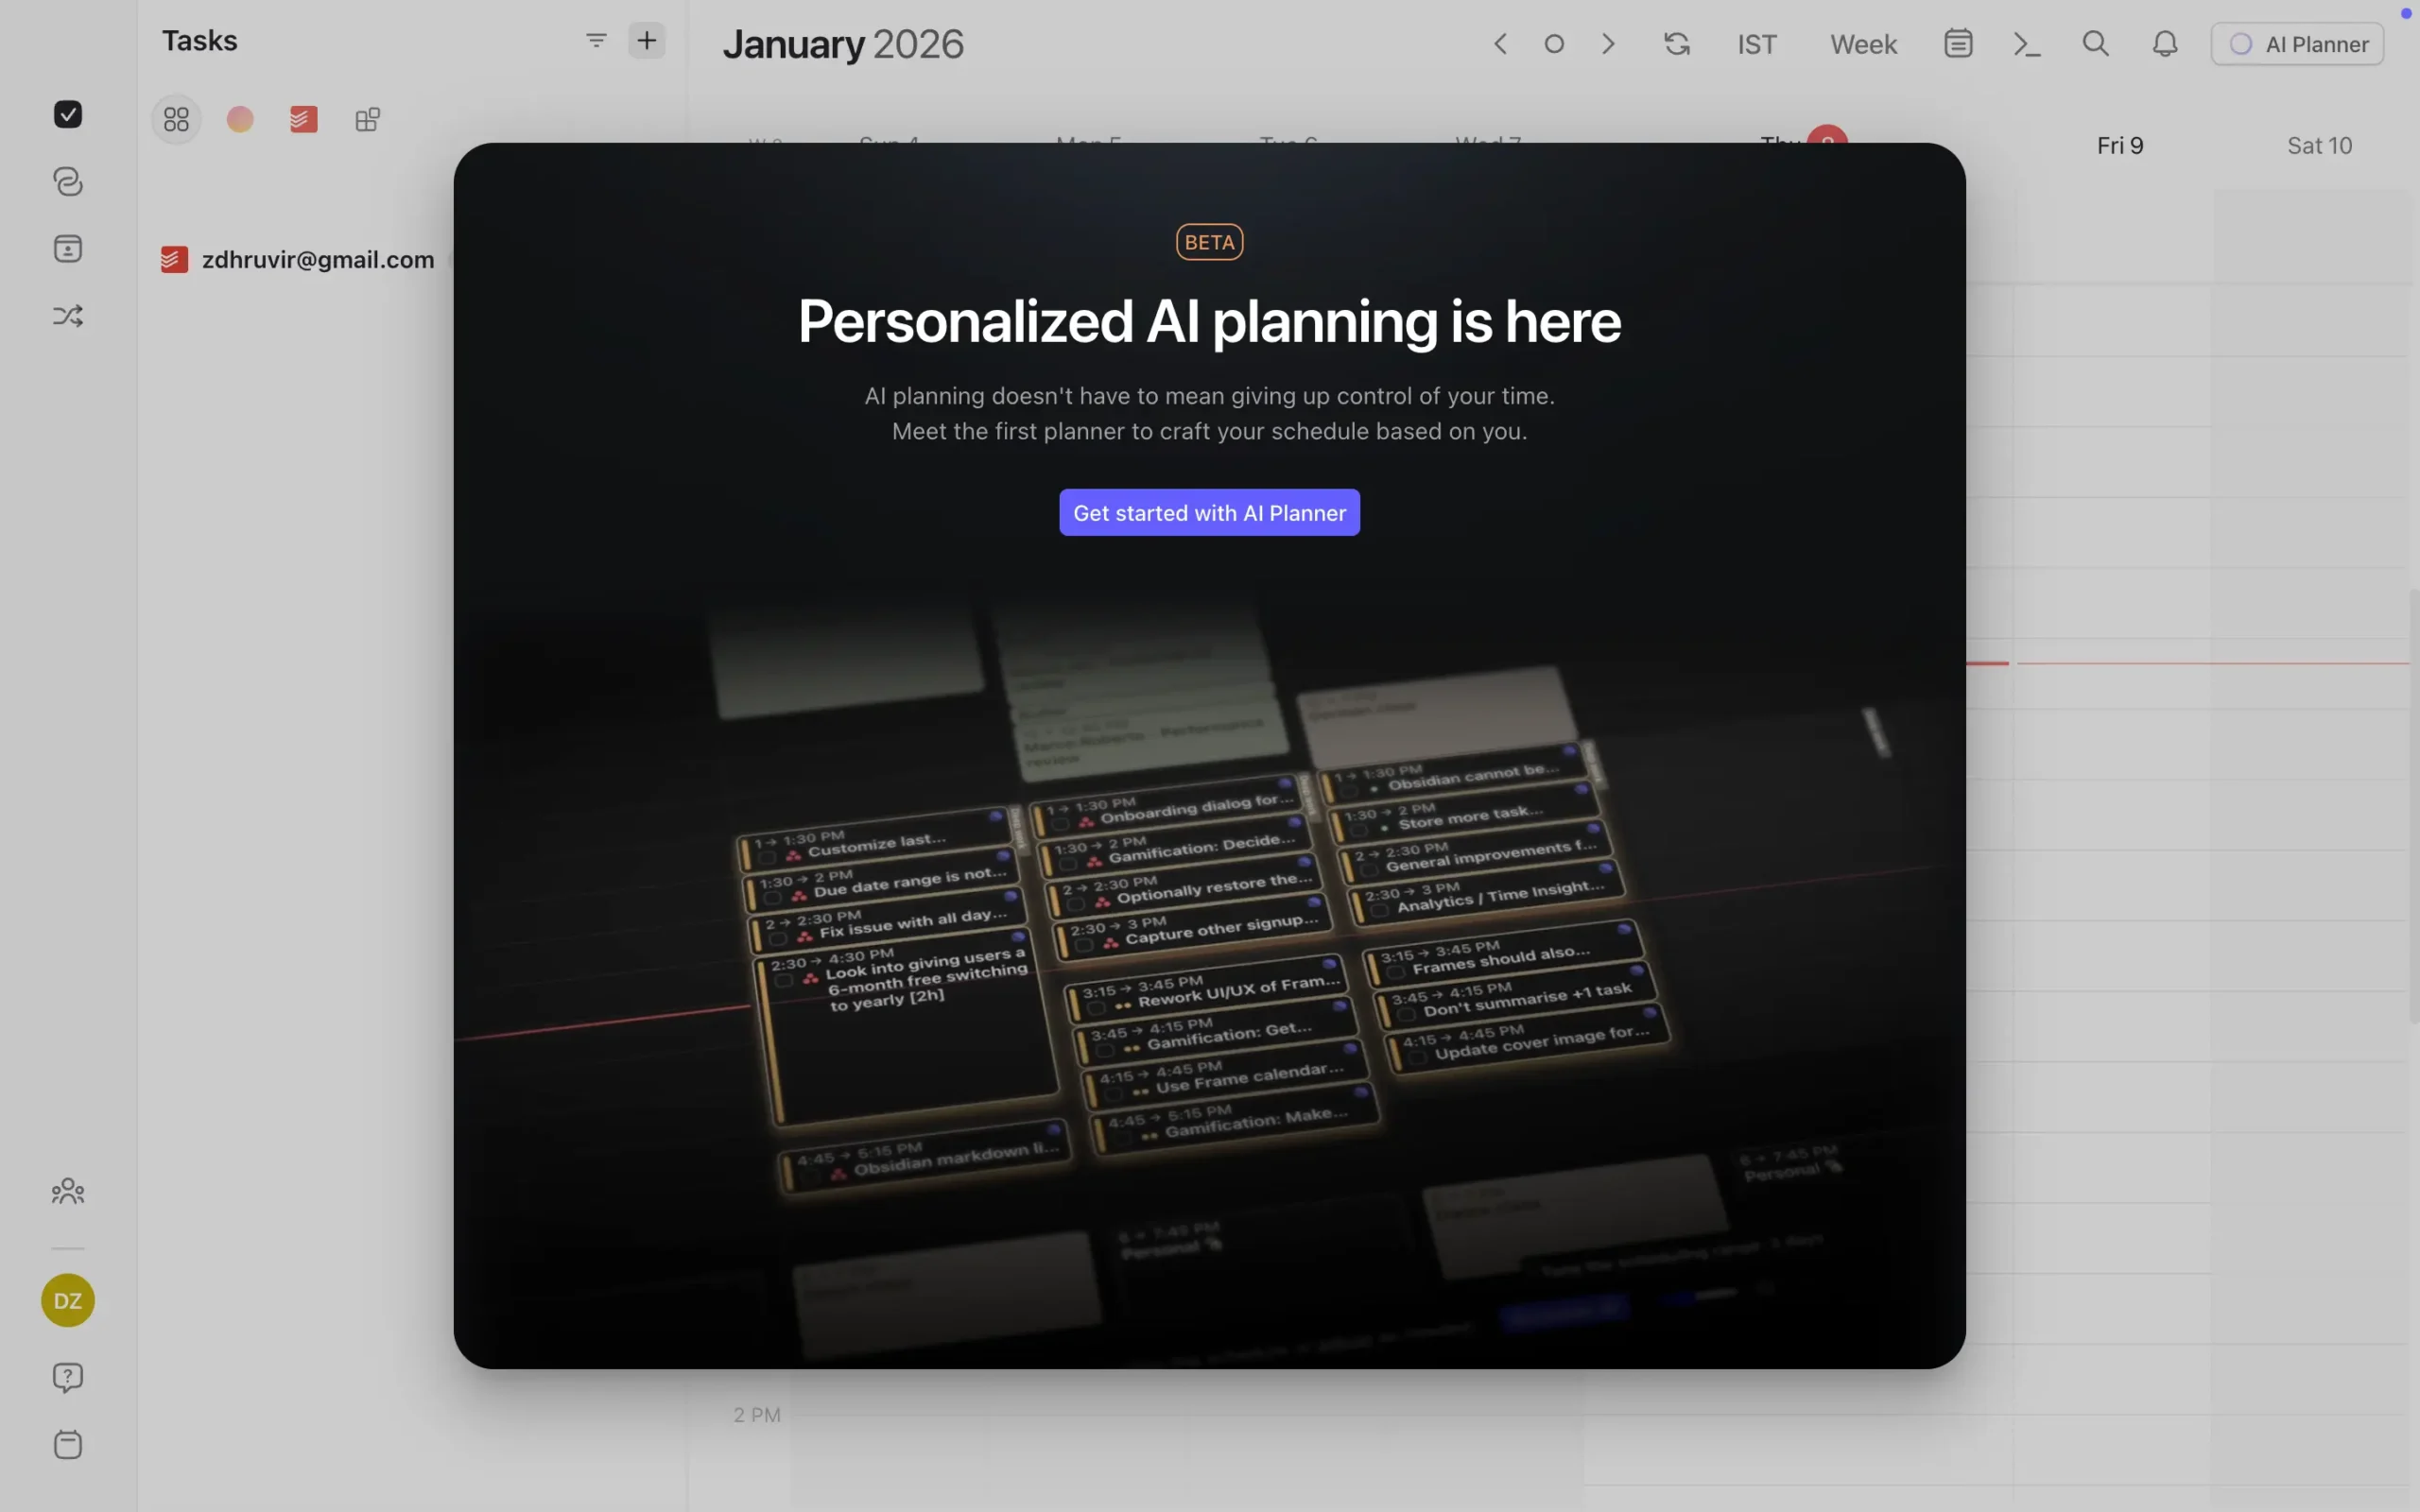
My verdict: Morgen is the only daily planner in this category where the AI shows you the plan before it touches your calendar. Frames are what make that useful in practice, not just in theory: they teach the AI when to schedule what, so deep work stays in the morning and admin doesn’t eat your peak hours. Setup takes time. But once it’s done, the AI works the way you actually work. If you’re already paying for Calendly on top of your calendar app, Morgen makes that subscription redundant from day one.
Feature | Verdict |
|---|---|
Ease of use | Clean interface with minimal clutter. Learning Hub gets you up to speed in about 10 minutes. The mobile app requires a desktop setup first, which breaks the flow if you’re starting on your phone. |
AI planner | Suggests a full-day plan based on your tasks, priorities, and availability. You preview and approve before anything gets scheduled. |
Calendar sync | Two-way sync with Google Calendar, Outlook, iCloud, and more. Changes reflect instantly in both directions. |
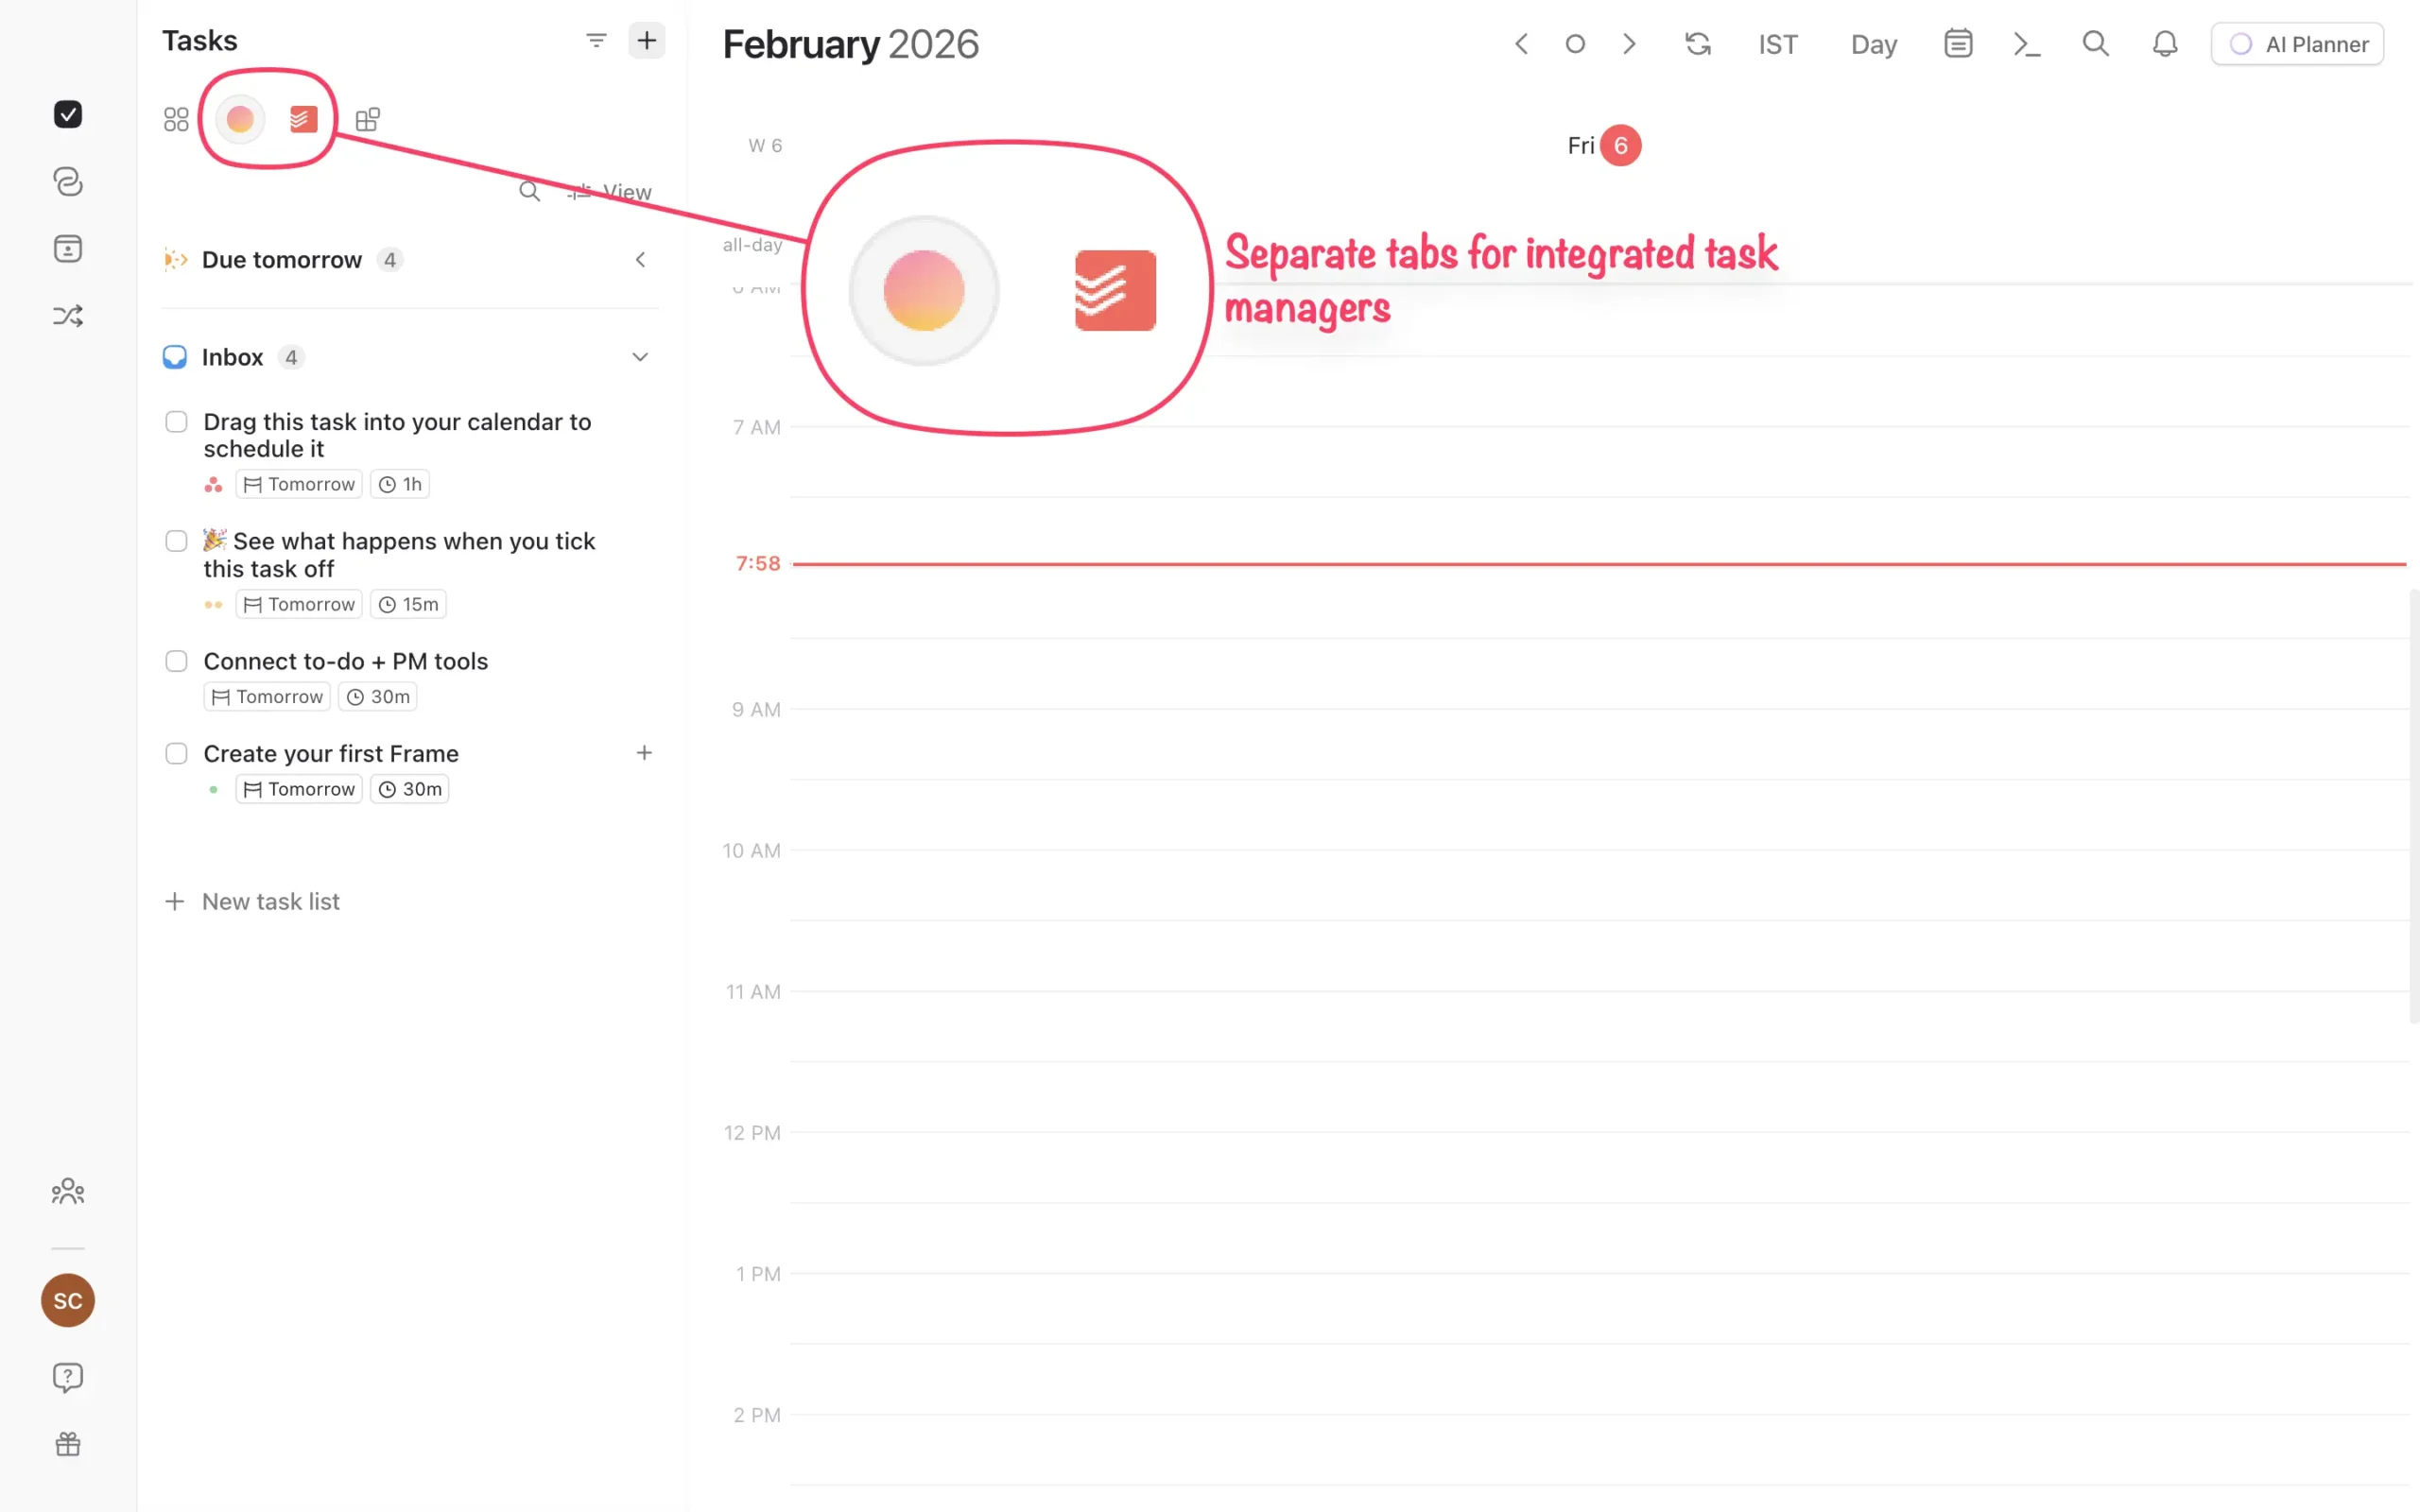
Task integrations | Pulls tasks from Todoist, Notion, ClickUp, Linear, and others. Each source gets its own sidebar tab so nothing gets jumbled. |
Frames | Time blocks that tell the AI what to schedule and when. Set filters by source, tag, or priority. The most powerful feature, with the steepest setup cost. |
Workflows | Three background automations: buffer time between meetings, travel time blocking, and personal/work calendar sync. No custom workflows yet. |
Scheduling links | Calendly-style booking pages included with Pro. Checks real availability across all calendars. No payment collection or custom intake forms. |
Mobile app | Clean and fast on iOS and Android. Requires a desktop setup first. Good for checking your schedule and adding quick tasks on the go. |
Pricing | $30/month or $15/month billed yearly. 14-day free trial. Teams start at $10/seat/year. |
What is Morgen?
Morgen is an AI-powered daily planner that puts all your calendars and tasks in one place, then helps you figure out what to do when.

You connect your Google Calendar, Outlook, or whatever calendar you use. Same with tasks—pull them from Notion, Todoist, ClickUp, wherever.
Morgen’s AI Planner looks at everything and suggests a daily schedule.
But you’re not locked into what the AI decides. You preview the plan, move things around if you want, then accept it.
The other thing Morgen does well is scheduling meetings. You share a link, and people book time based on your real availability across all your calendars. One less subscription to manage.
I tested Morgen (desktop app) on my MacBook Pro M1. Some features—like Apple Reminders integration and system shortcuts—only work on the desktop app, not the web version.
Worth knowing if you live in your browser.
So, how do you actually start using it? Let me walk you through the setup.
What features does Morgen offer?
Morgen does a few things:
- connects all your calendars in one view
- pulls in tasks from your existing tools
- suggests daily plans with AI (but you approve first)
- includes scheduling links like Calendly
- runs background workflows to handle calendar busywork
- and works well on mobile.
The features that matter most are the unified calendar view, AI planning with preview mode, and the included scheduling links.
Let me show you how each one works.
All your calendars sync perfectly in one place
Morgen pulls all your calendars into one view.
You connect your calendars—Google, Outlook, iCloud, Fastmail, whatever you use—and they all show up together.
I tested this with a Google Calendar account. To connect it, I clicked my profile picture in the bottom-left corner, went to Integrations, then Calendars.
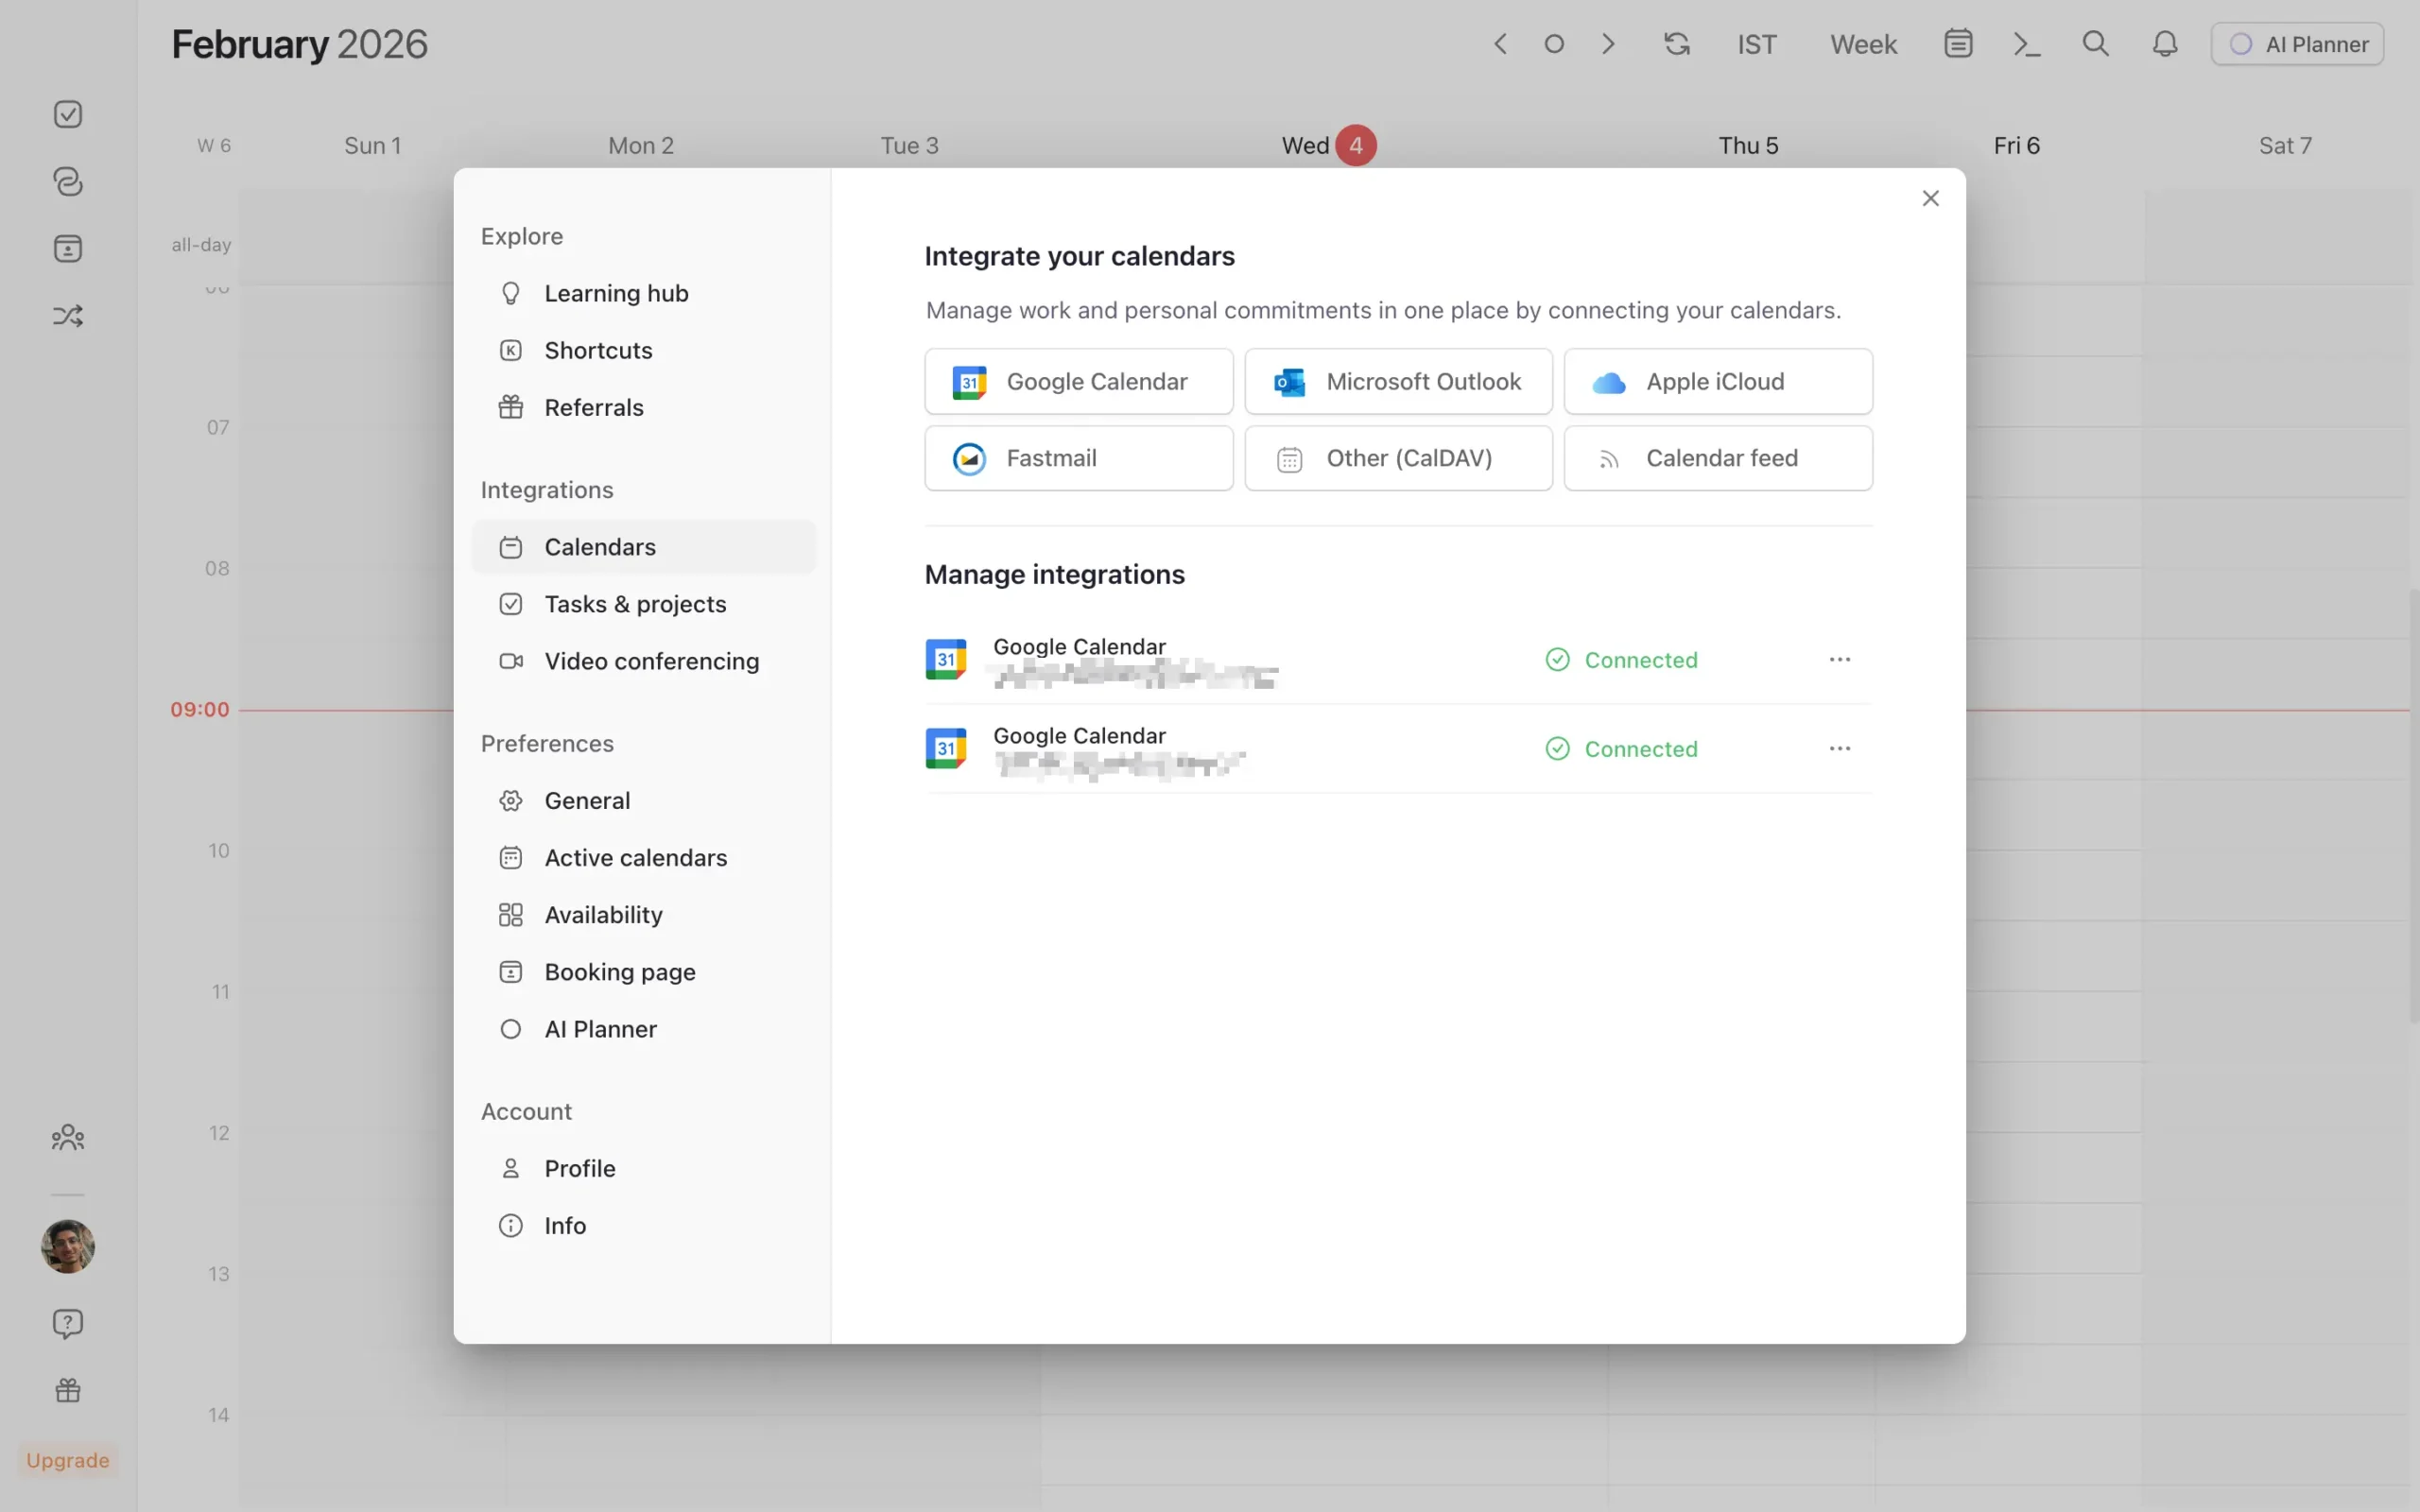
You’ll see buttons for Google Calendar, Microsoft Outlook, Apple iCloud, Fastmail, and a few others. Click one, authorize access, and your events appear in Morgen immediately.
Here’s what surprised me: the two-way sync actually works.
I created an event in Morgen. It showed up in Google Calendar within seconds. Then I edited it in Google Calendar. Morgen updated instantly.
The interface stays clean even with multiple calendars connected. I compared Morgen side-by-side with Akiflow and Sunsama—two popular time-blocking tools in the same category.
All three use a similar layout: white space, drag-and-drop tasks, minimal clutter.
But Morgen feels slightly less cramped. The calendar grid breathes more. You can collapse the sidebars if you want even more space.
Once you’ve connected multiple calendars, you need a way to see them selectively. That’s where calendar sets come in.
Think of them as views.
You can create a “Work” set that shows only your work calendar, a “Personal” set for everything else, or a “Full” set that displays all calendars at once. Each set gets a keyboard shortcut.
To manage which calendars appear in each view, go to Preferences → Active calendars. You’ll see all your connected calendars listed. Check or uncheck them to control visibility.
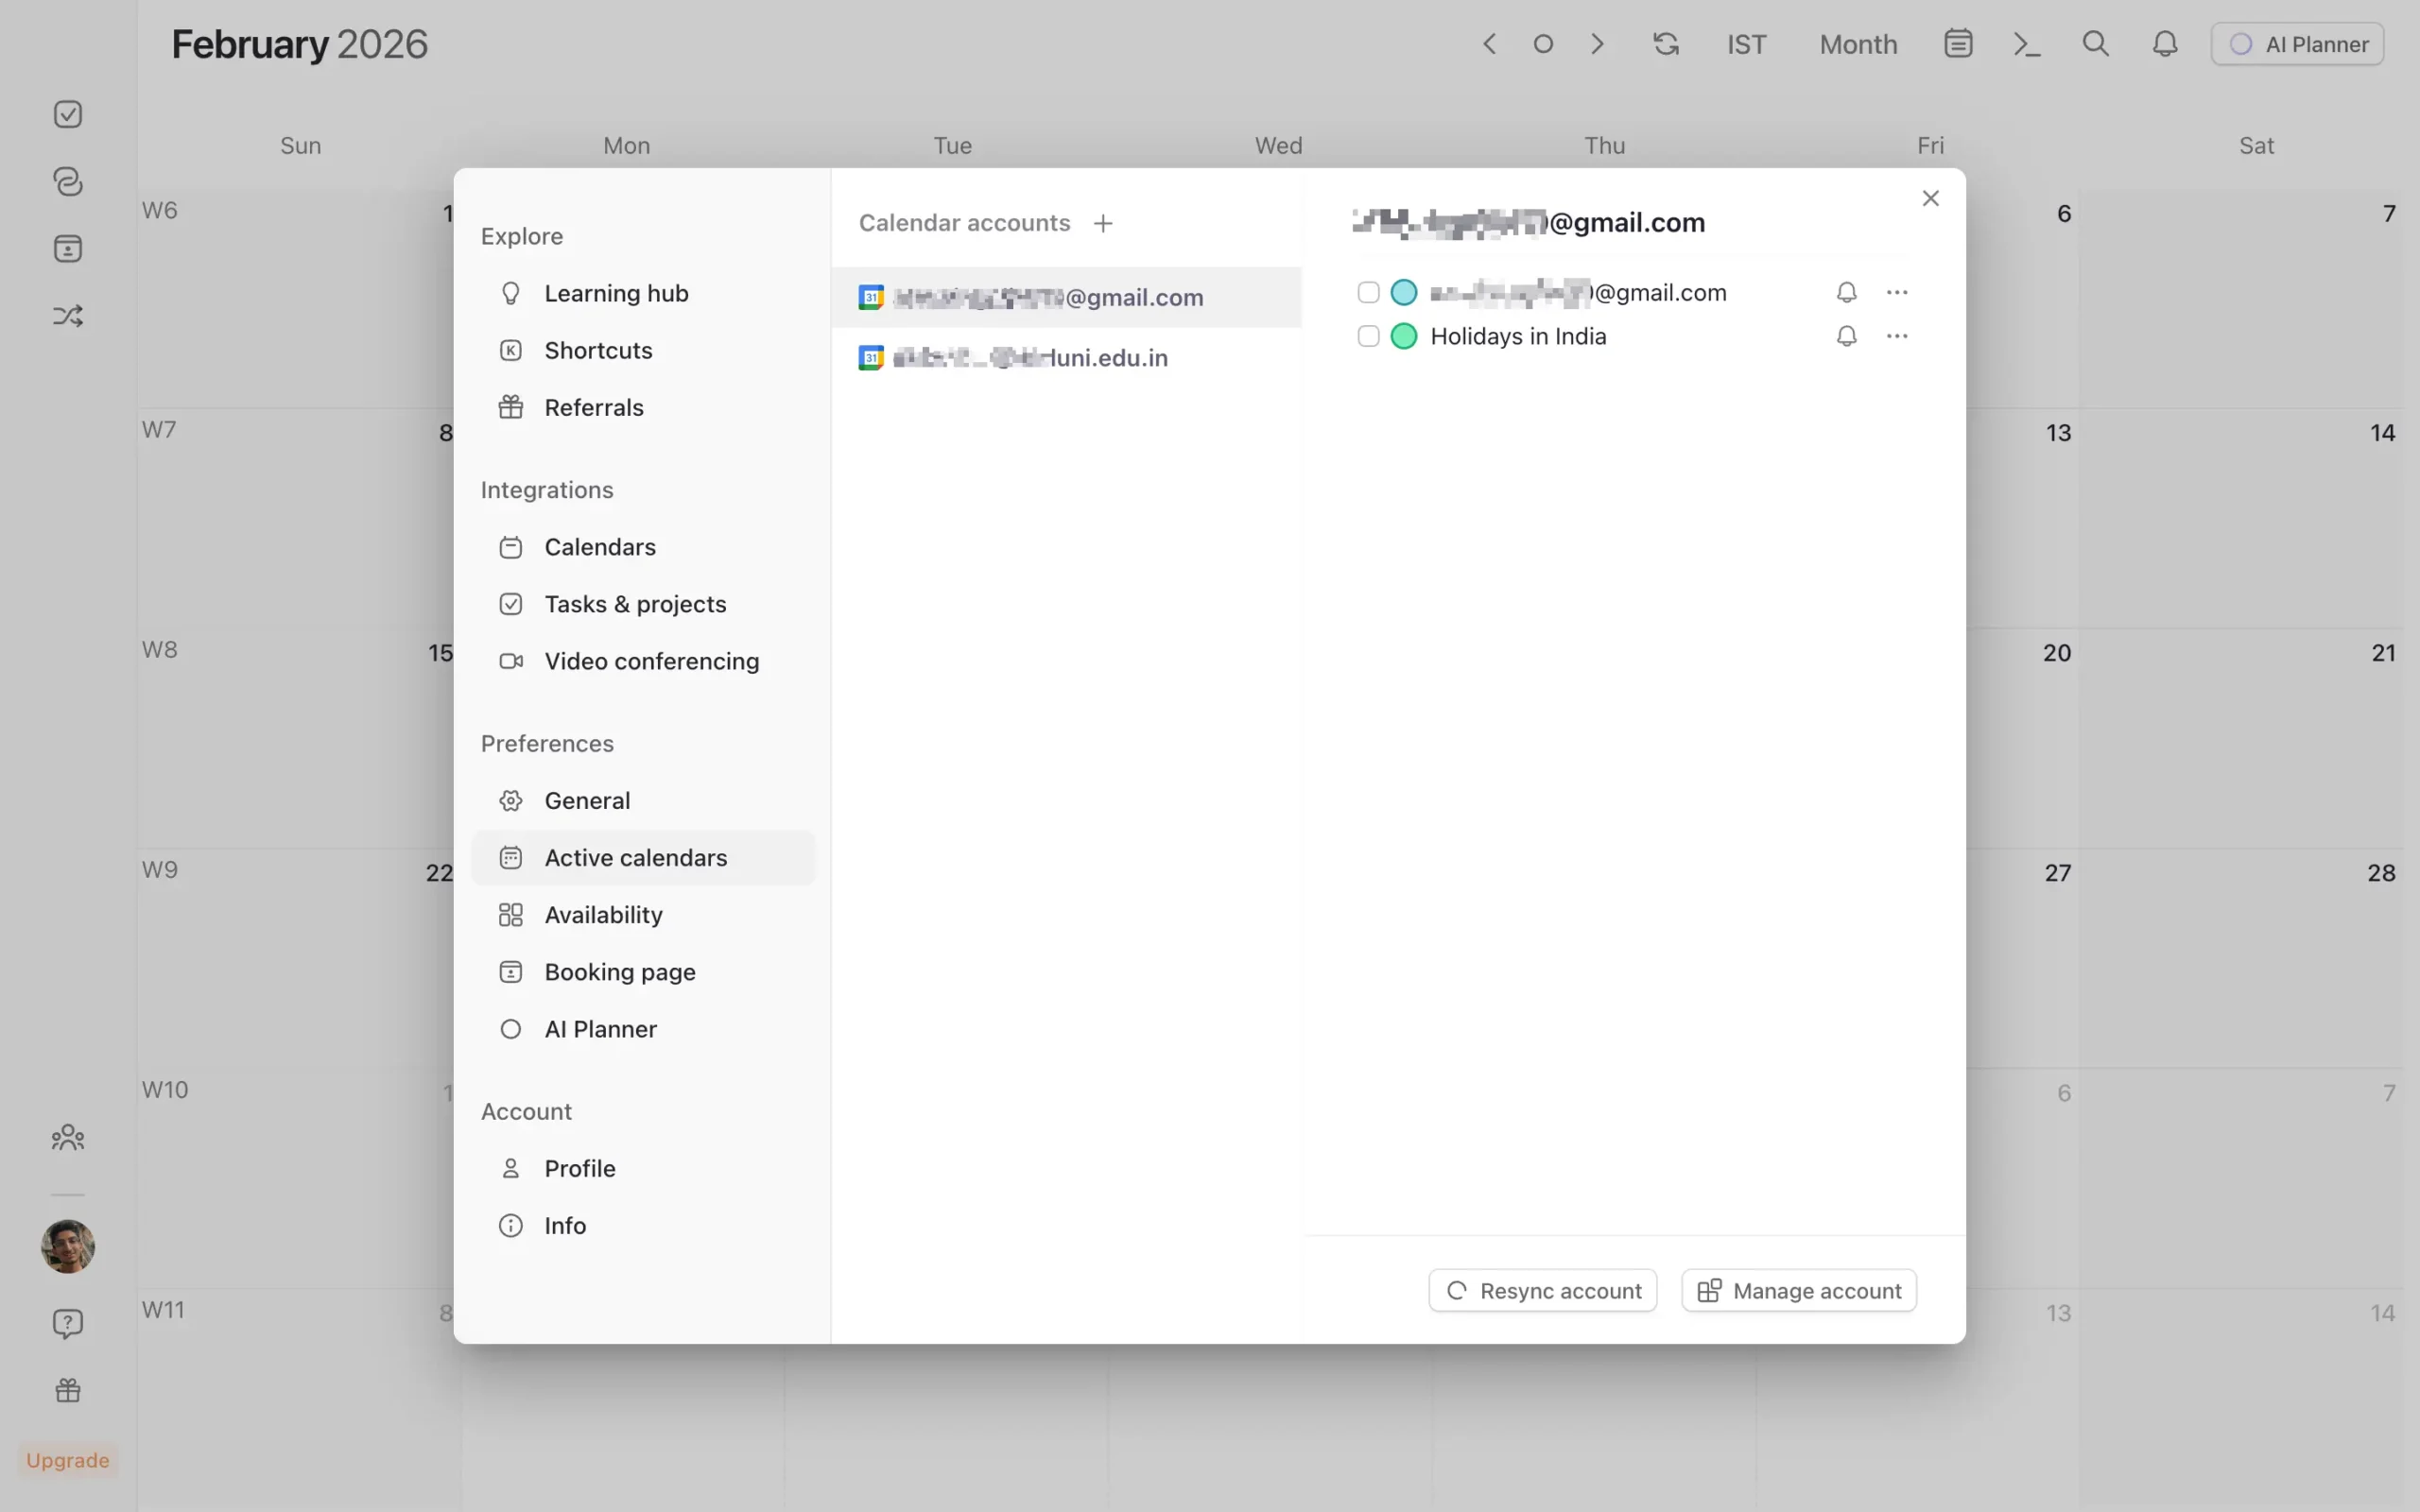
This is useful if you have a calendar you need access to but don’t want cluttering your main view—like a company-wide events calendar or regional holidays.
Morgen also handles multiple time zones. Click the timezone indicator at the top of the calendar, and you can add as many as you need.
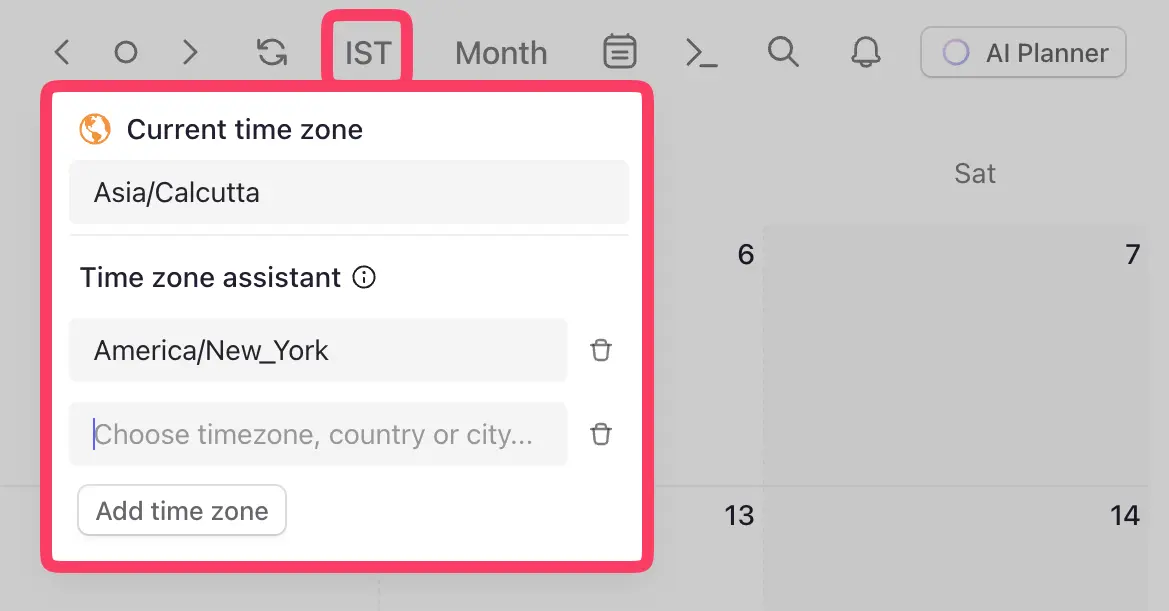
I didn’t think I’d use this feature. Then I scheduled a call with someone in Australia. Having both time zones visible meant I didn’t have to do mental math or pull up a converter.
The other thing Morgen gets right is navigation speed.
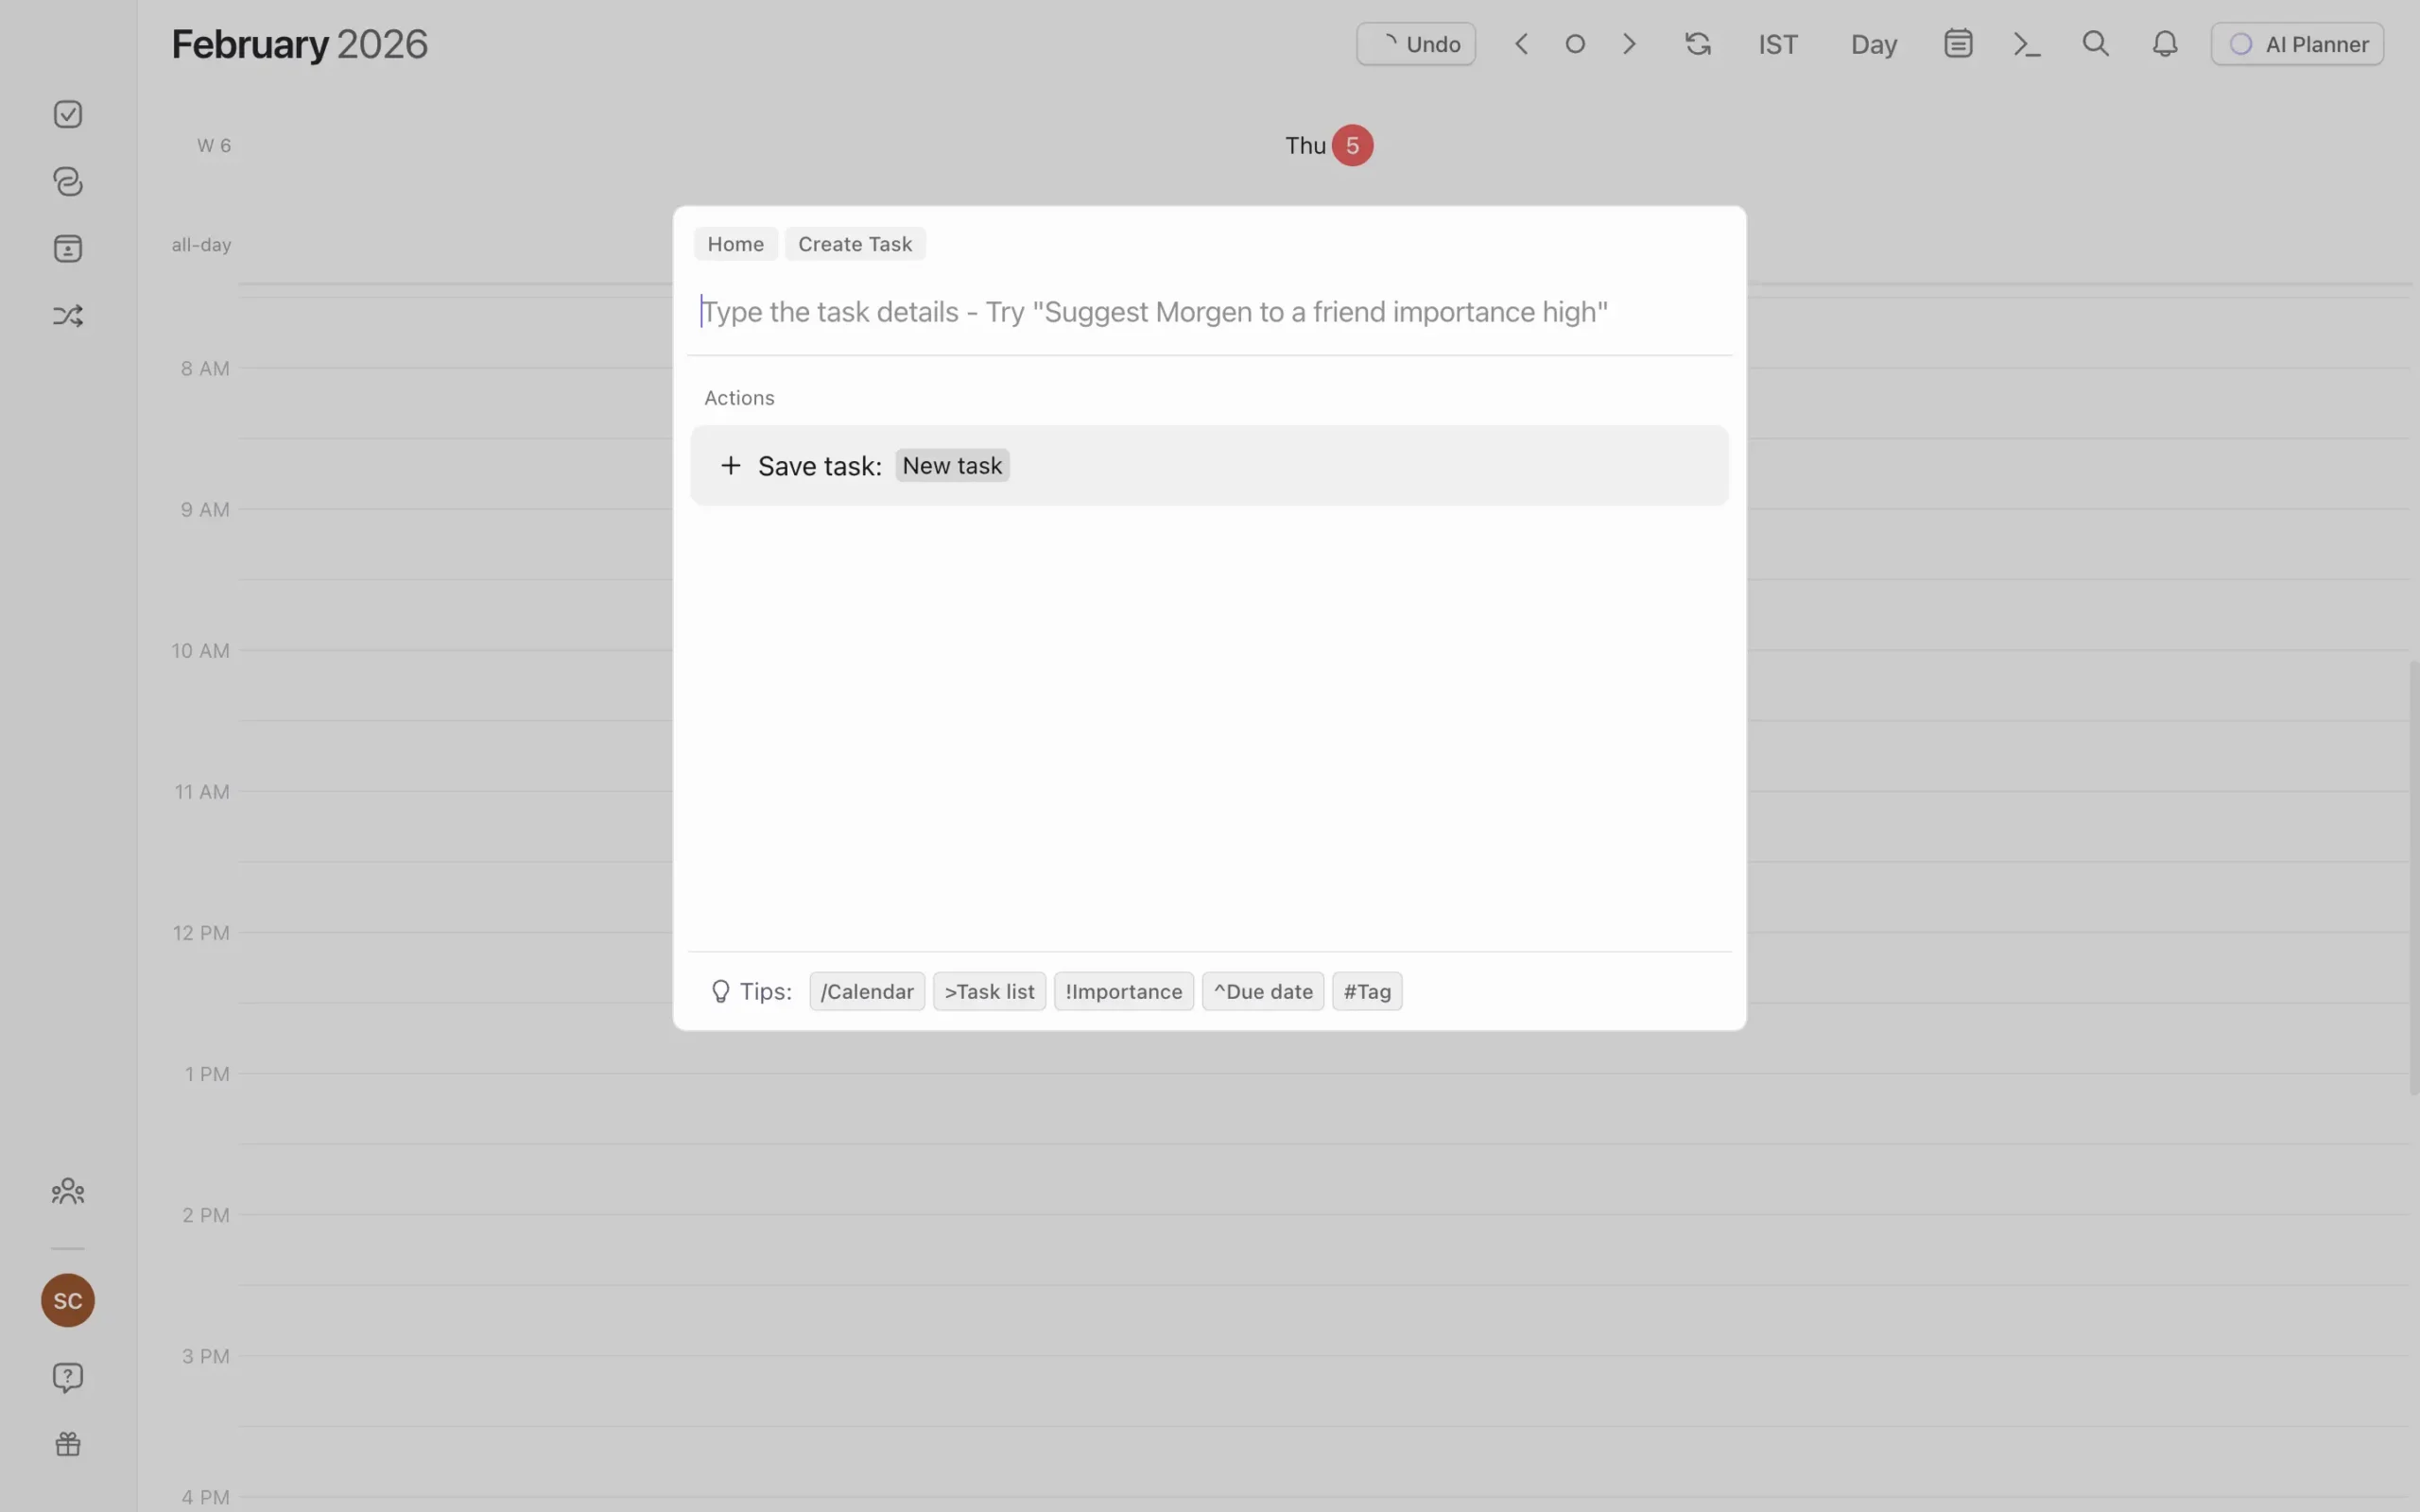
There’s a global command bar—press Cmd+K on Mac or Ctrl+K on Windows. Type what you want to do. “Create event tomorrow 2pm.” “Jump to next week.” “Show only work calendar.”
It works like Spotlight or Raycast. Once you get used to it, clicking through menus feels slow.
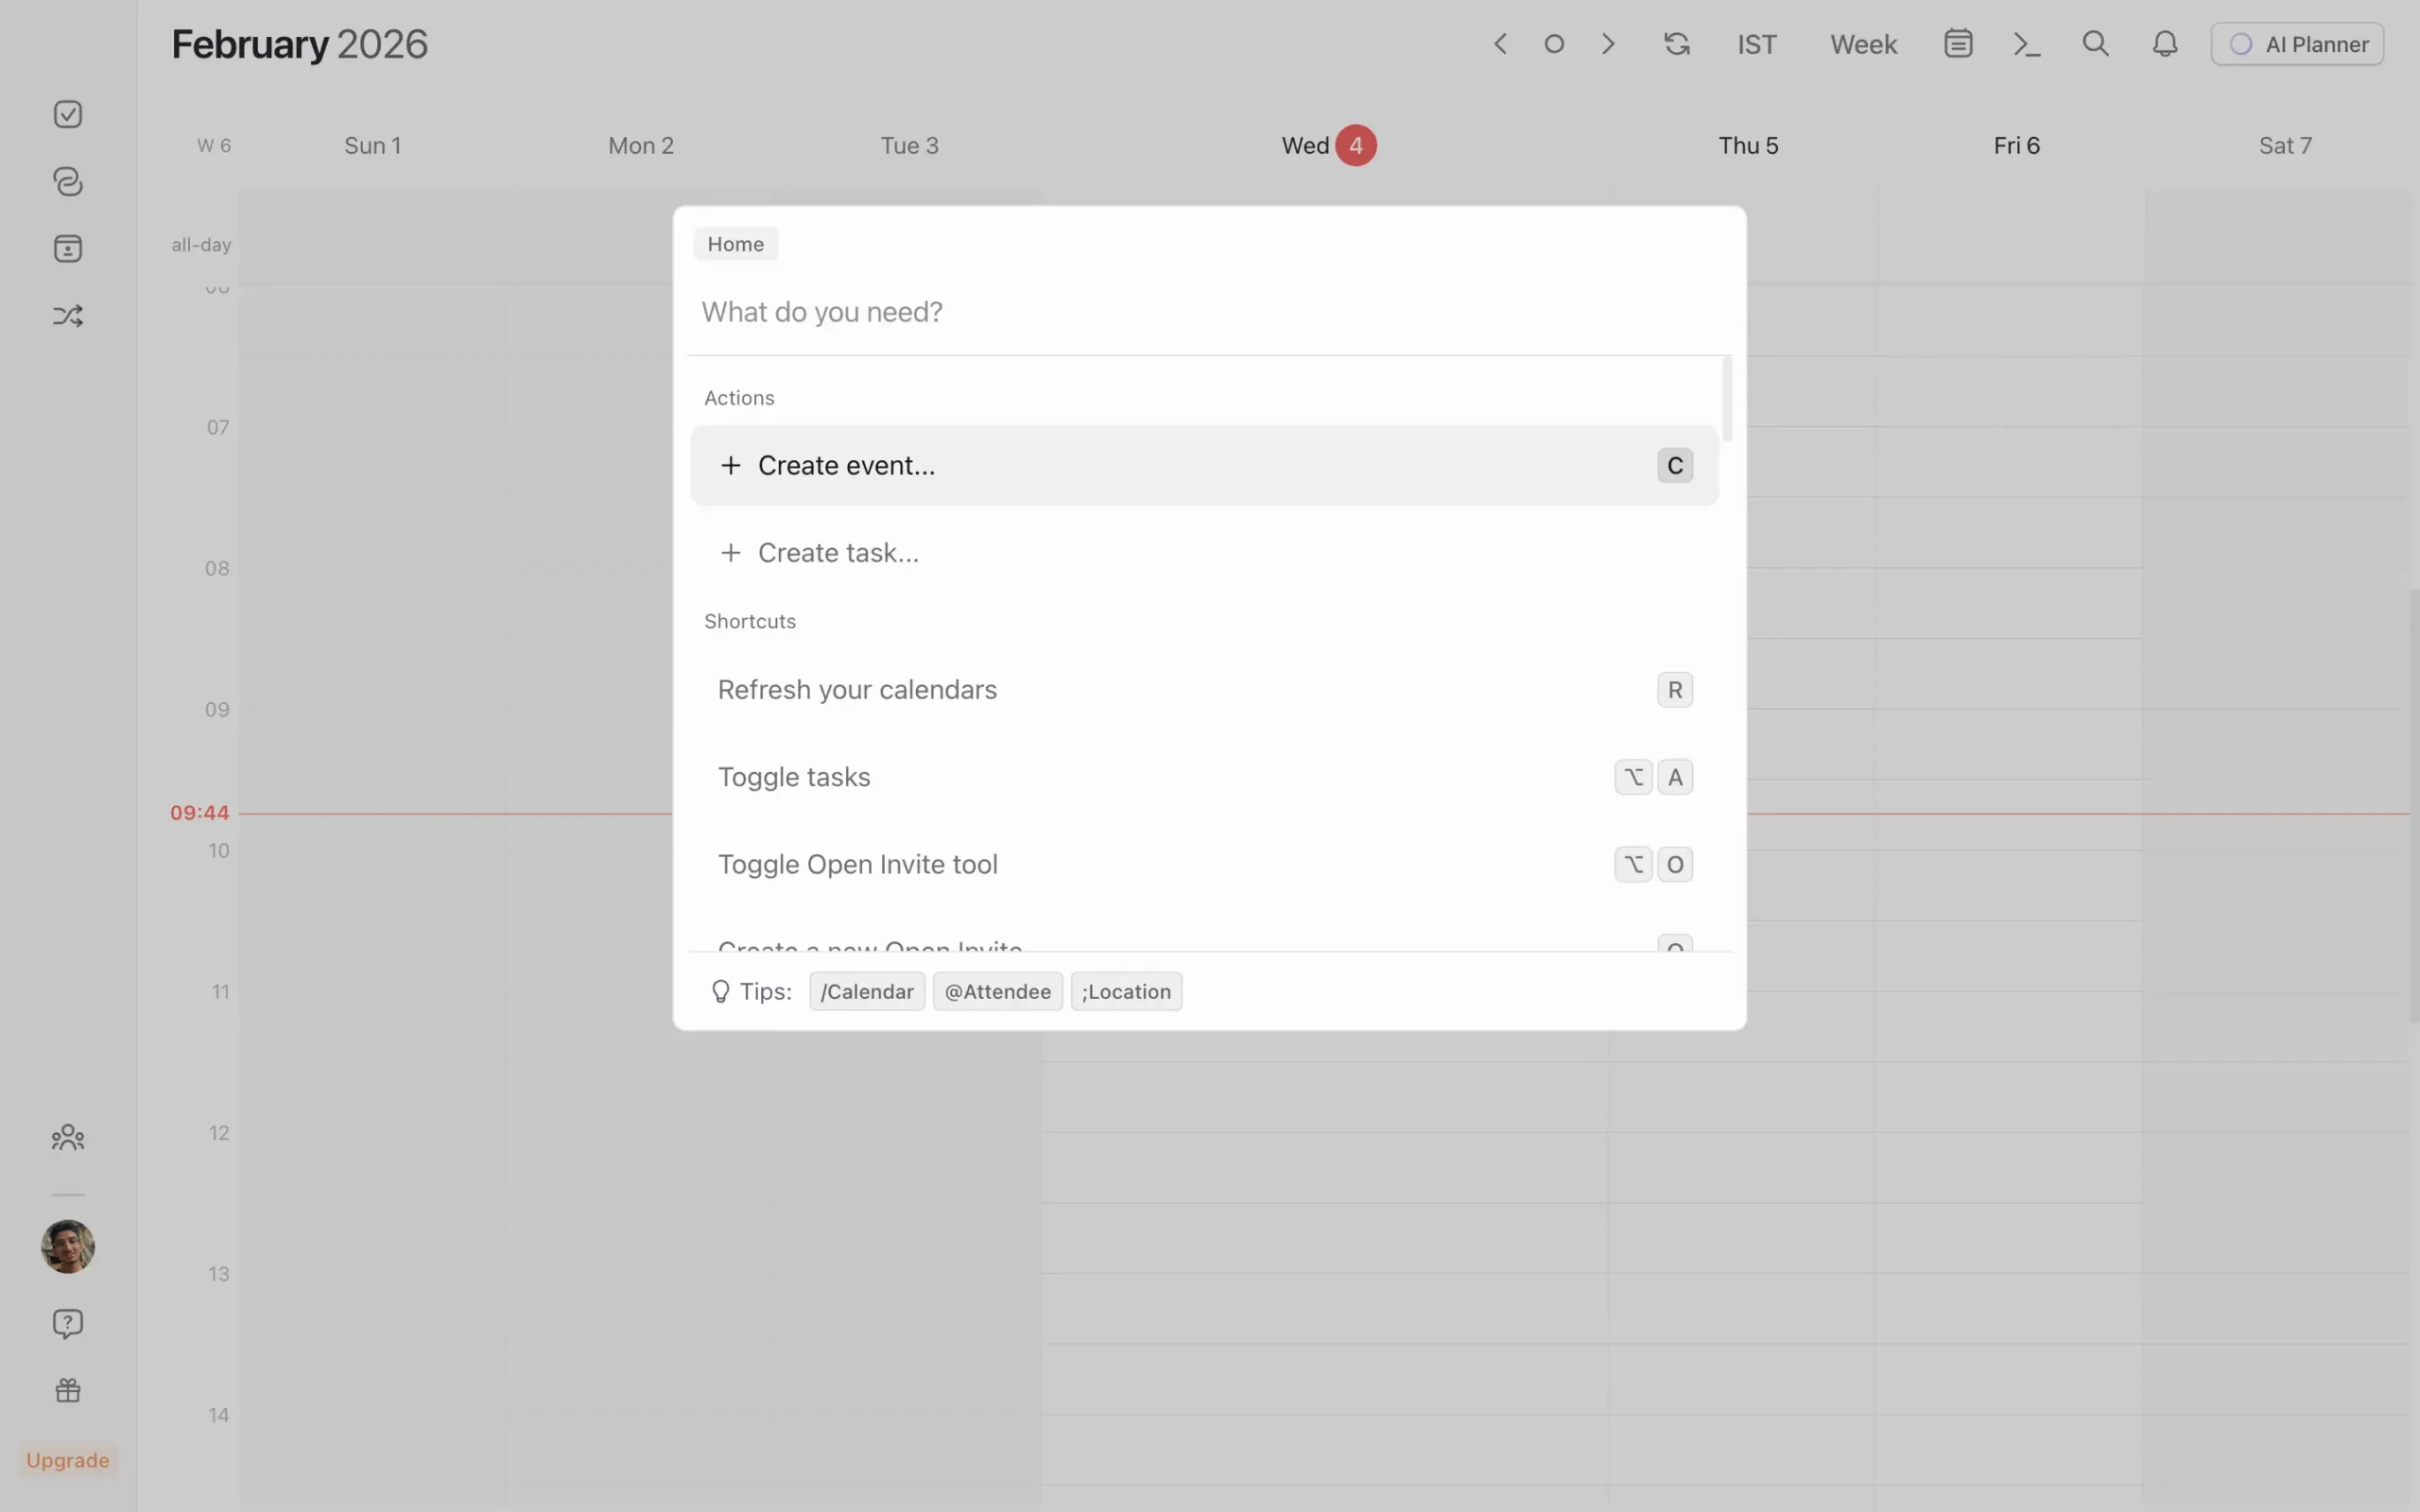
And yes, it does support natural language understanding.
For teams, Morgen lets you view colleagues’ availability if you have access to their calendars.
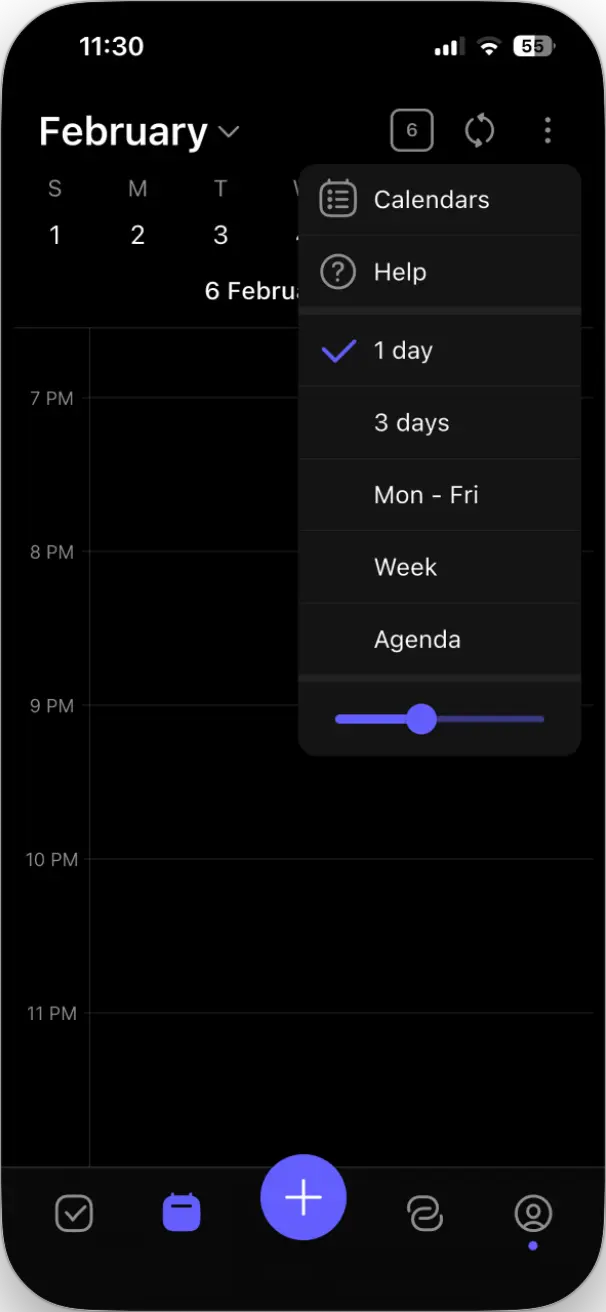
The calendar view options are flexible, too.
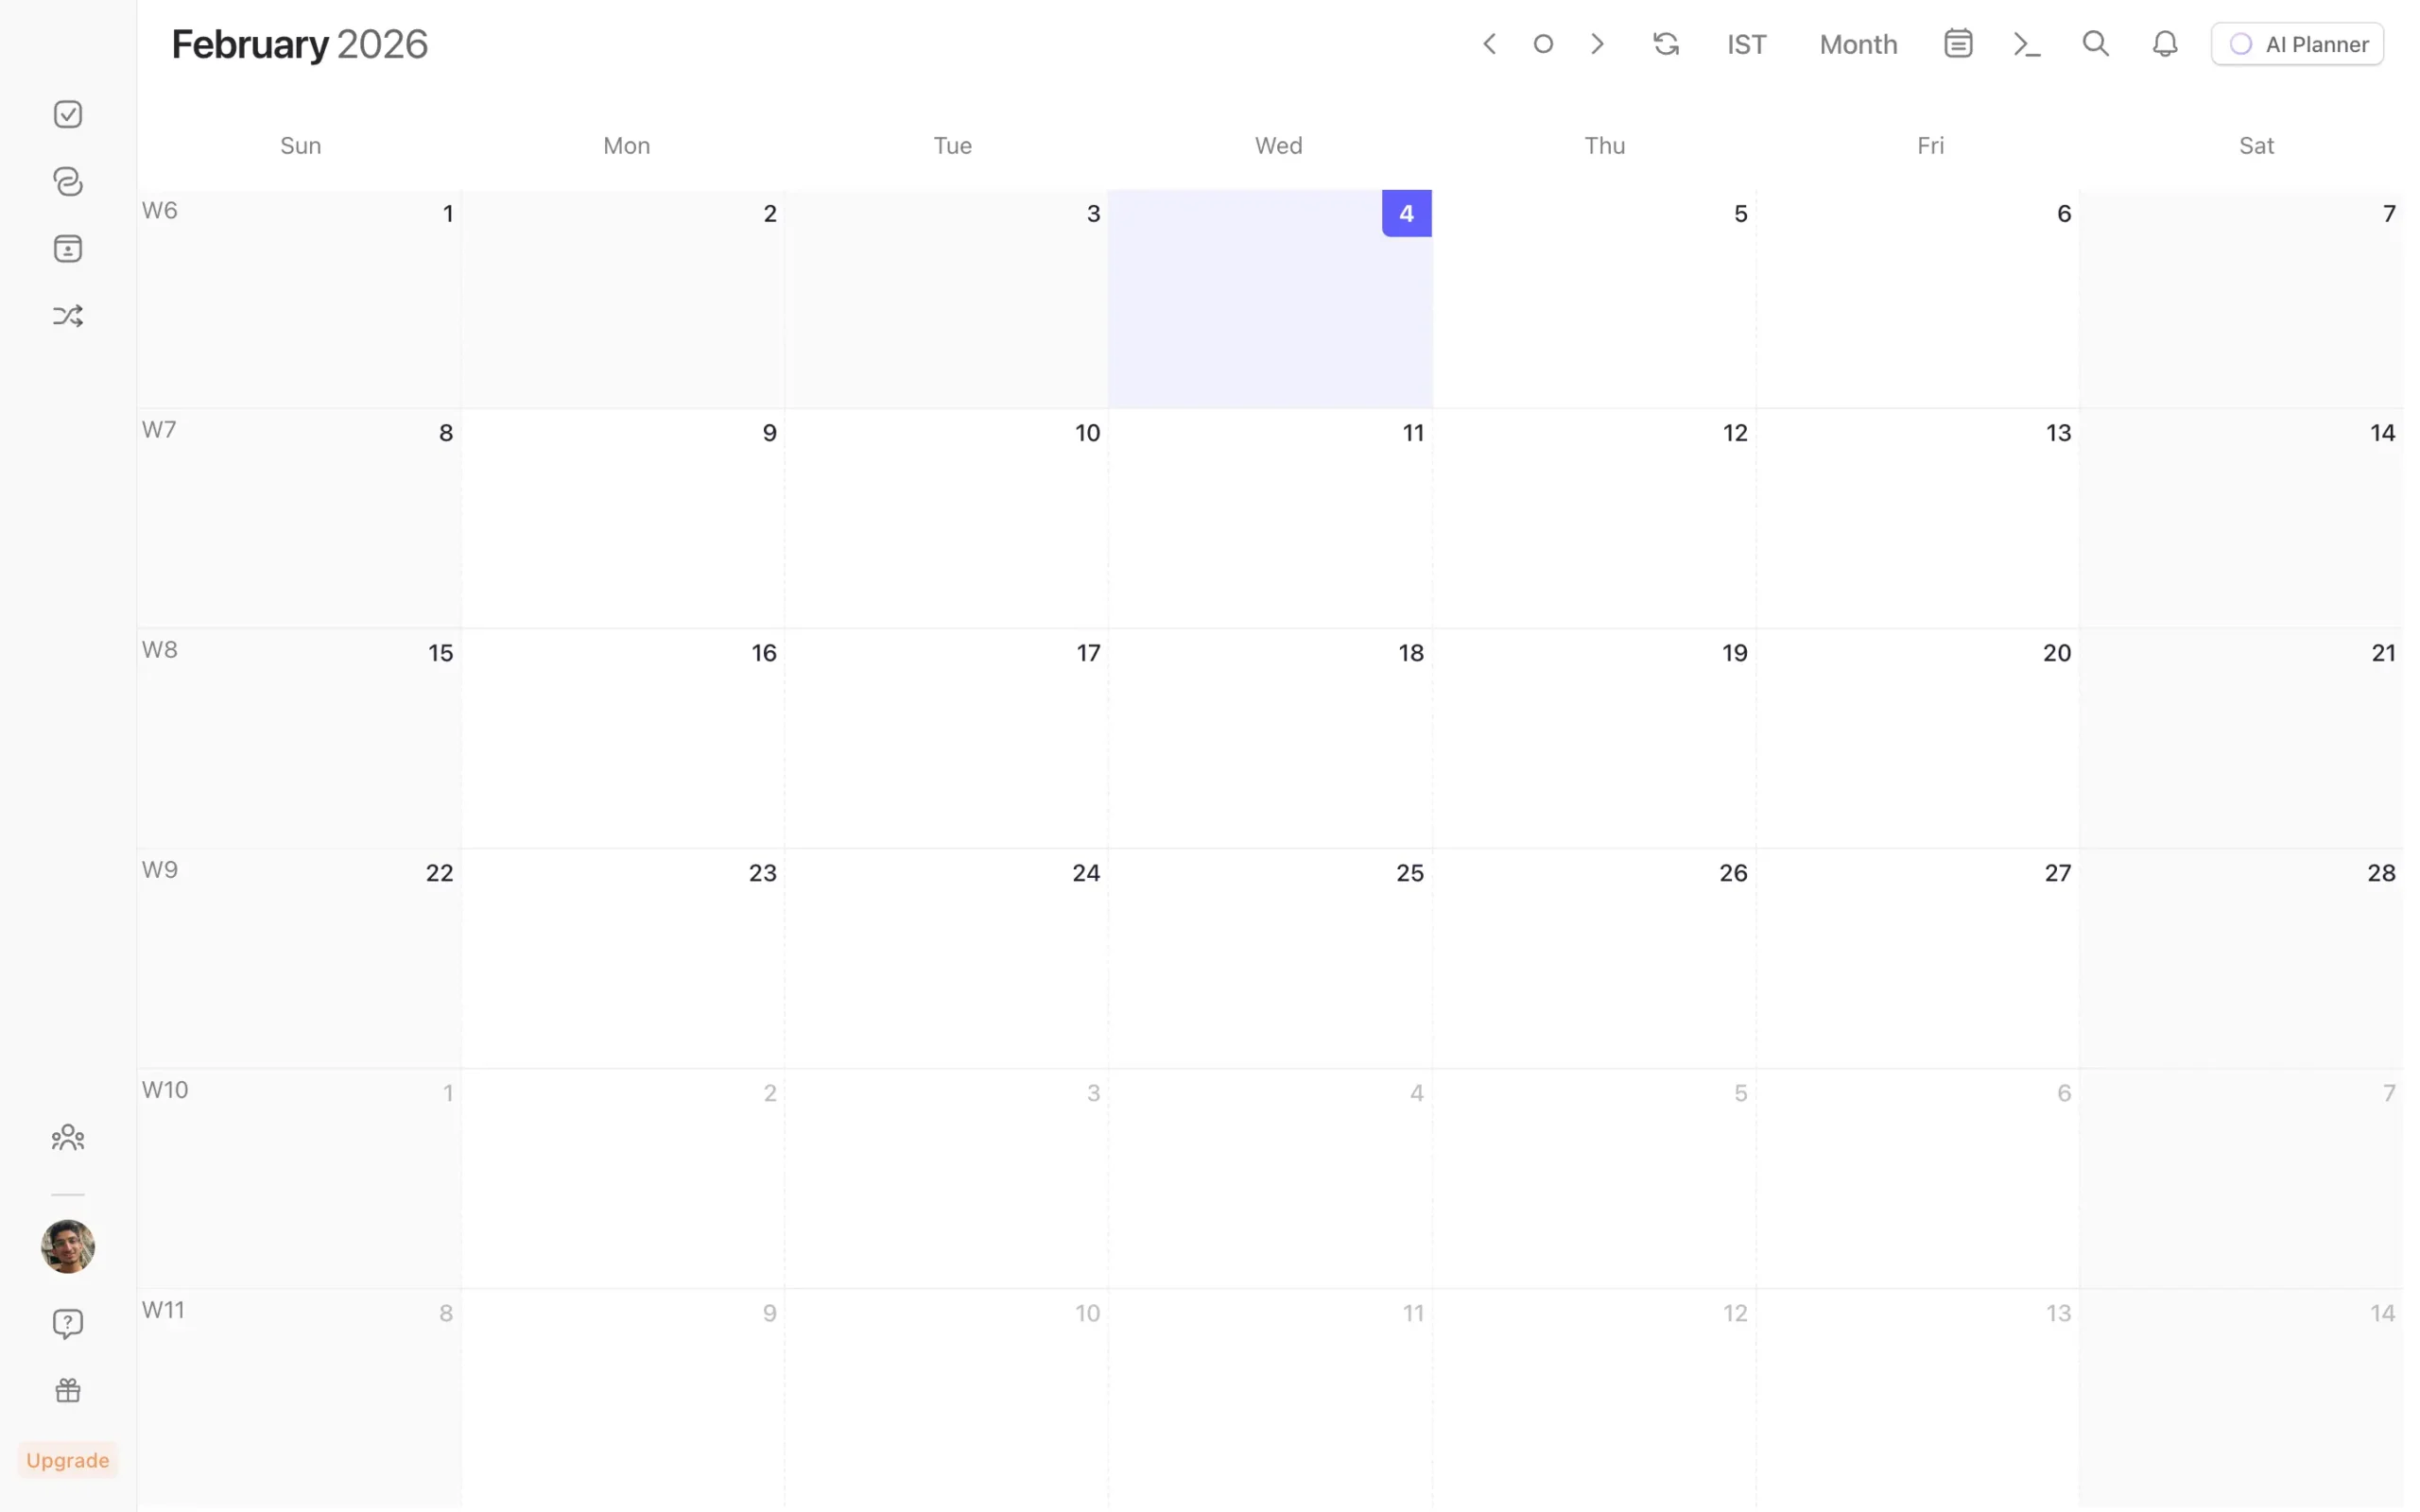
Day, week, month, agenda, two weeks, or a custom range. You can toggle weekend visibility, dim past events, merge duplicate events, and show or hide completed tasks—all from a dropdown menu.

Most of these settings are obvious.
But “merge duplicate events” is worth enabling if you sync events between calendars. Without it, you’ll see the same meeting twice.
Time-block tasks from any app in one calendar
Most people keep their tasks in one app and their calendar in another.
Tasks live in Todoist or Notion. Meetings show up in Google Calendar. The two don’t talk to each other.
So you end up looking at your calendar, seeing three hours free between meetings, and thinking you have time. But you don’t actually know if you have time because your task list isn’t visible.
Morgen fixes this by putting everything in one place.
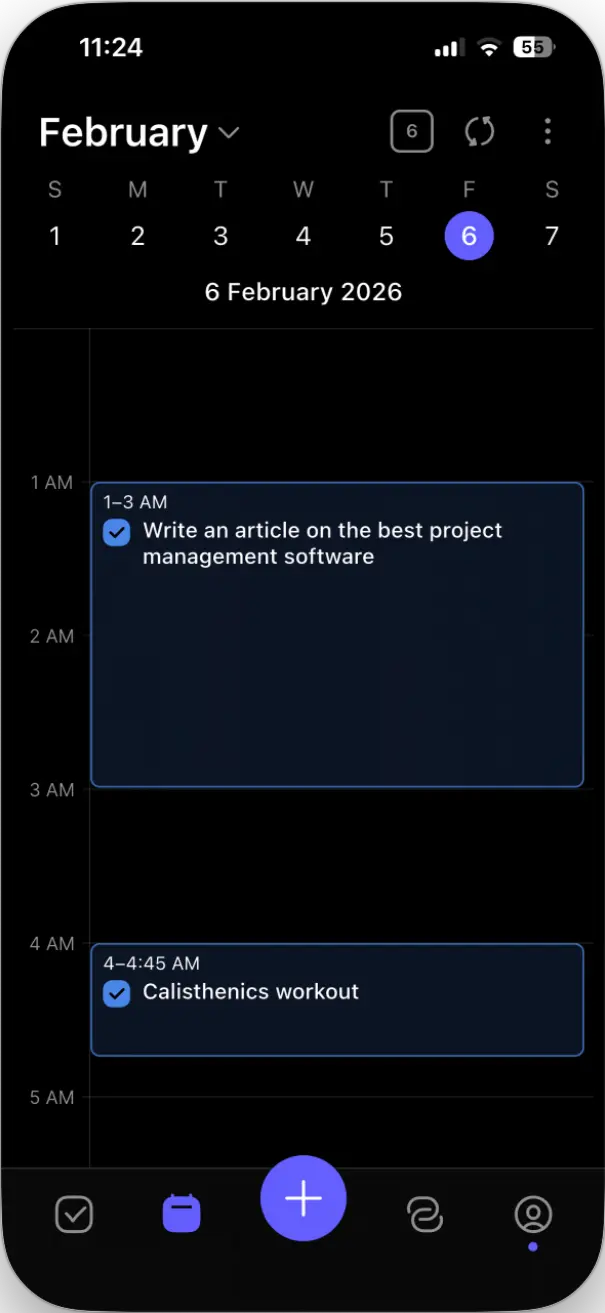
You can create tasks directly in Morgen or pull them from whatever task manager you’re already using. Then you time-block them on your calendar. Meetings and tasks, all visible at once.
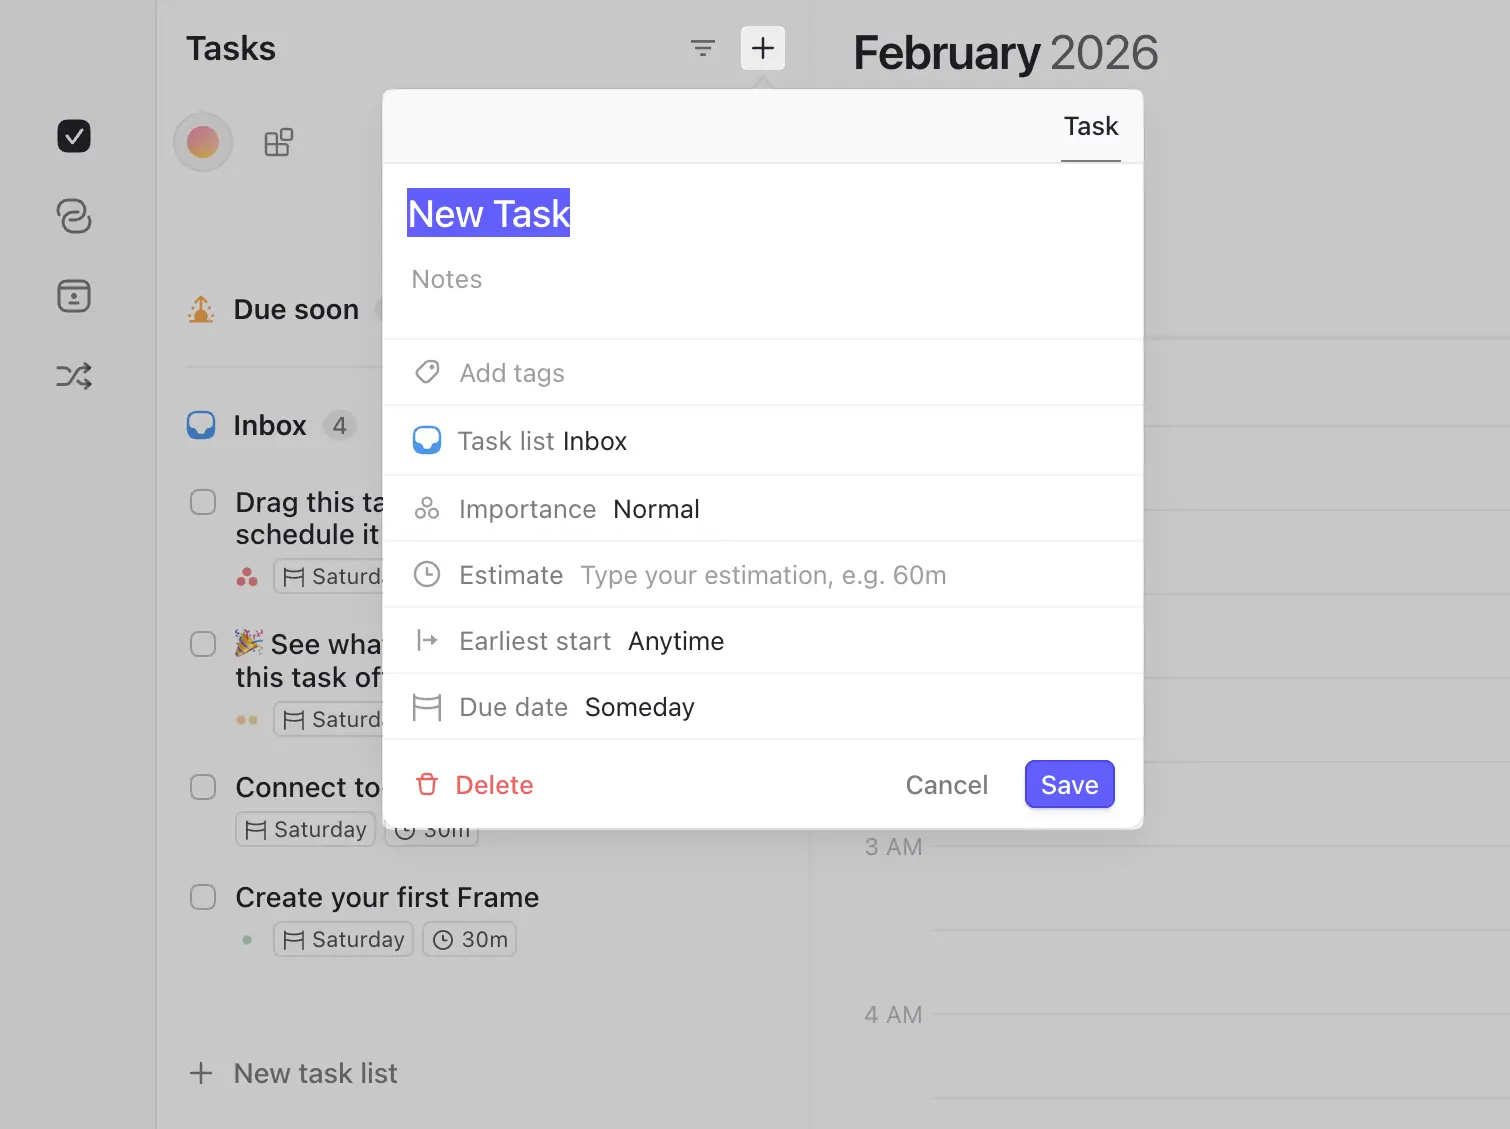
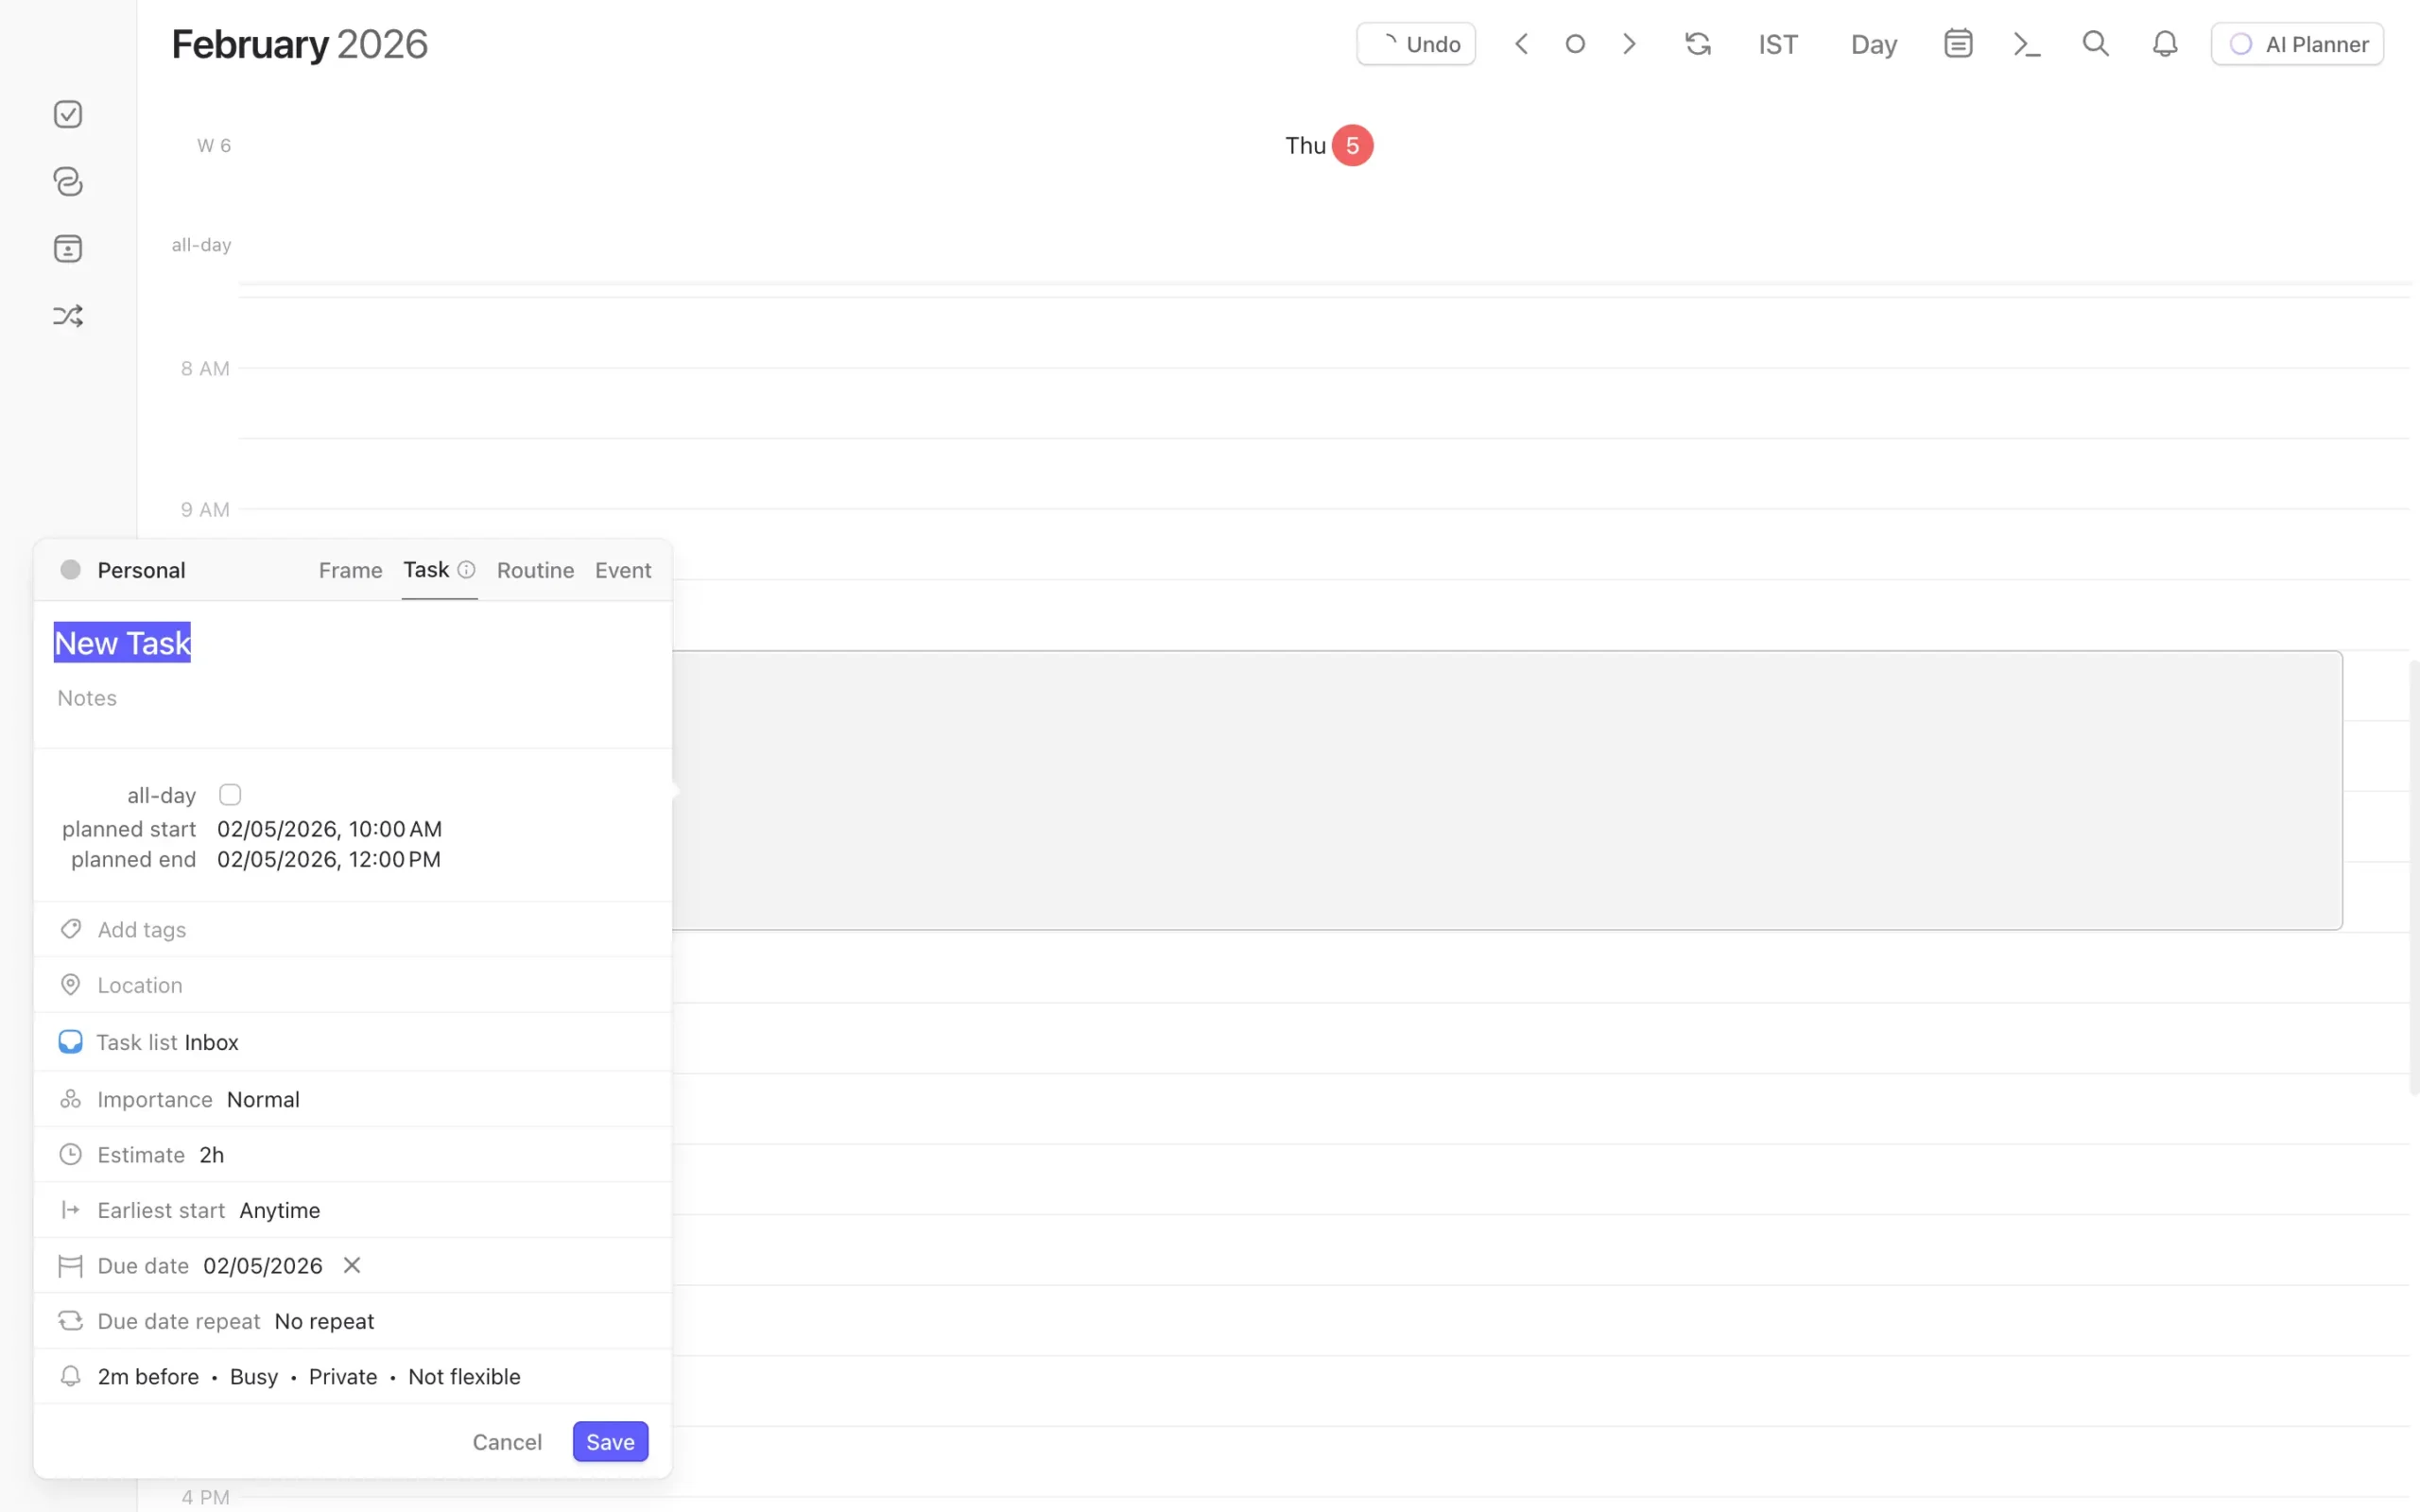
Creating a task in Morgen is straightforward.
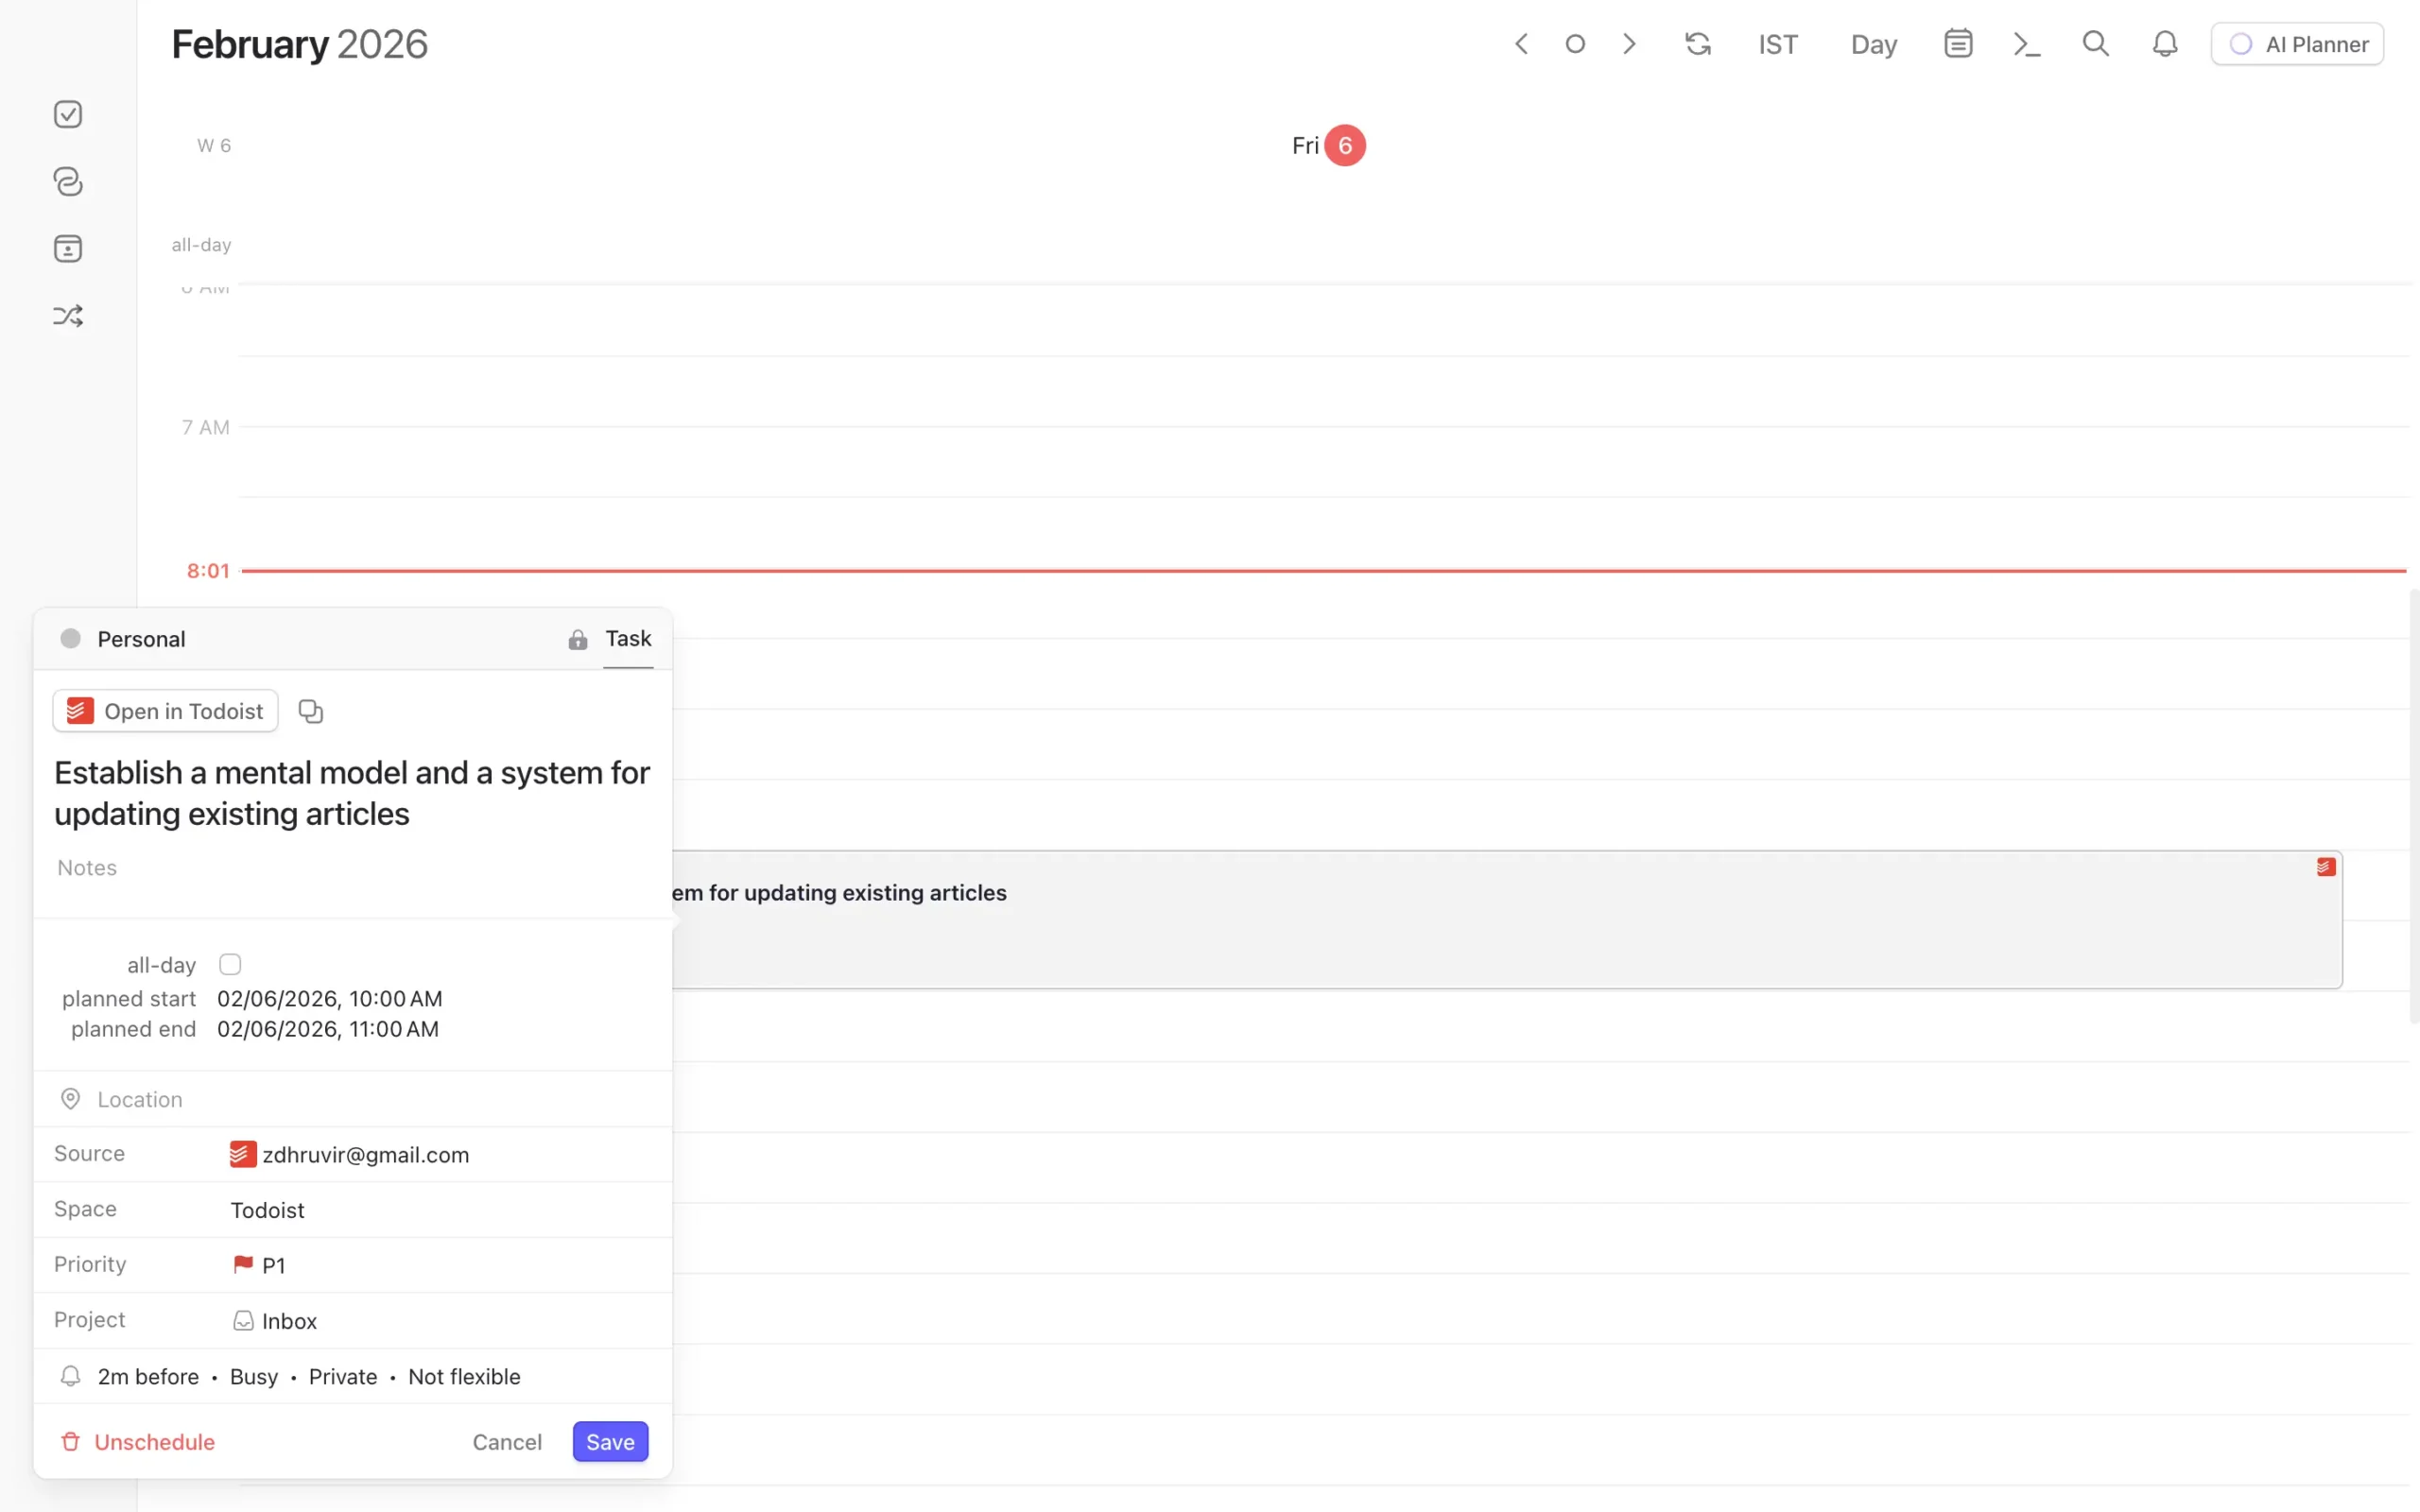
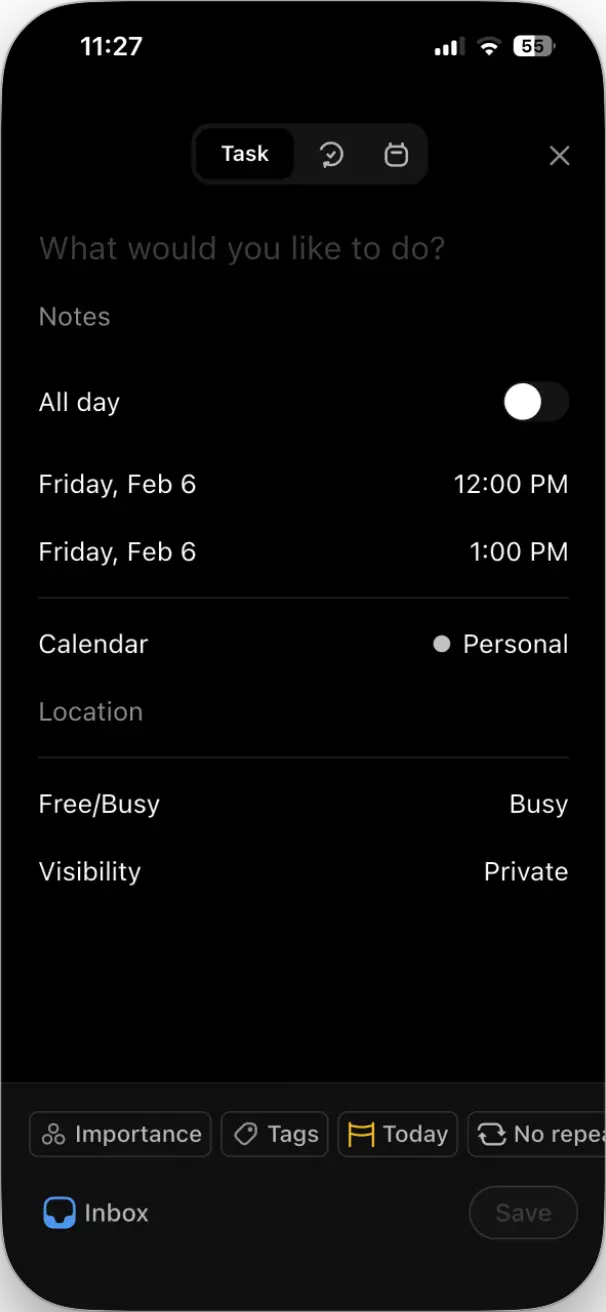
The simplest way is to click the Tasks panel in the left sidebar and hit the ‘+’ button. You’ll get a pop-up where you can add the task name, notes, due date, time estimate, importance level, and which list it belongs to.
But there’s a faster method.
Drag a time slot directly on your calendar. When you release, Morgen asks if you want to create an event, a frame, or a task. Select “task.”
This creates the task and time-blocks it in one motion. No extra steps.
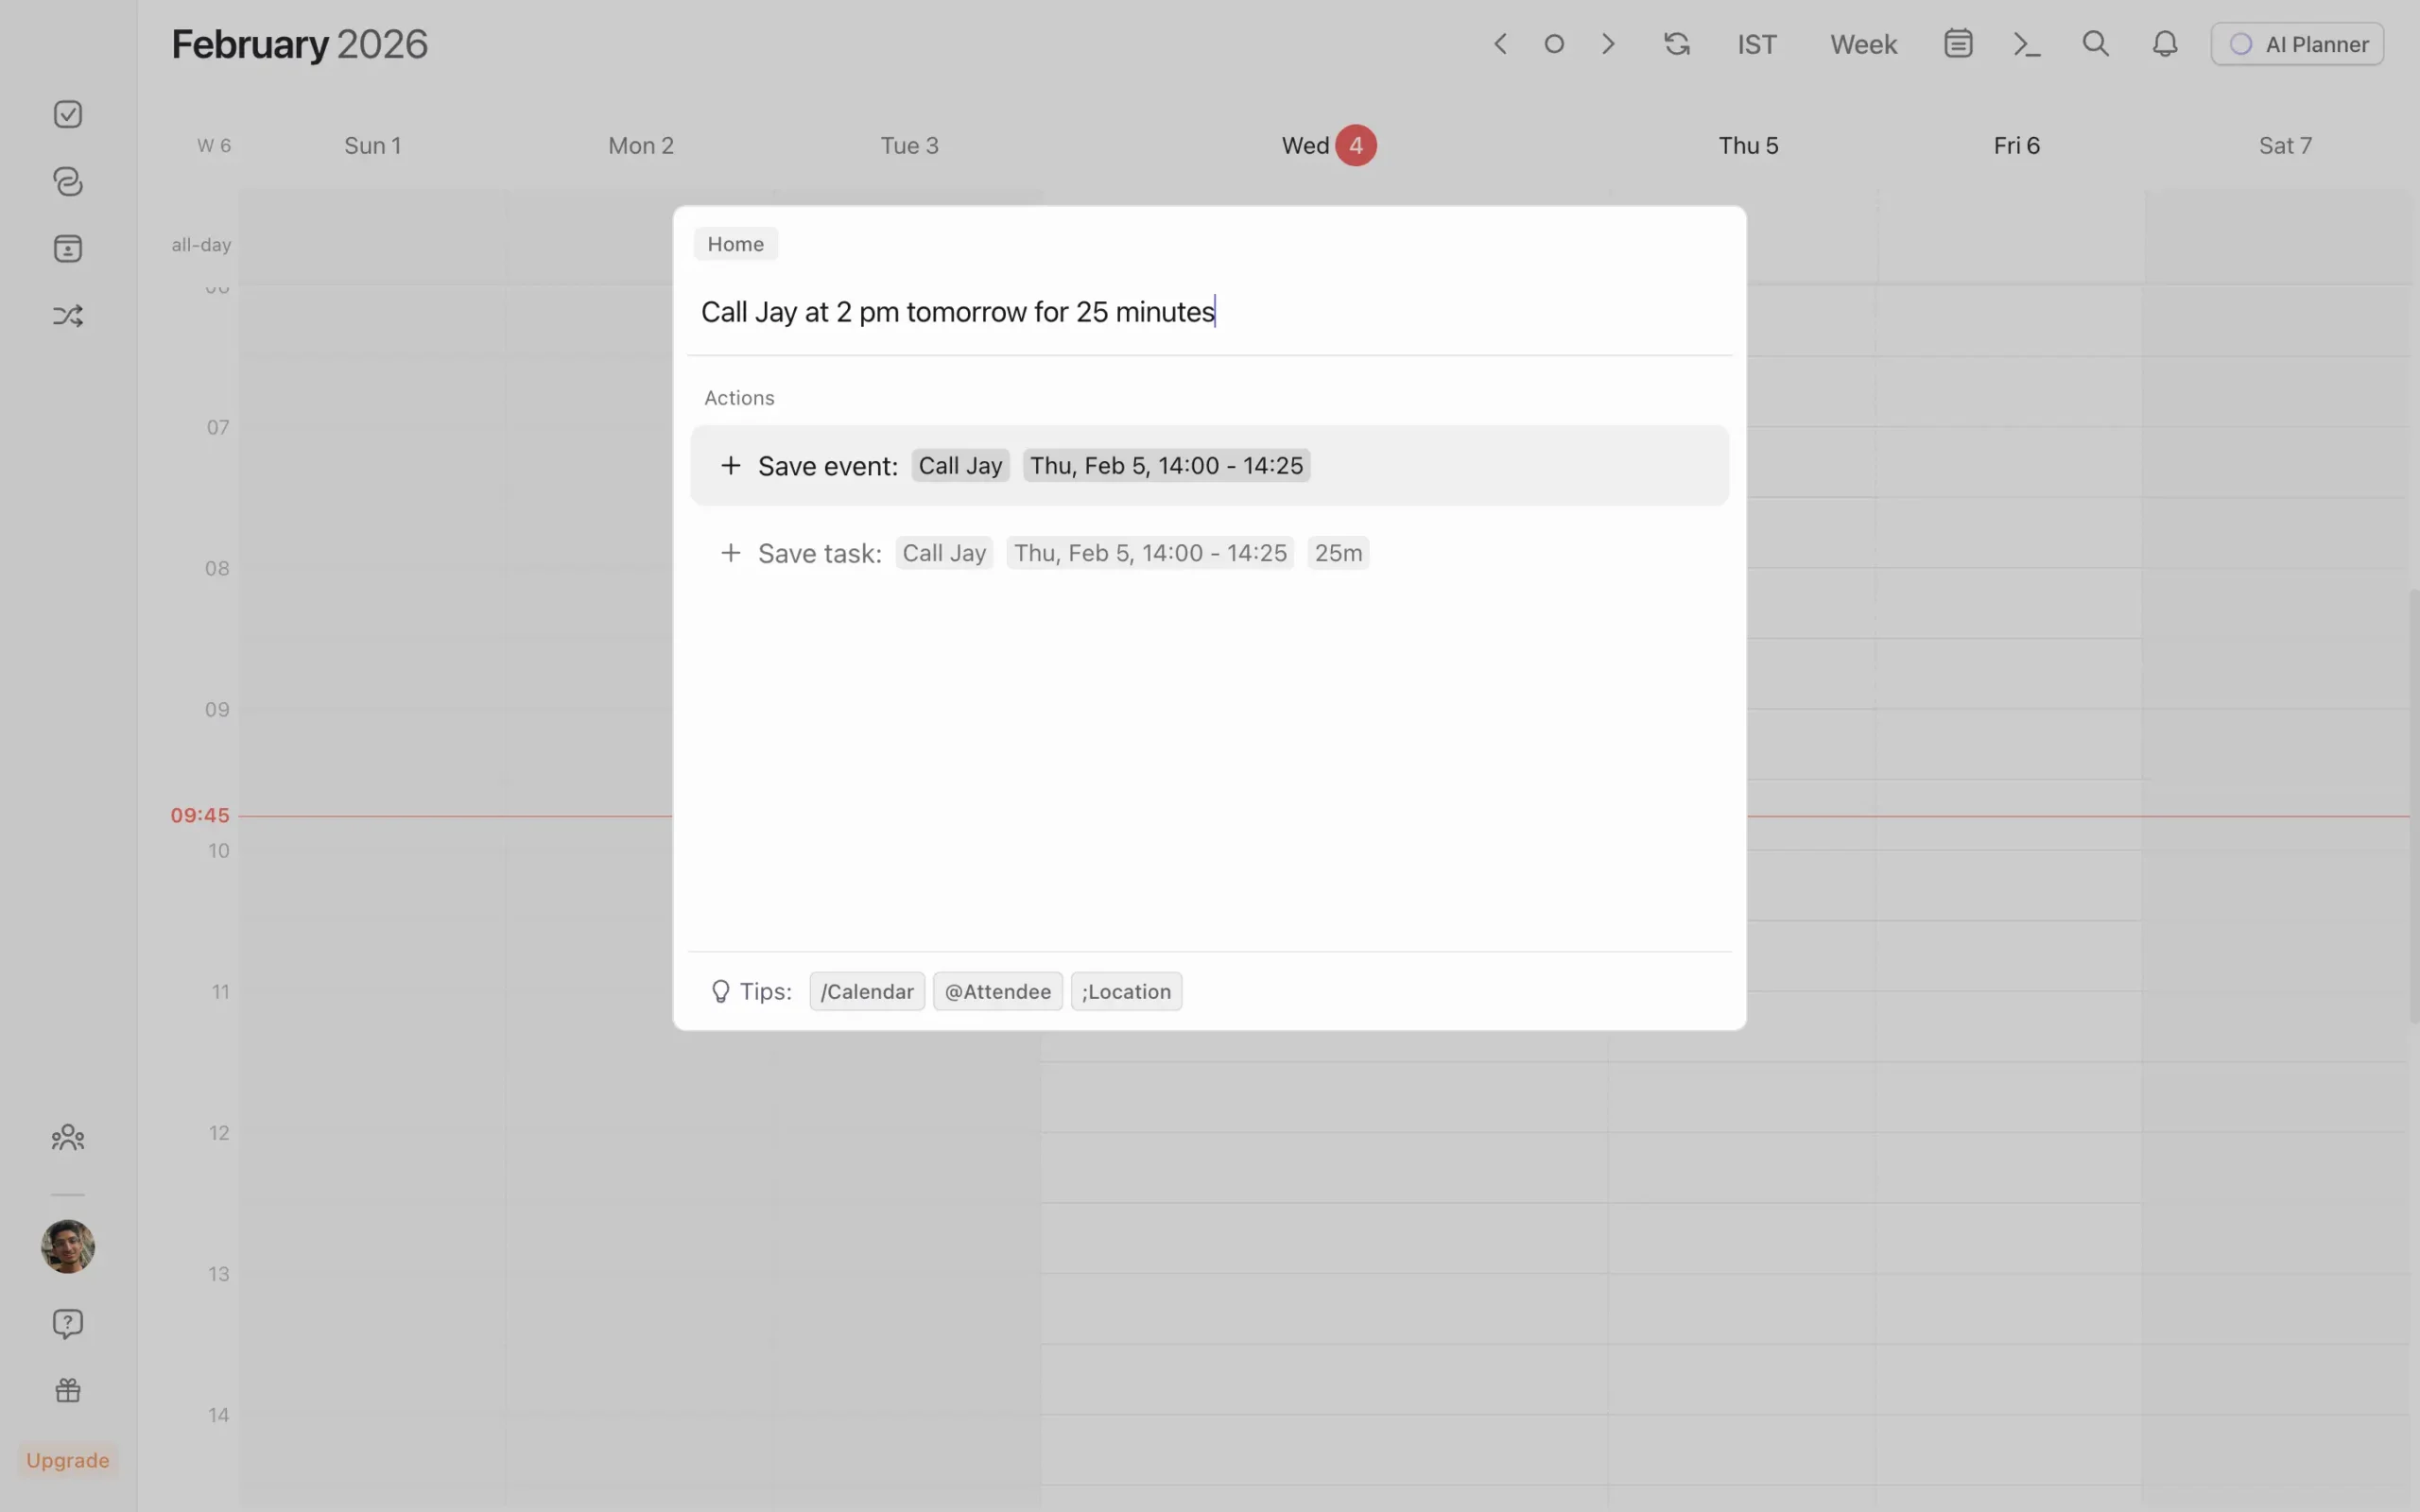
The third way, as we previously uncovered, is the command bar. Press Command+K on Mac or Ctrl+K on Windows, type your task, and you’re done.
Once you understand those three methods, you’ll pick the one that fits your workflow.
I use the drag method most of the time because I’m usually already looking at my calendar when I realize I need to block time for something.
Now here’s where Morgen gets useful: you can connect your existing task apps.
Go to Settings, then Integrations, then Tasks & projects.
You’ll see options for Notion, ClickUp, Linear, Todoist, Microsoft To Do, Outlook Email, Google Tasks, Apple Reminders, Obsidian, and Zapier.
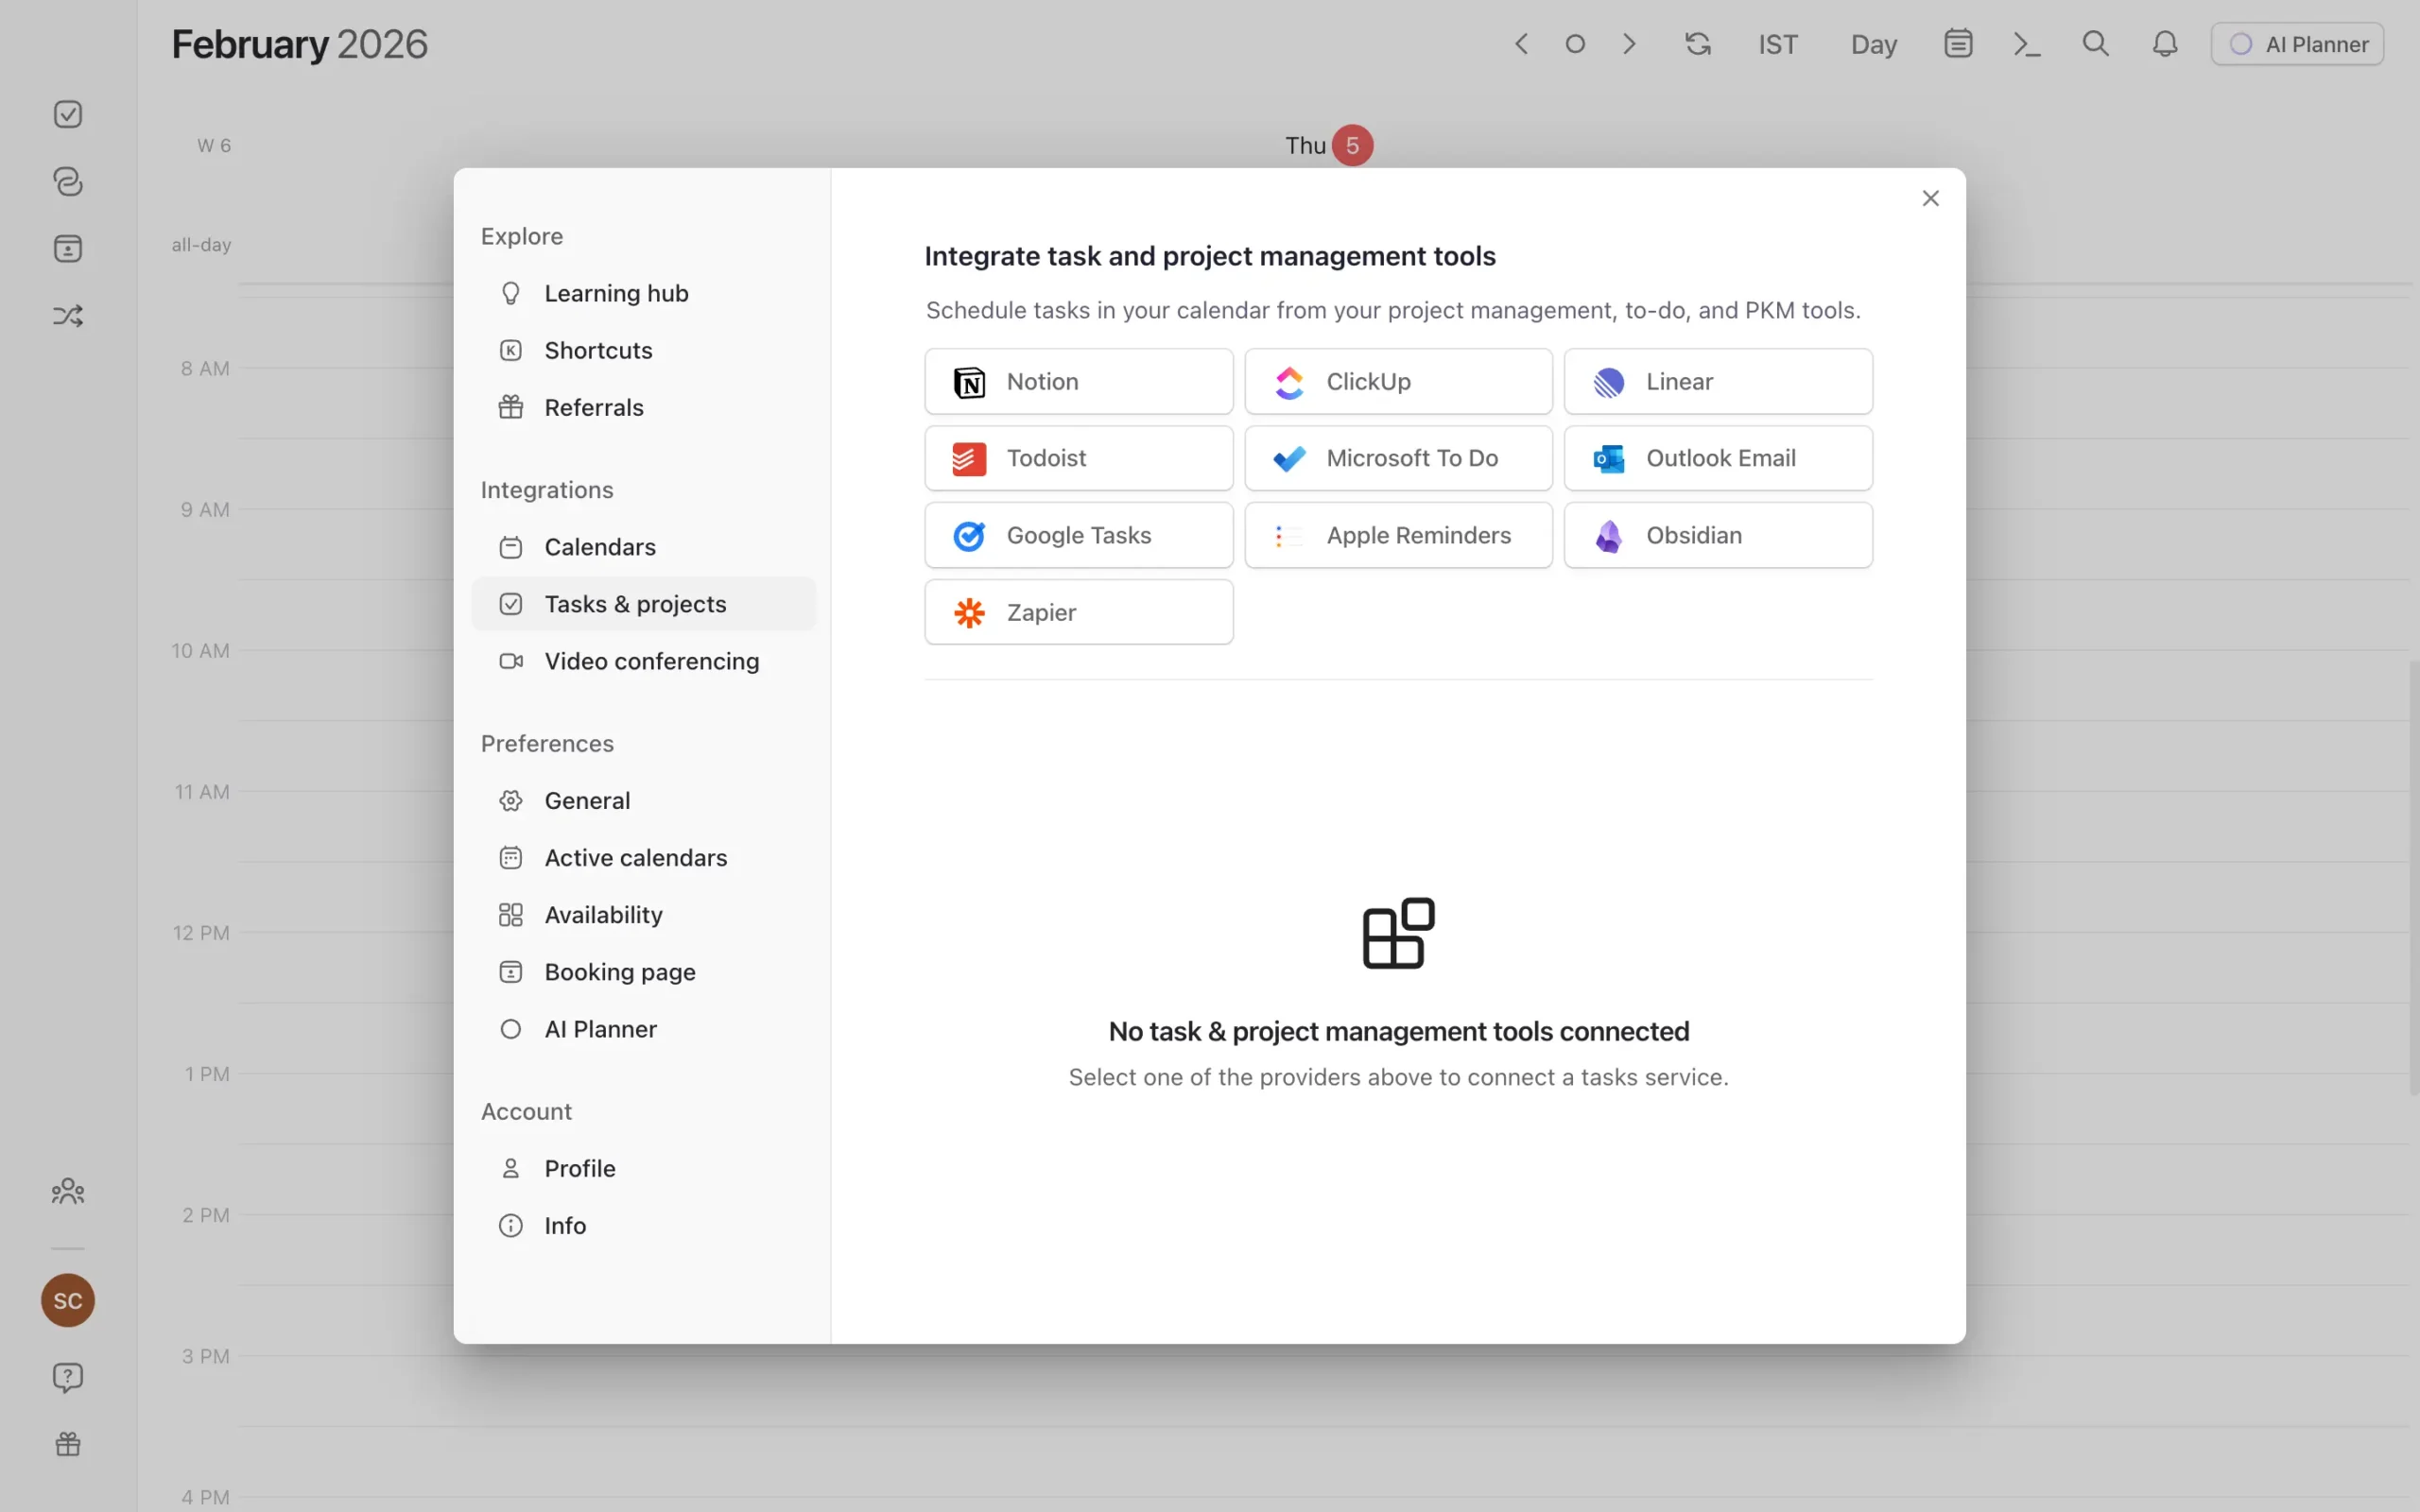
I tested this with Todoist.
Click the Todoist option, authorize the connection, and Morgen gives you customization choices. You can import all tasks, only tasks assigned to you, or all tasks assigned to you or unassigned.
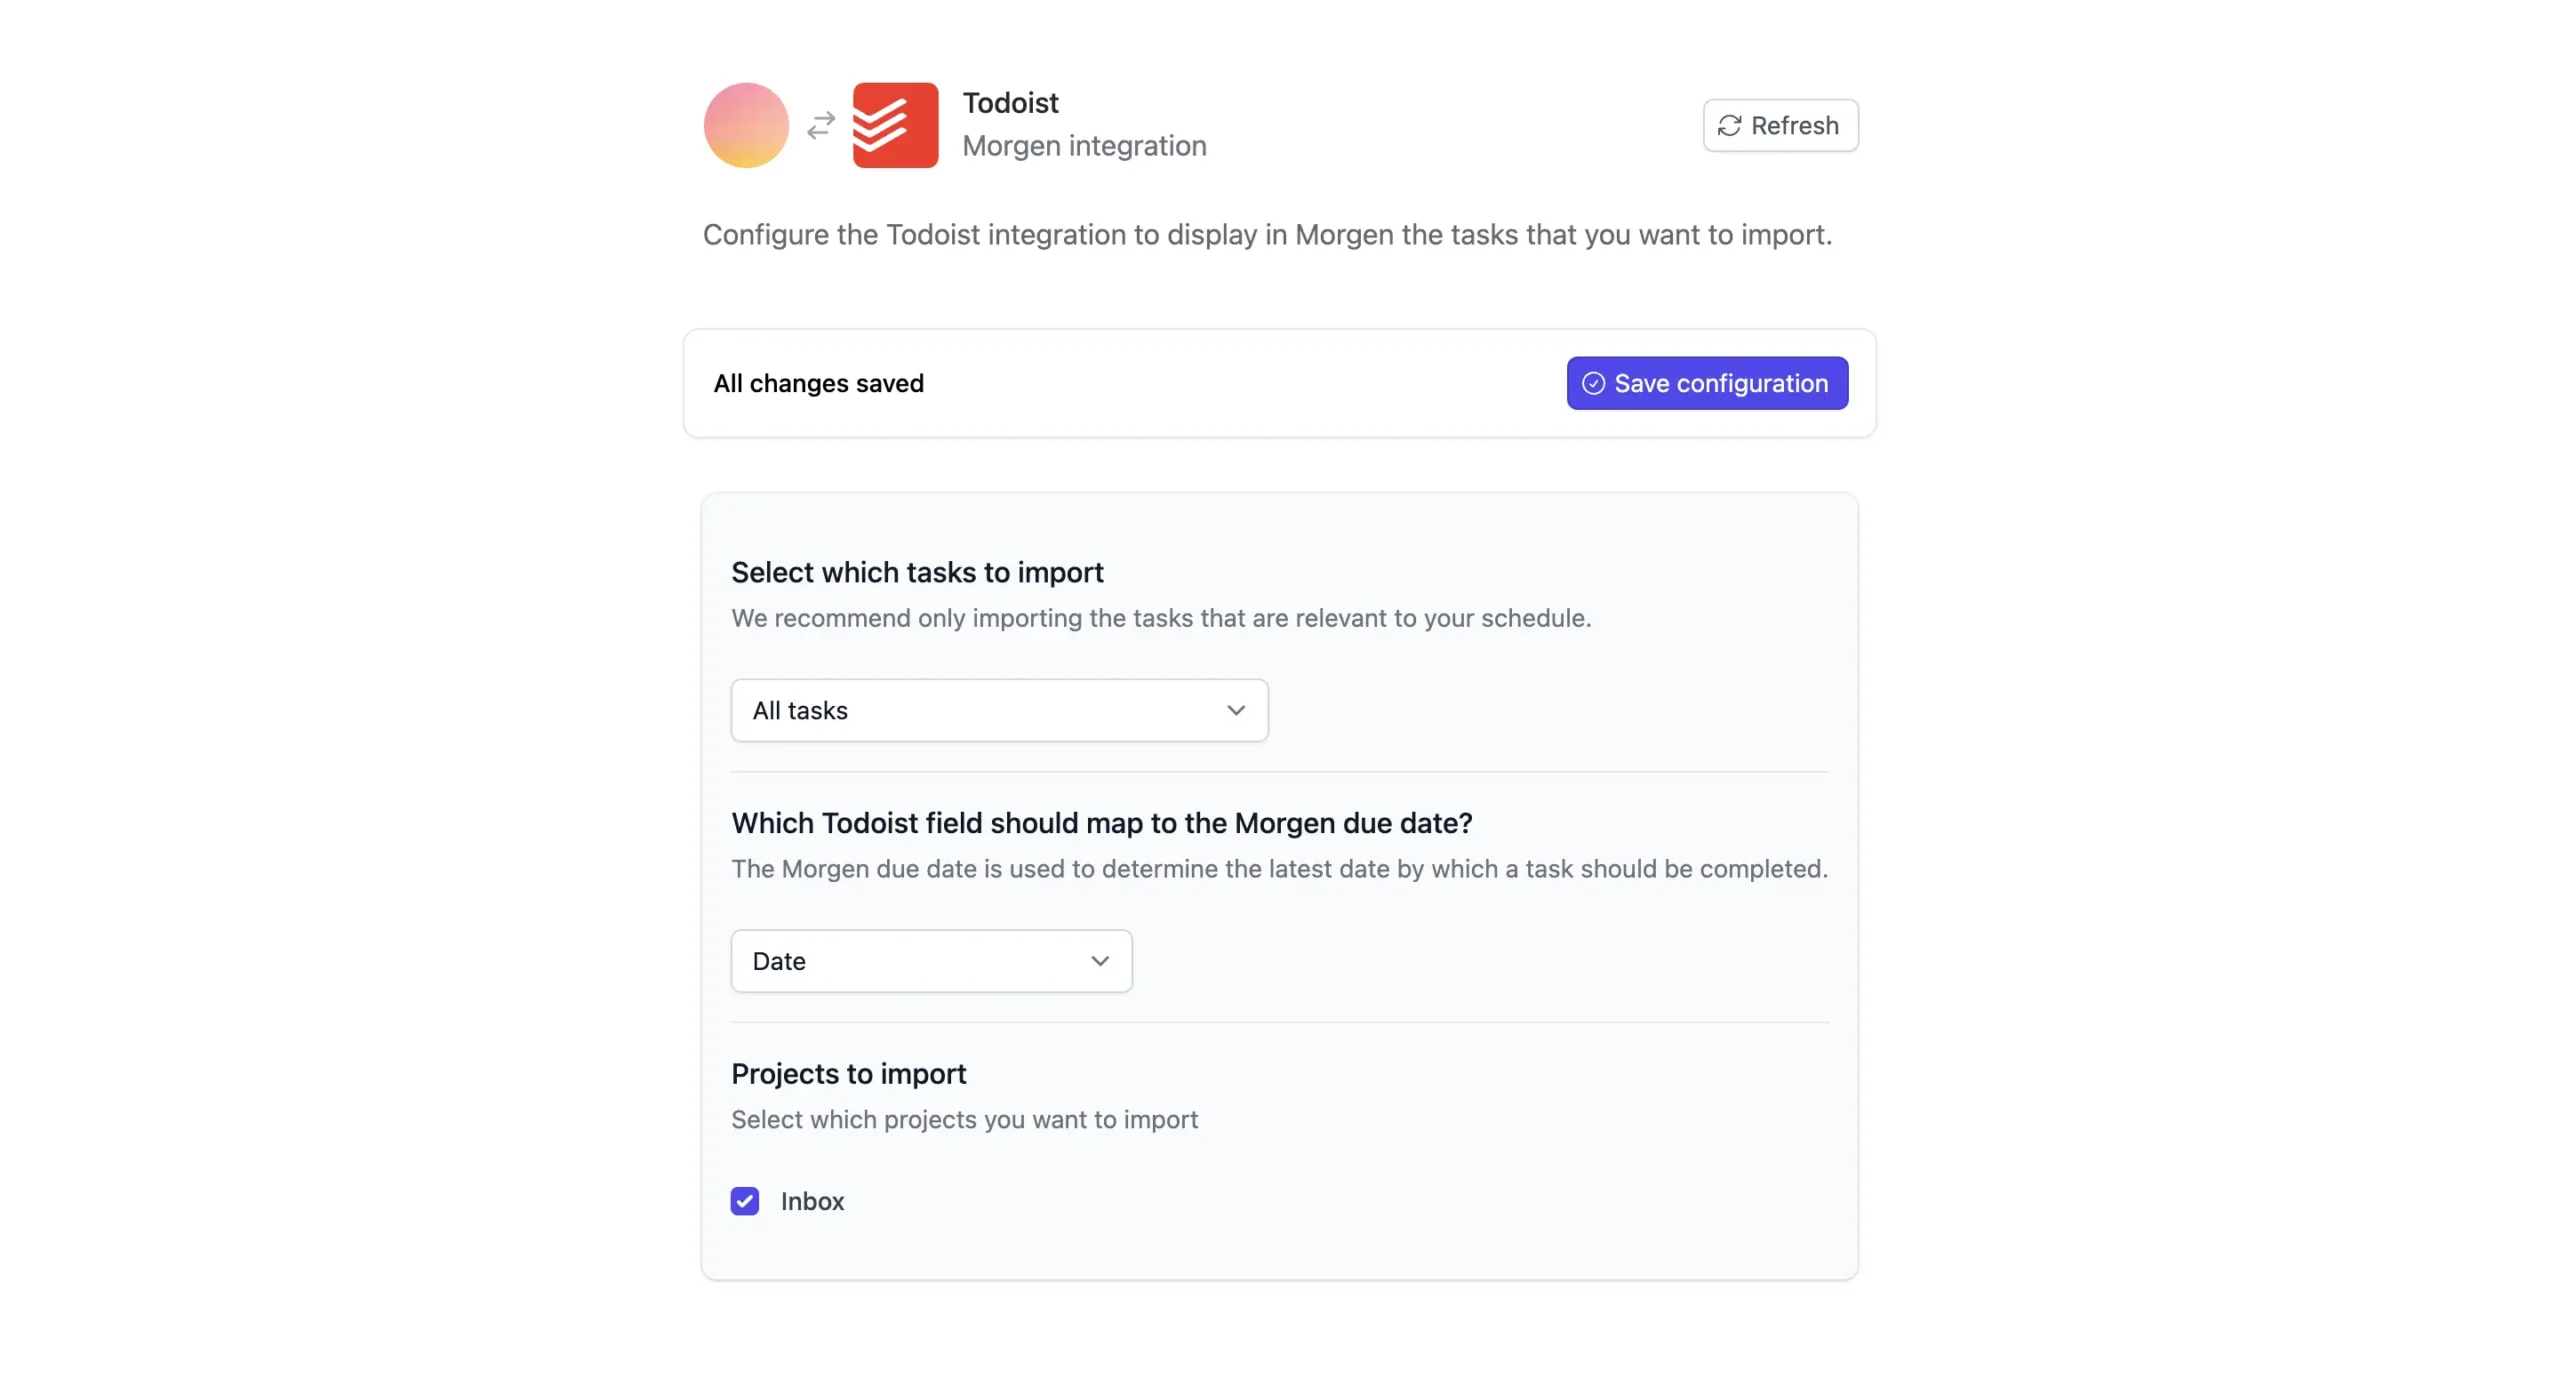
Akiflow has a similar feature. But Morgen and Sunsama both handle this differently than Akiflow does.
Side note: to learn more about the exact differences between Sunsama and Akiflow, read my complete Akiflow vs Sunsama comparison article.
In Akiflow, all your integrated tasks show up in one Universal Inbox. In Morgen and Sunsama, each integration gets its own section in the sidebar.
I prefer Morgen’s approach.
When you have tasks from five different sources, keeping them separated makes it easier to see what belongs where.
Time-blocking tasks from integrated apps works the same as blocking Morgen’s native tasks. Drag and drop.
The only difference: if the task came from Todoist, you’ll see a small Todoist icon next to it.
The sync is two-way.
Mark a task complete in Morgen, and it completes in Todoist automatically. Update the due date in Morgen, and Todoist updates. It actually works.
If you’re using the desktop app, there’s another small feature worth mentioning.
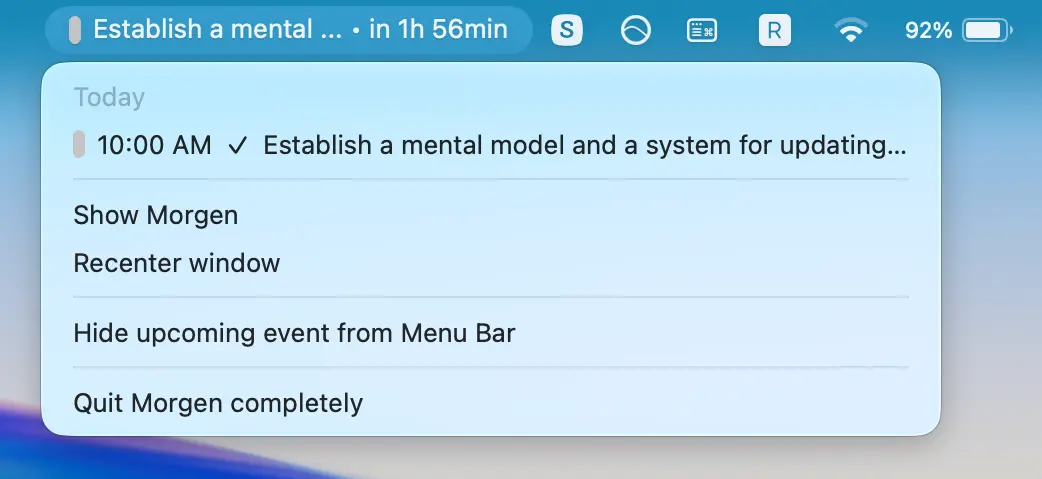
The active task shows up in your menu bar at the top of your screen. You can see what you’re supposed to be working on without opening Morgen.
And when you complete a task, you get confetti. It’s silly. But it works. Tiny rewards matter.
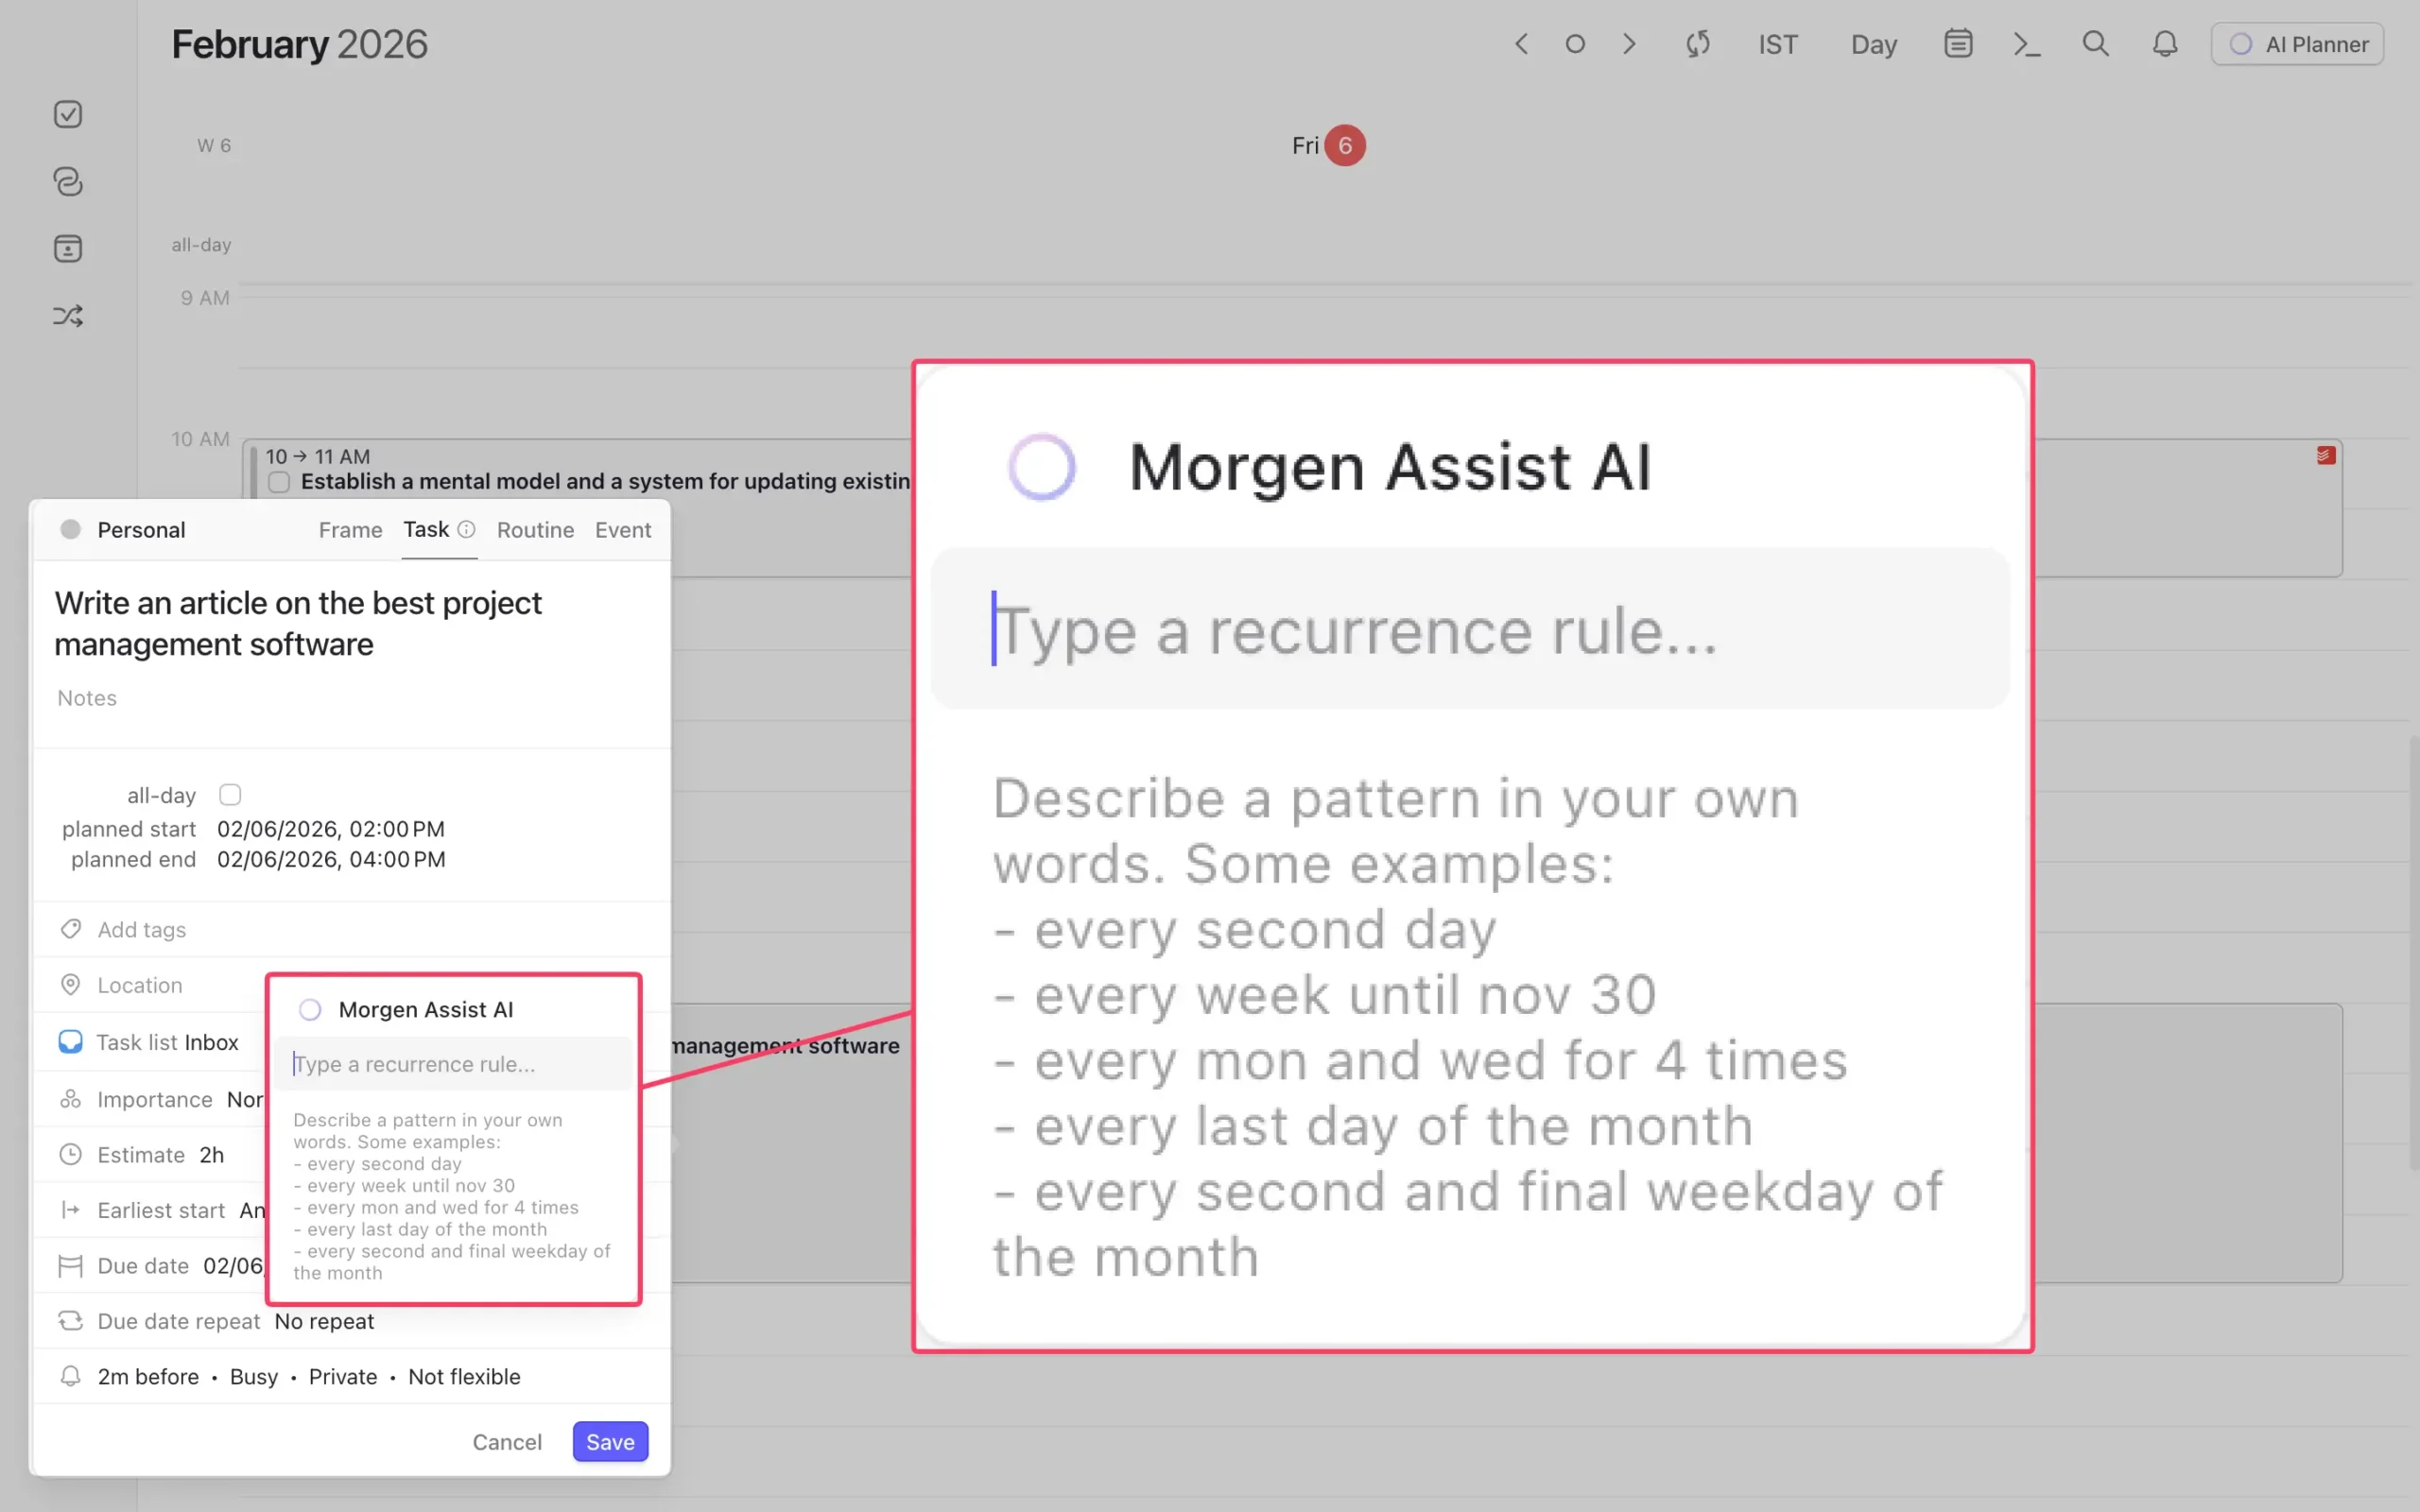
Morgen’s recurring task options are more flexible than most calendar apps.
You can set a task to repeat every 37 days if you want (thanks for Morgen Assist AI). Or every third Tuesday. Or whatever pattern you actually need, not just the standard daily/weekly/monthly options.
There’s also a “busy time” feature that matters if you share scheduling links with people.
When you time-block a task, you can mark that slot as “busy.” That prevents people from booking meetings during that time when they use your scheduling link.
You can also assign tasks to different calendars. If you want work tasks in your work calendar and personal tasks in your personal calendar, Morgen handles that.
Morgen gives you two ways to plan your day: manual and AI-assisted.
Manual planning is what I’ve just shown you—dragging tasks onto your calendar yourself.
The AI Planner is different. It looks at all your tasks and suggests when to work on each one based on your available time and the task’s priority.
I’ll explain how that works next.
AI suggests tasks, you approve the final plan
Morgen’s AI Planner doesn’t work as you’d expect.
Most daily planning apps follow the same pattern. Sunsama does it. Akiflow does it. You open a daily planning tab, pull in today’s tasks, drag them onto your calendar, and maybe reflect on what you’re going to do.
Morgen skips all that.
There’s no dedicated daily planning tab. No weekly planning screen. No review interface.
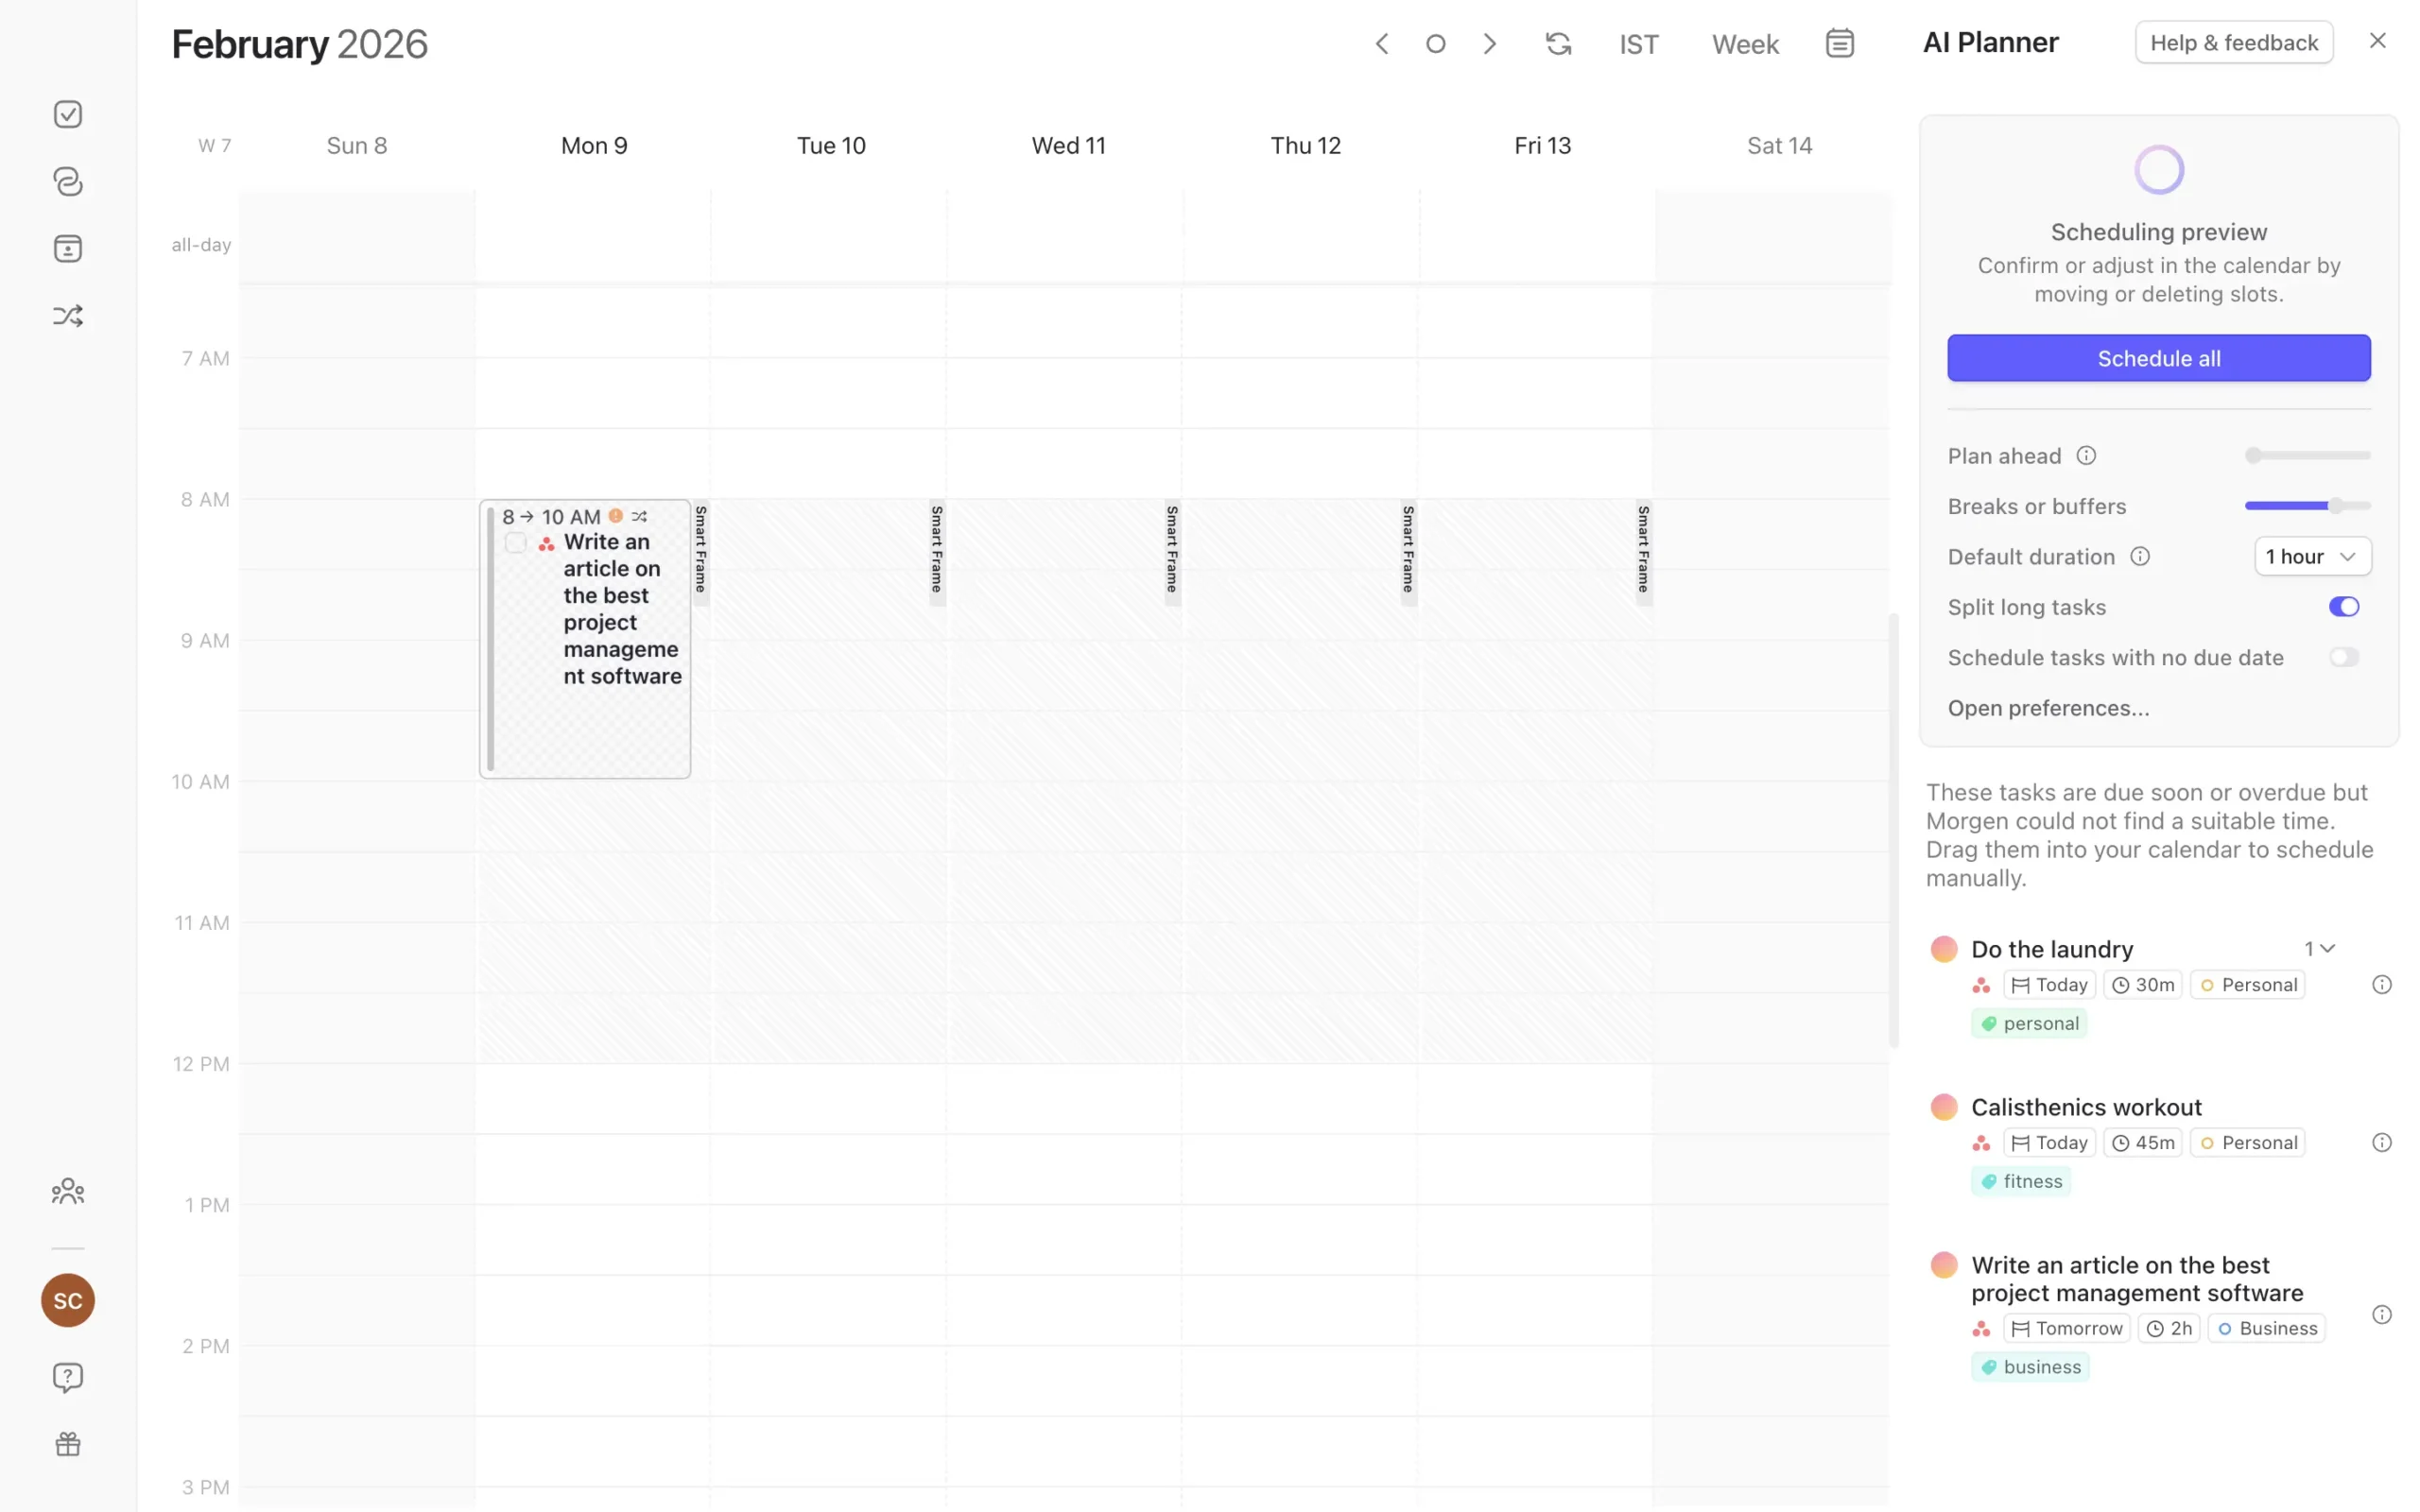
Instead, you get AI Planner. Click the button in the top right corner, and the AI suggests when to work on which tasks.
What happens next is what makes this interesting.
Your tasks start appearing on your calendar—but they’re not scheduled yet. They pulsate. That’s how you know they’re suggestions, not confirmed events.
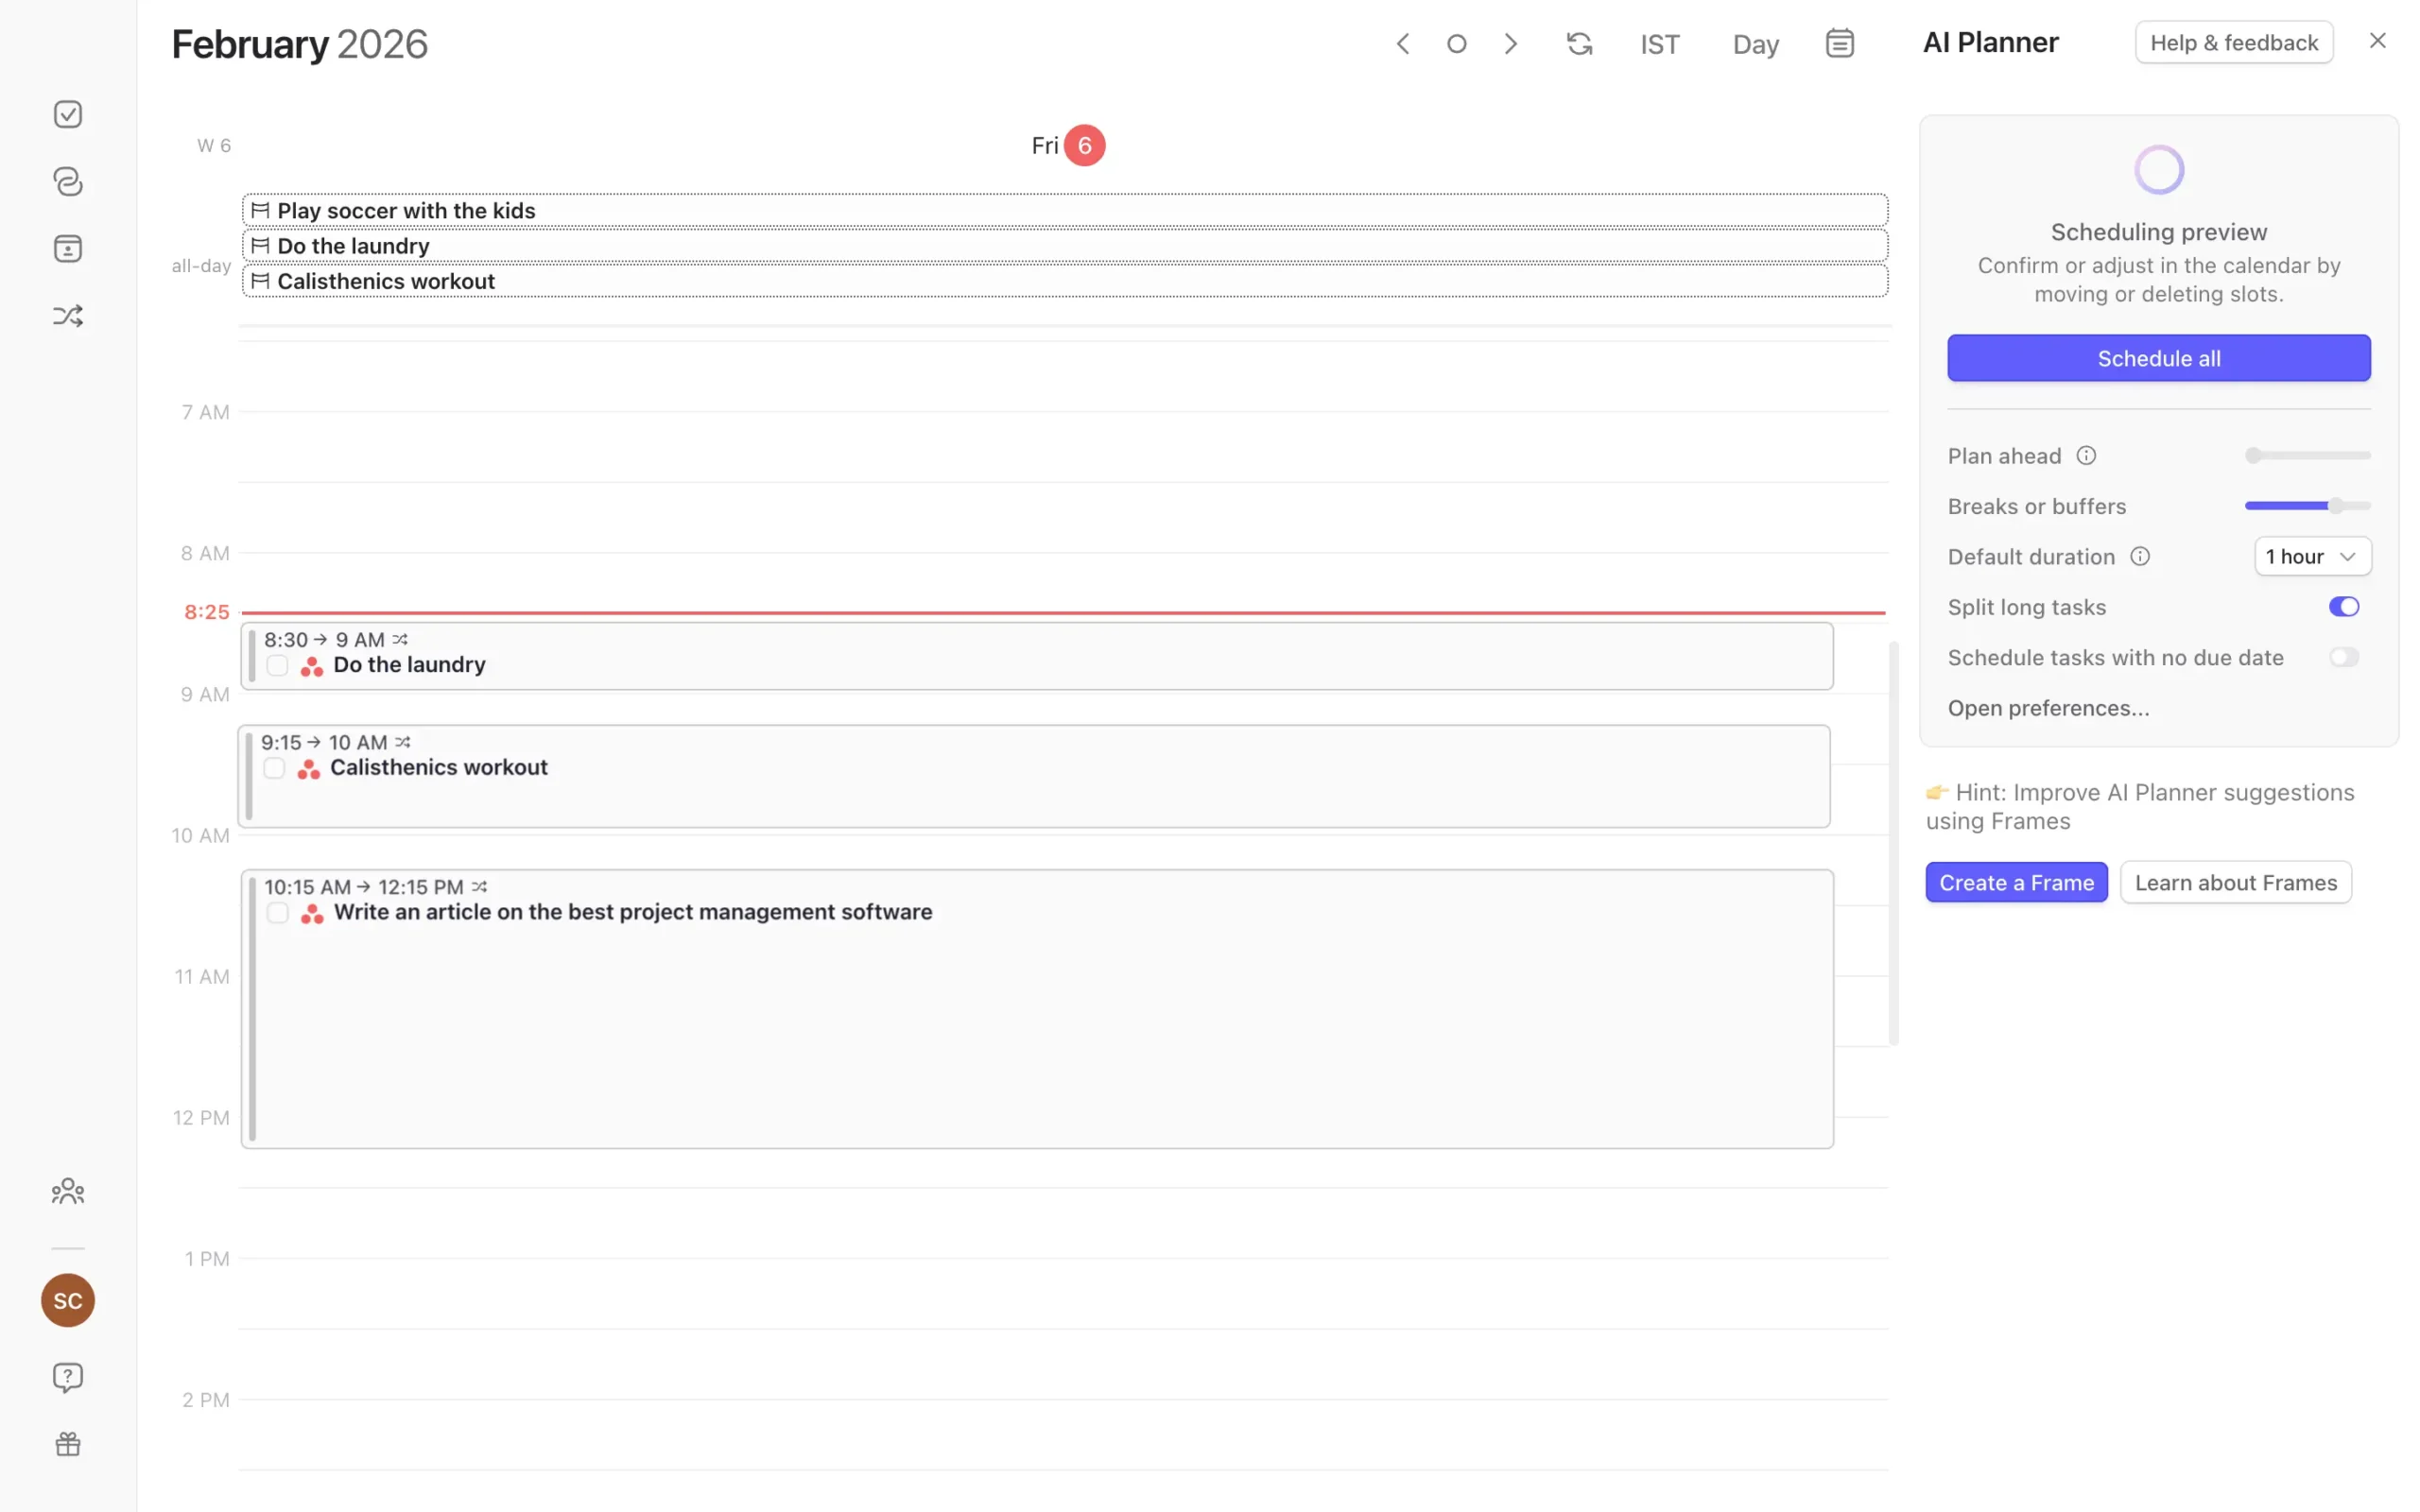
The AI looked at everything. Your calendar availability. Task deadlines. Time estimates. Priority levels. Then it designed a day for you.
But here’s the critical part: you control what happens next. Morgen shows you the plan first. You can accept it, ignore parts of it, or rearrange everything.
That preview mode is what makes this work.
On the right sidebar, you’ll see a “Schedule all” button. That’s your acceptance button. Click it, and everything gets time-blocked in your calendar.

But before you click it, you probably want to adjust things.
The settings in the sidebar let you tune the entire plan at once.
You can plan anywhere from one day to eight days ahead. Change how many breaks the AI schedules. Set default task durations for tasks without time estimates. Tell it whether to split long tasks into multiple sessions.
That real-time adjustment is useful.
You’re not configuring preferences in a settings menu somewhere, hoping it works. You see the result instantly.
If you want to get more specific, there’s a full preferences panel. Click “Open preferences…” at the bottom of the sidebar, or go to Settings → Preferences → AI Planner.
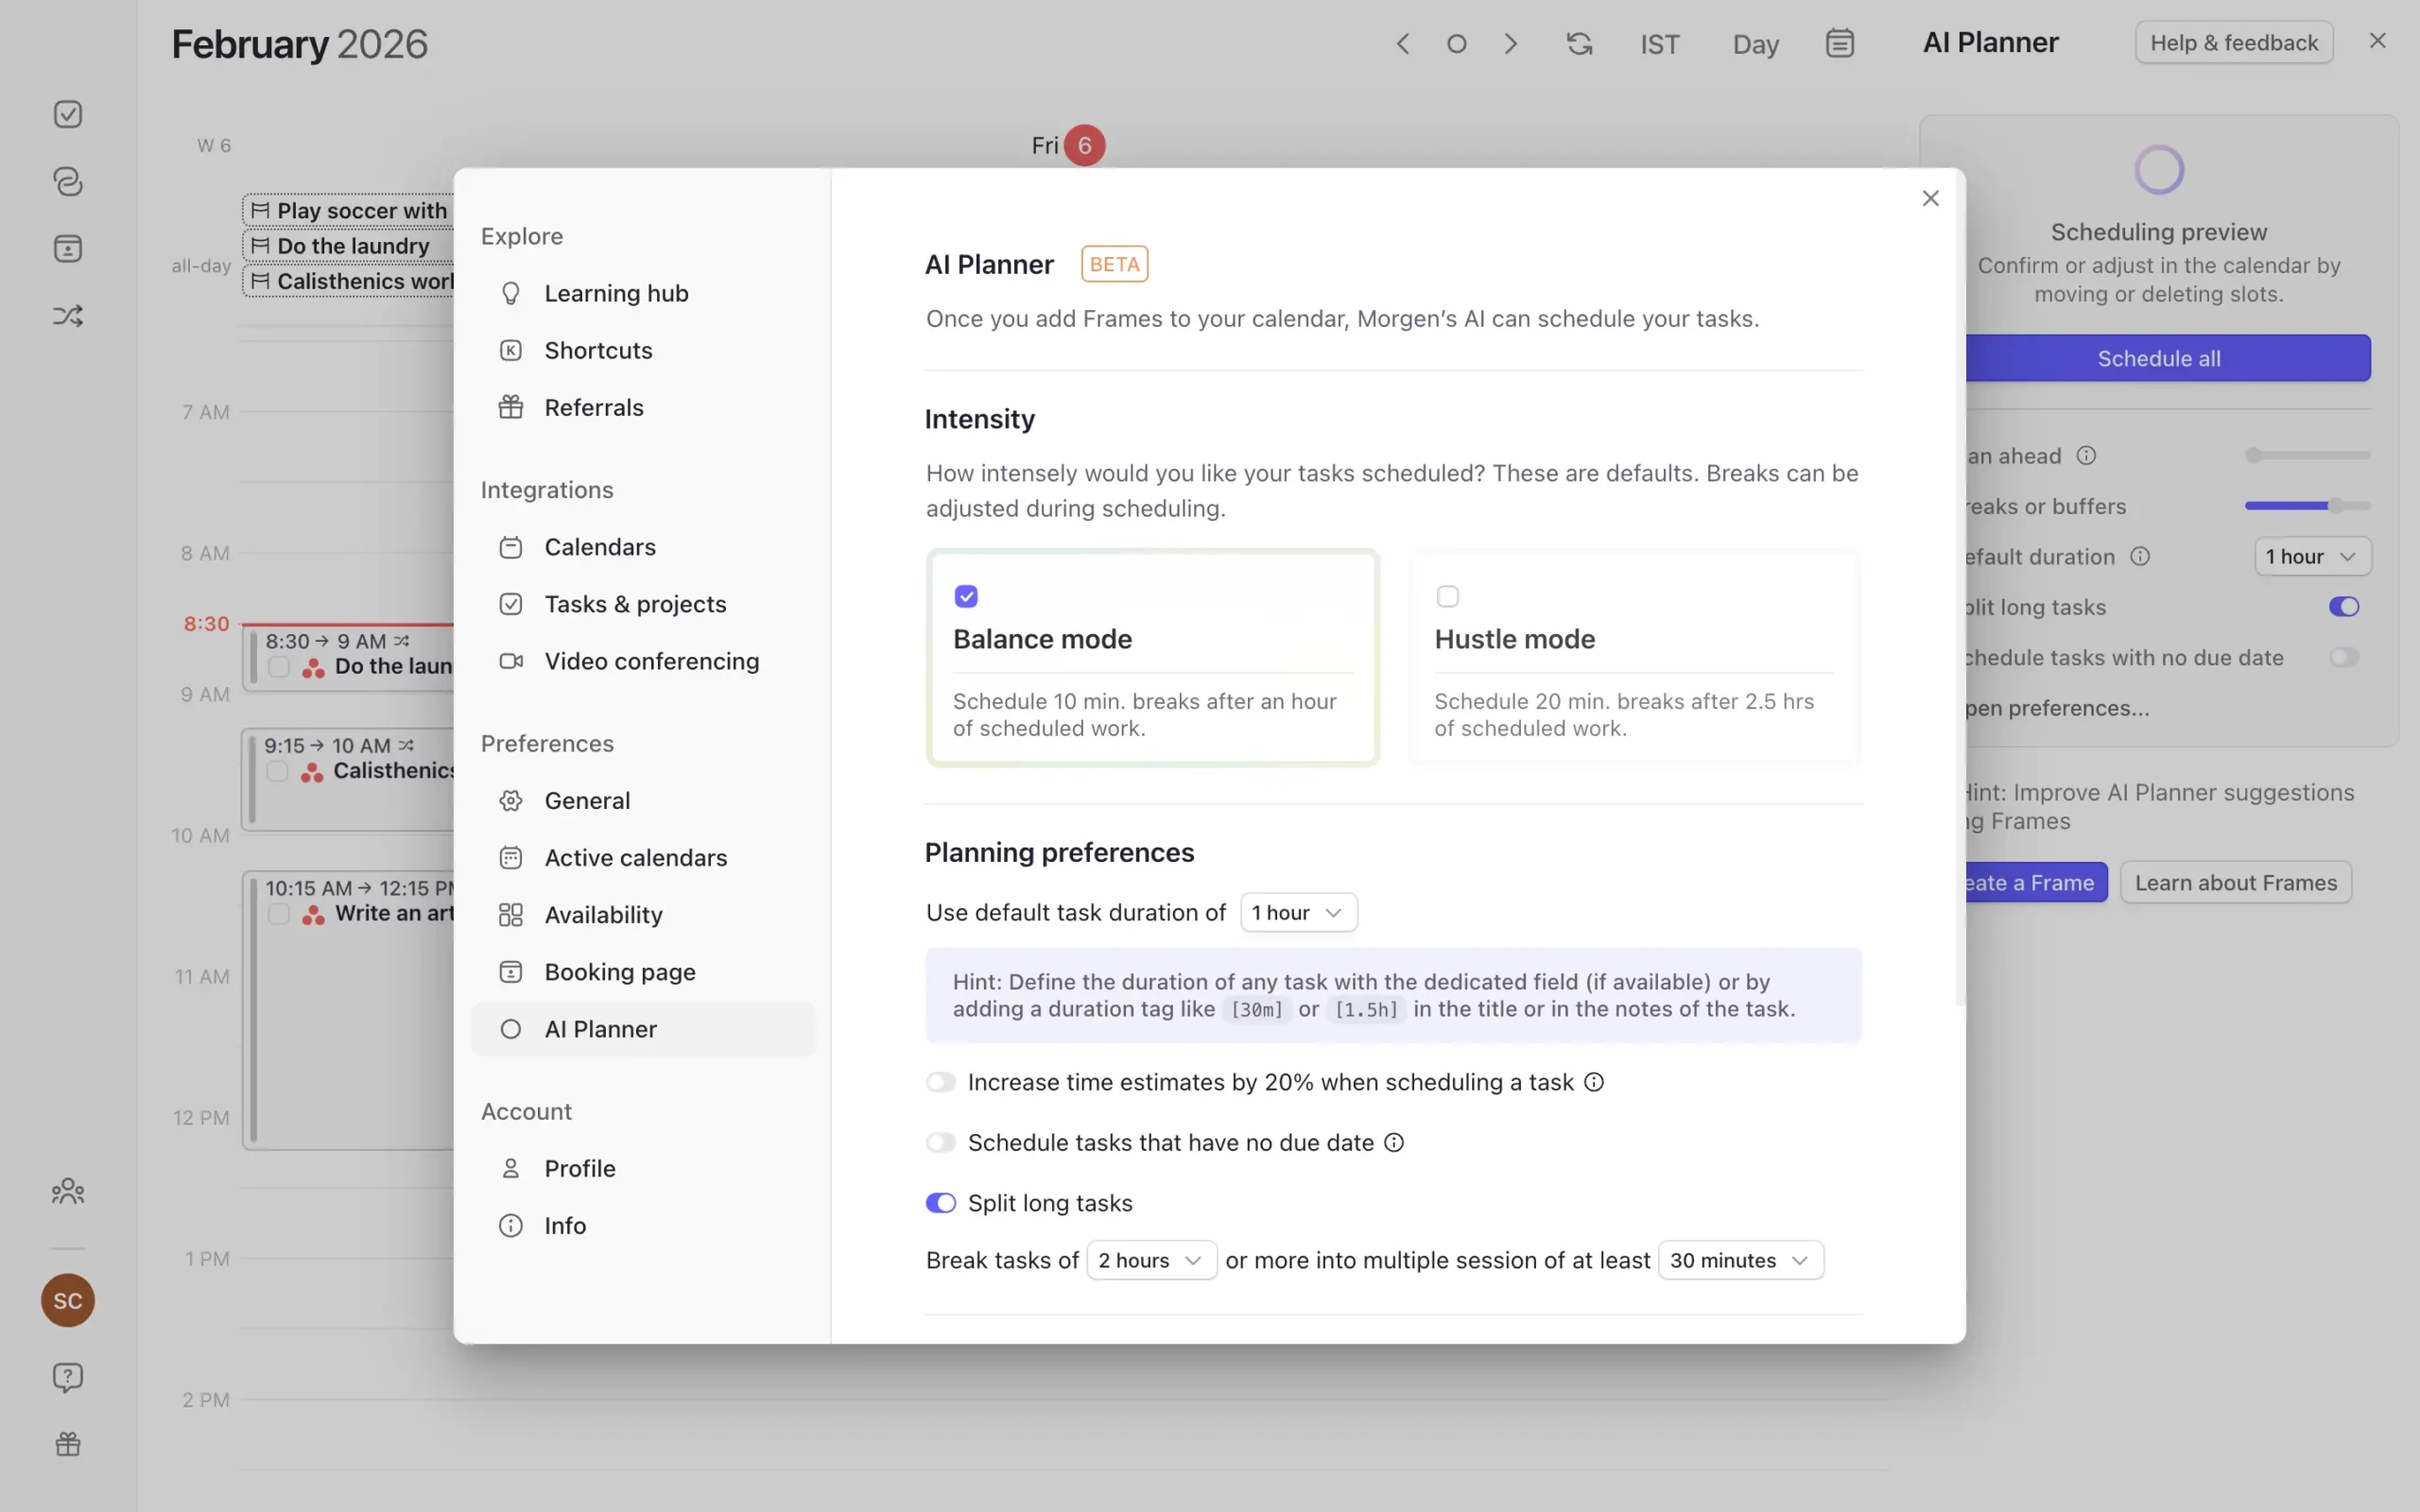
The first choice is intensity. Balance mode or Hustle mode.
Balance mode gives you 10-minute breaks after every hour of work. Hustle mode extends that to 20-minute breaks after every 2.5 hours.
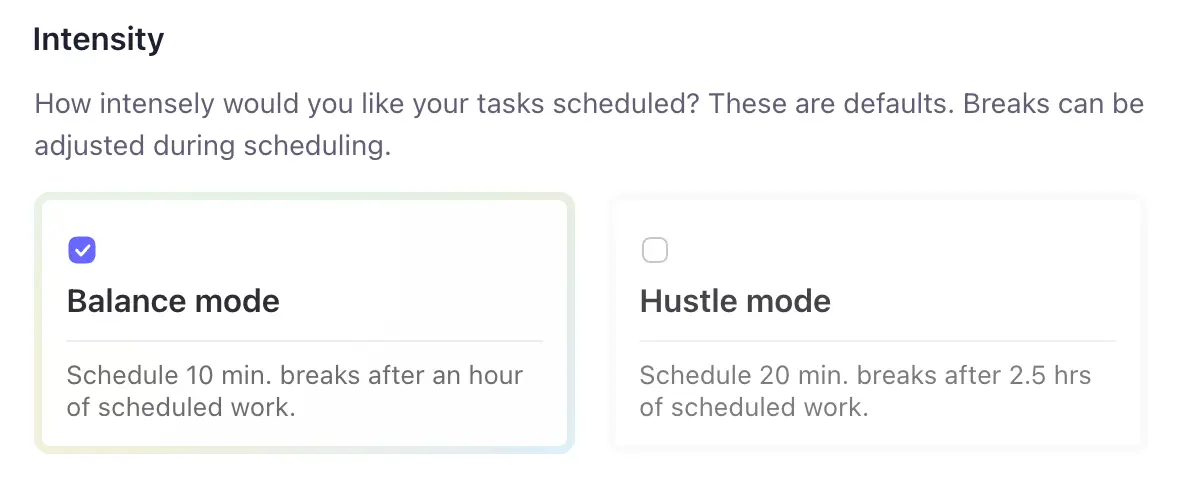
I appreciate that Morgen asks. Most productivity tools assume everyone wants to maximize output. Some of us just want sustainable days.
Below that, you’ll find planning preferences. Default task duration (useful if your task manager doesn’t store time estimates).
Whether to increase time estimates by 20% when scheduling (smart, since most people underestimate task duration). Whether to schedule tasks that have no due date.
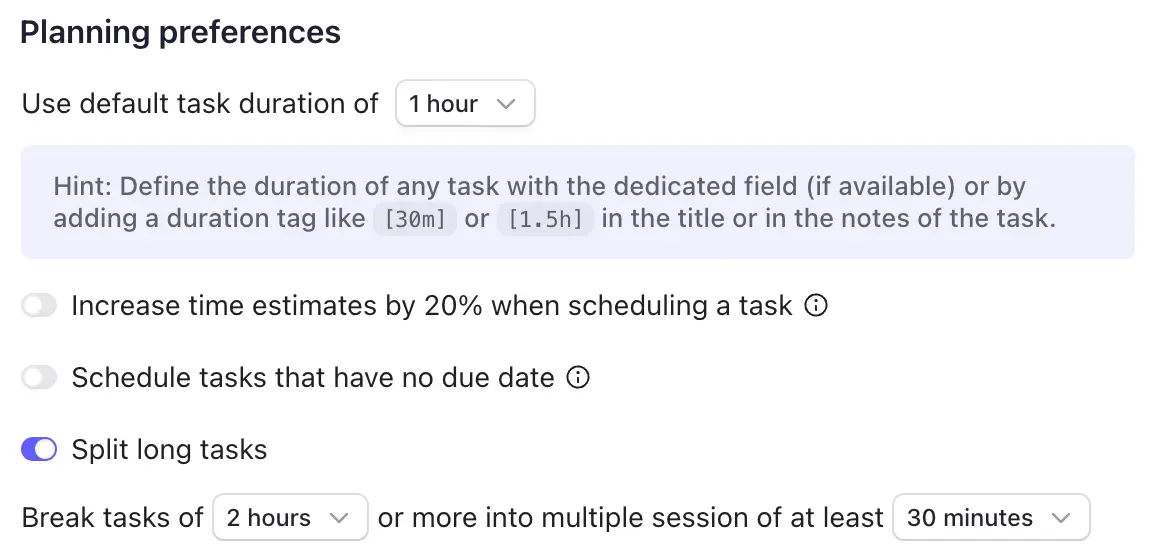
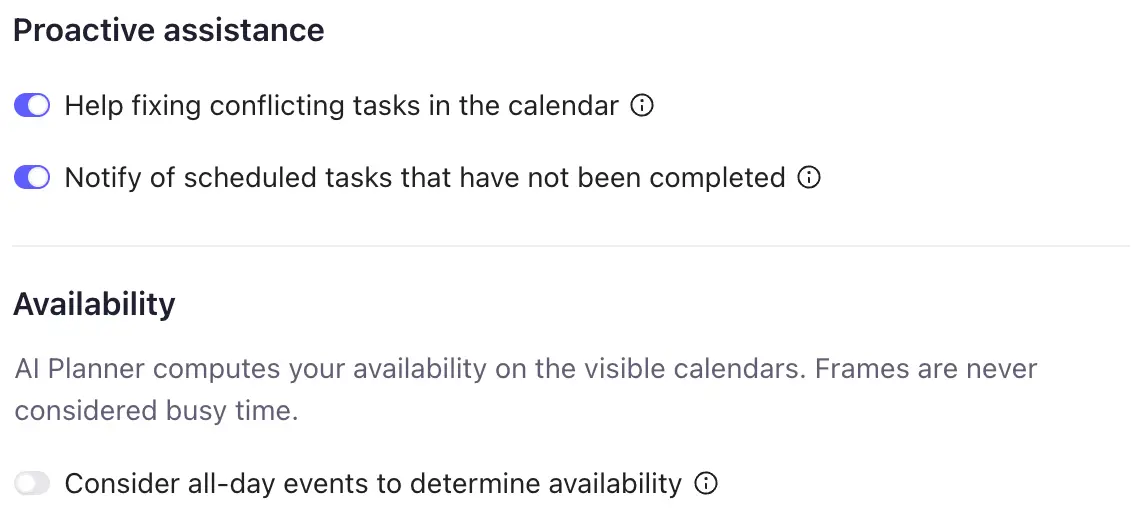
Then there’s proactive assistance.
The AI can notify you when scheduled tasks haven’t been completed. It can help fix conflicting tasks. These are optional.
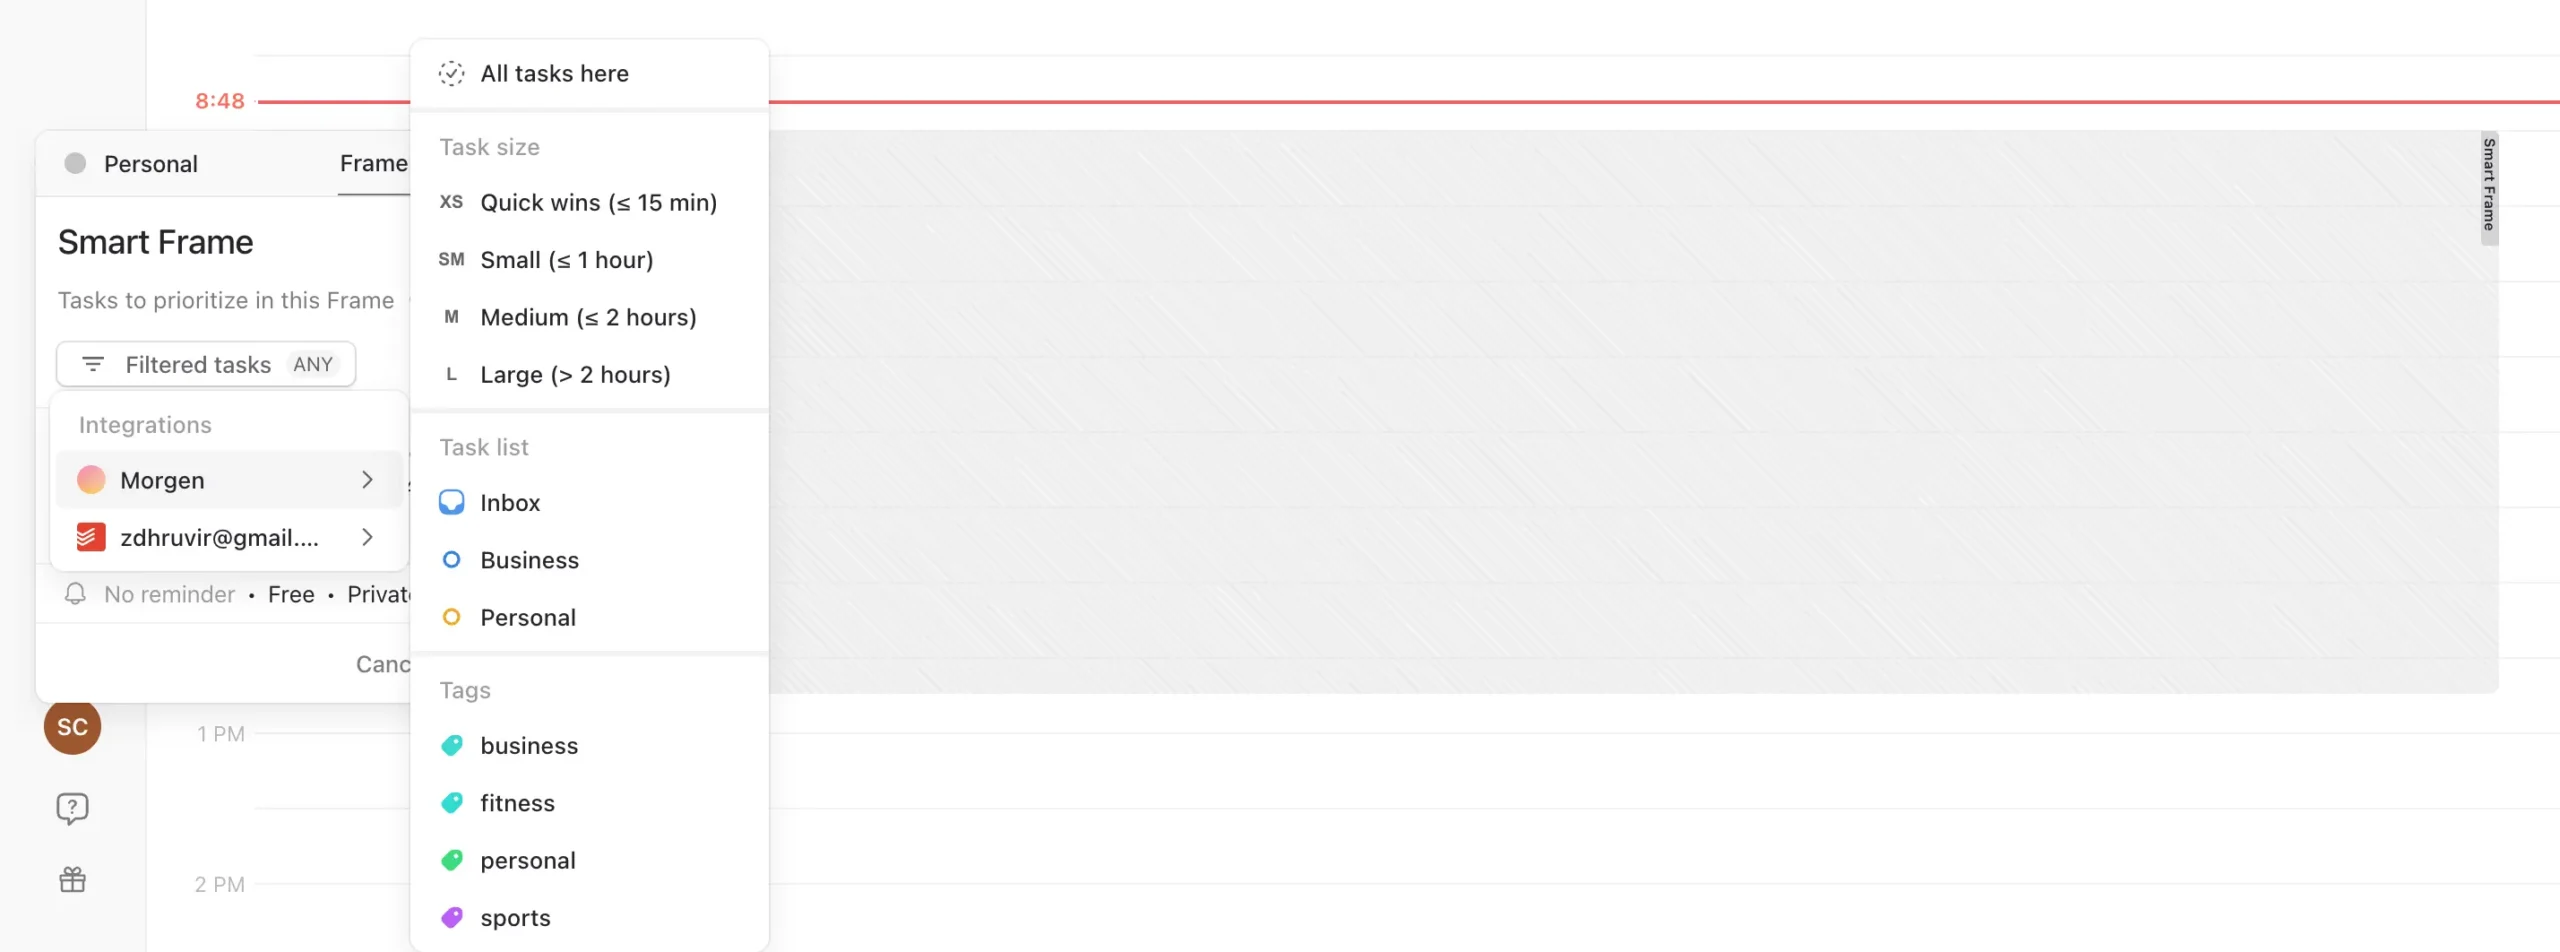
What I found most useful isn’t in the general settings. It’s Frames.
Frames are where Morgen’s AI Planner becomes genuinely different from everything else. A Frame is a time block where the AI is allowed to schedule tasks.
Think of it as a constraint.
Instead of letting the AI schedule tasks anywhere in your day, you create Frames that say: “Only schedule tasks here, and only schedule specific types of tasks.“
To create a Frame, drag a time slot on your calendar. When the pop-up appears, select “Frame” instead of “Task”, “Event”, or “Routine”.
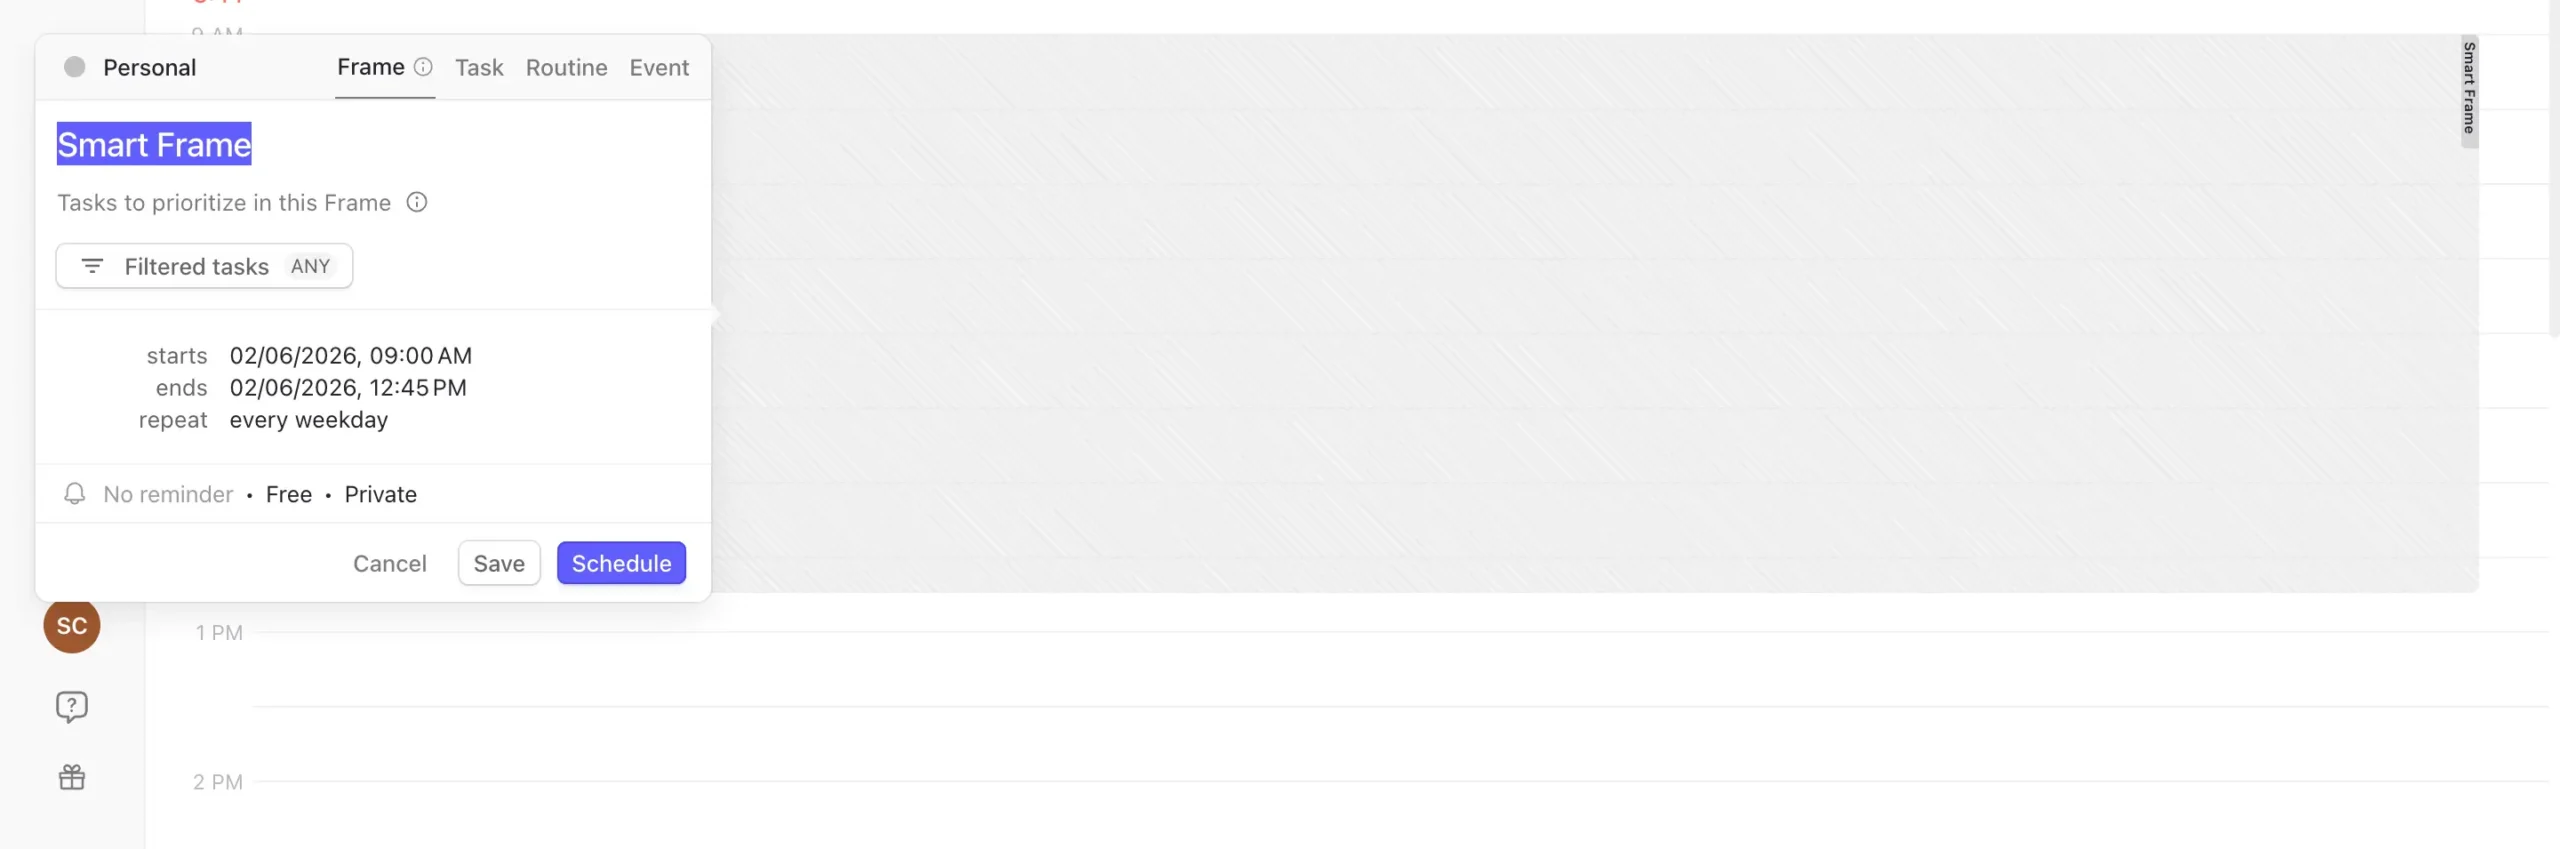
Name it something meaningful. “Deep Work.” “Quick Wins.” “Life Admin.” Whatever reflects the type of work you want to do then.
Here’s where it gets smart.
Inside the Frame pop-up, you’ll see “Filtered tasks.” Click it.
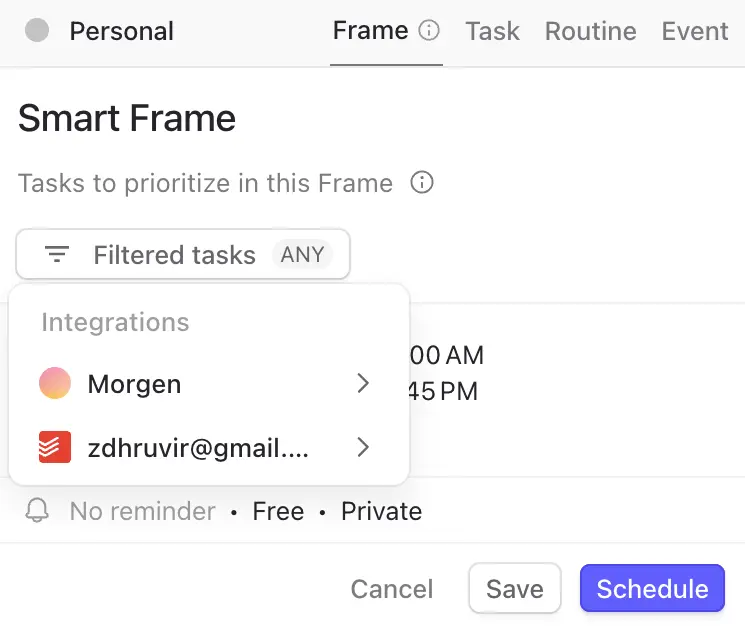
Now you can tell Morgen which tasks belong in this Frame. Only tasks from your Todoist inbox. Only tasks tagged “urgent” from Notion. Only tasks from a specific project in ClickUp.
The use cases for this are endless.
I created a Frame from 8 AM to 12 PM every weekday. Named it “Deep Work.” Set the filter to only include tasks from my Morgen “Business” list that are marked “High” importance.
Now, when I run the AI Planner, it only suggests deep work tasks during that morning block. Quick admin tasks get scheduled elsewhere. The AI respects the template I created.
You can create as many Frames as you want. Morning deep work. Afternoon shallow work. Evening learning time. Weekend life admin.
Each Frame can have its own filter. Each Frame can recur on its own schedule—daily, weekly, every second Tuesday, whatever pattern you need.
Without Frames, the AI Planner still works. It’ll schedule your tasks based on priority and availability.
But it won’t know that you’re sharpest in the morning and should do hard work then. It won’t know that Friday afternoons should stay clear for administrative tasks, not creative work.
Frames teach the AI how you actually work.
Let’s say the AI suggests a plan, and you don’t like some of it.
You can make changes directly in the preview.
Right-click on any suggested task. You’ll see options to ignore it or change the time estimate.
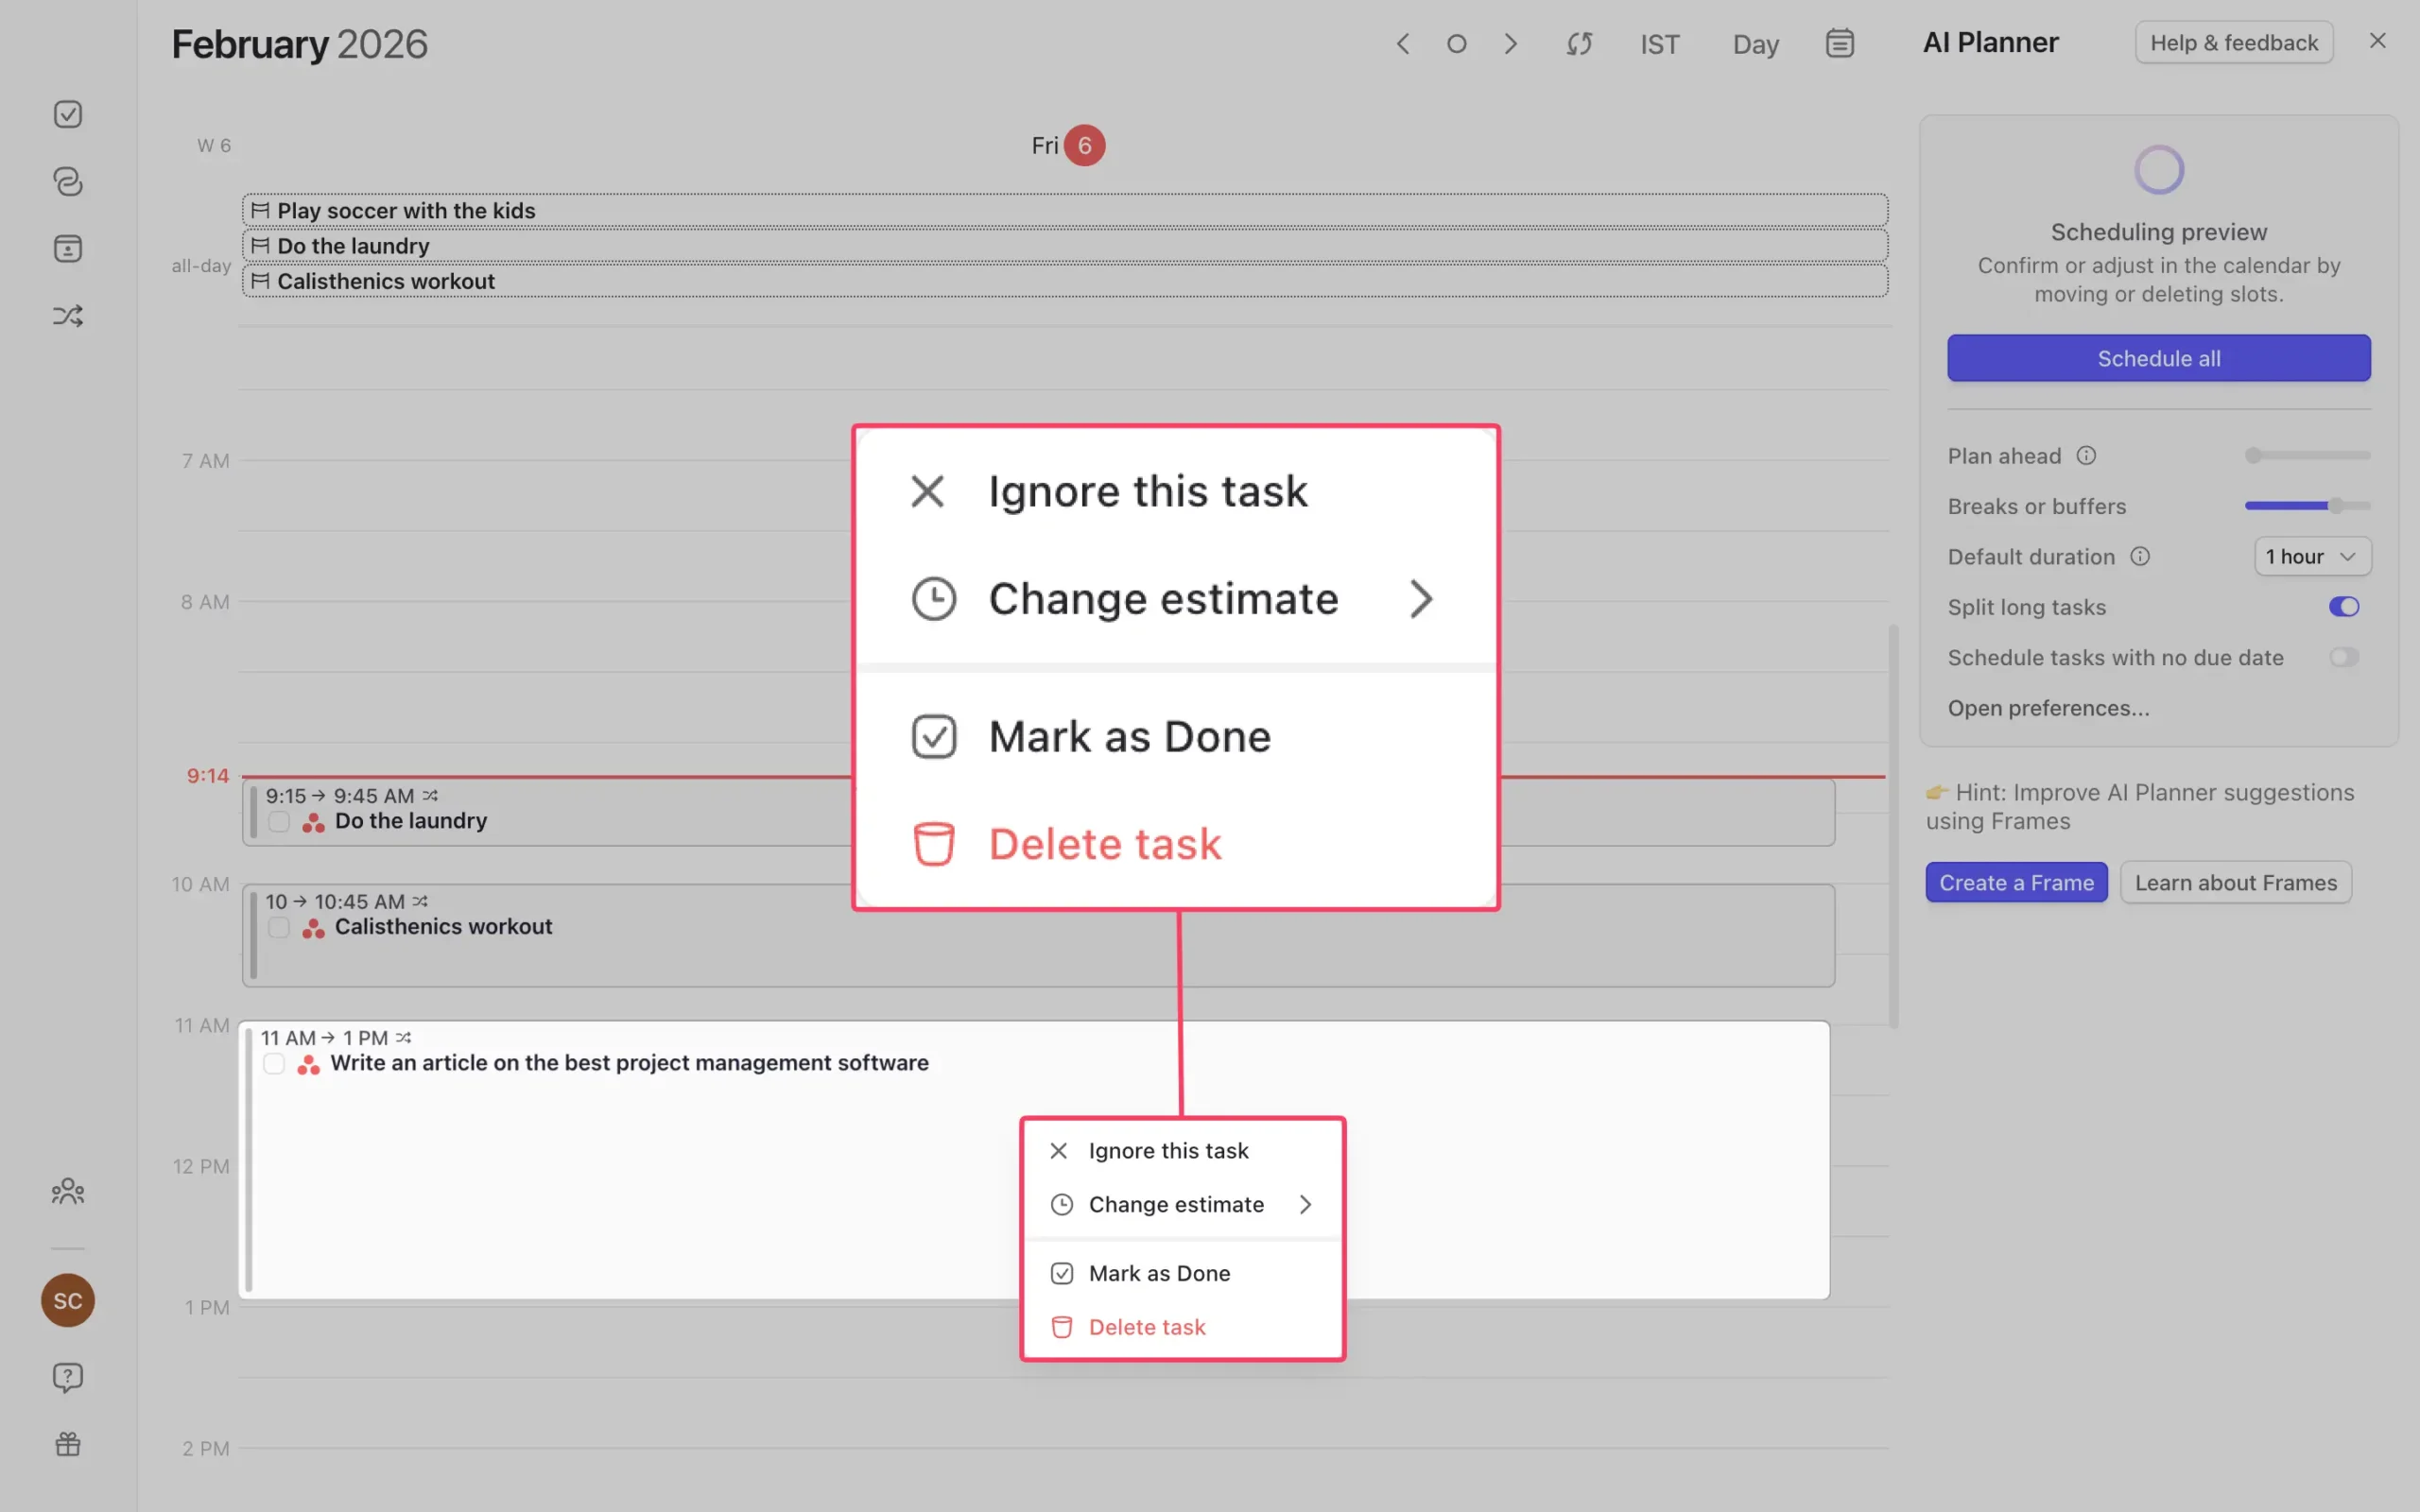
Ignoring a task removes it from the plan. The AI fills that spot with the next priority task if there’s time.
You can also drag tasks from the left sidebar directly onto your calendar. That overrides the AI’s suggestion and signals that this task needs to happen at this specific time. The plan reshuffles around your manual placement.
The AI respects your decisions.
One last feature worth mentioning: incomplete task handling.
If you had tasks scheduled yesterday that you didn’t complete, Morgen notifies you. You get three options:
- reschedule ASAP
- let the AI rearrange your current plan to fit them in
- or unschedule them and do nothing.
Choose one of the first two options, and the AI shows you where it plans to put the incomplete task. You approve it or reject it.
The AI Planner is in beta. That means features are still being added, and occasionally something doesn’t work as expected.
But the core concept—AI suggests, you decide—already works well.
If you’re willing to invest the time upfront—creating Frames, adding estimates to important tasks, tweaking your preferences—the AI Planner becomes genuinely useful.
Background workflows eliminate calendar administrative work
The AI Planner handles your daily task scheduling. But Morgen has another automation layer that runs continuously in the background.
They call it Morgen Workflows. Sometimes it’s called Morgen Assist. Same thing.
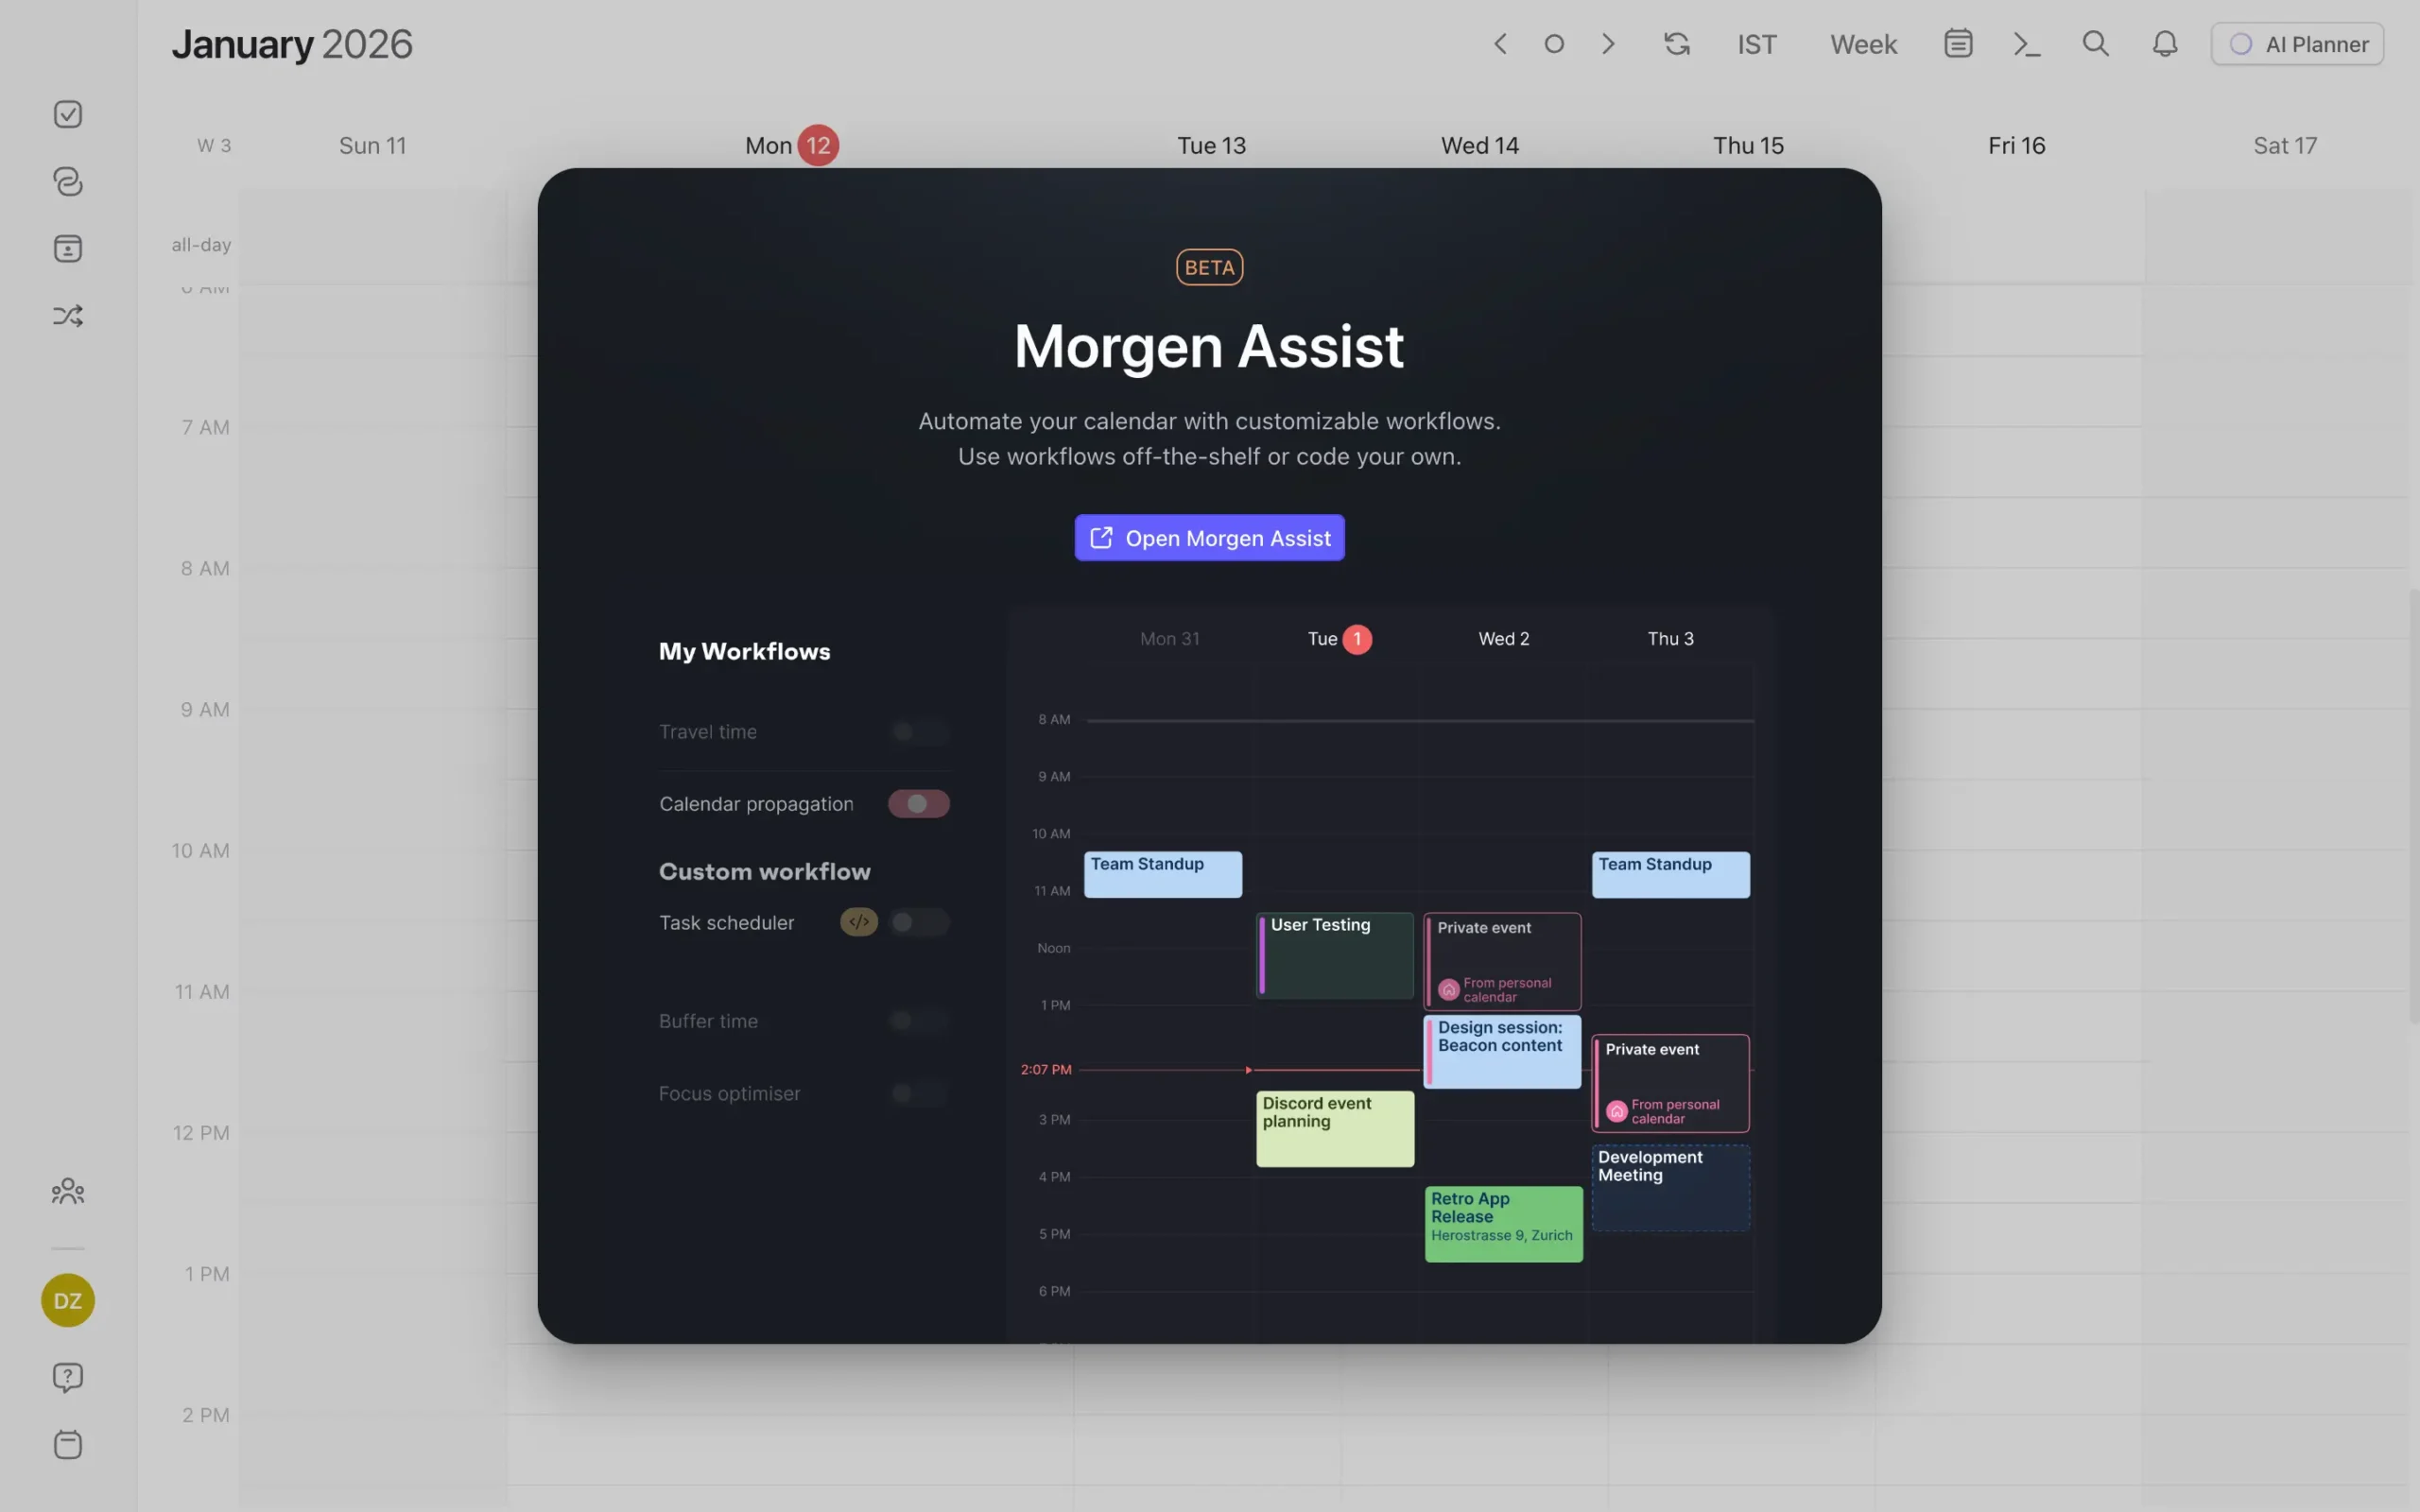
It automates the repetitive calendar tasks that waste time but need to happen.
Right now, Morgen gives you three built-in workflows:
- Calendar Propagation – Syncs events between your personal and work calendars so you don’t double-book
- Automated Travel Time – Calculates commute time and blocks it on your calendar
- Buffer Time – Adds breathing room between meetings
You can’t create custom workflows yet. Unlike Akiflow (Aki AI), which lets you build your own automation templates, Morgen limits you to these three.
But these three workflows solve real problems.
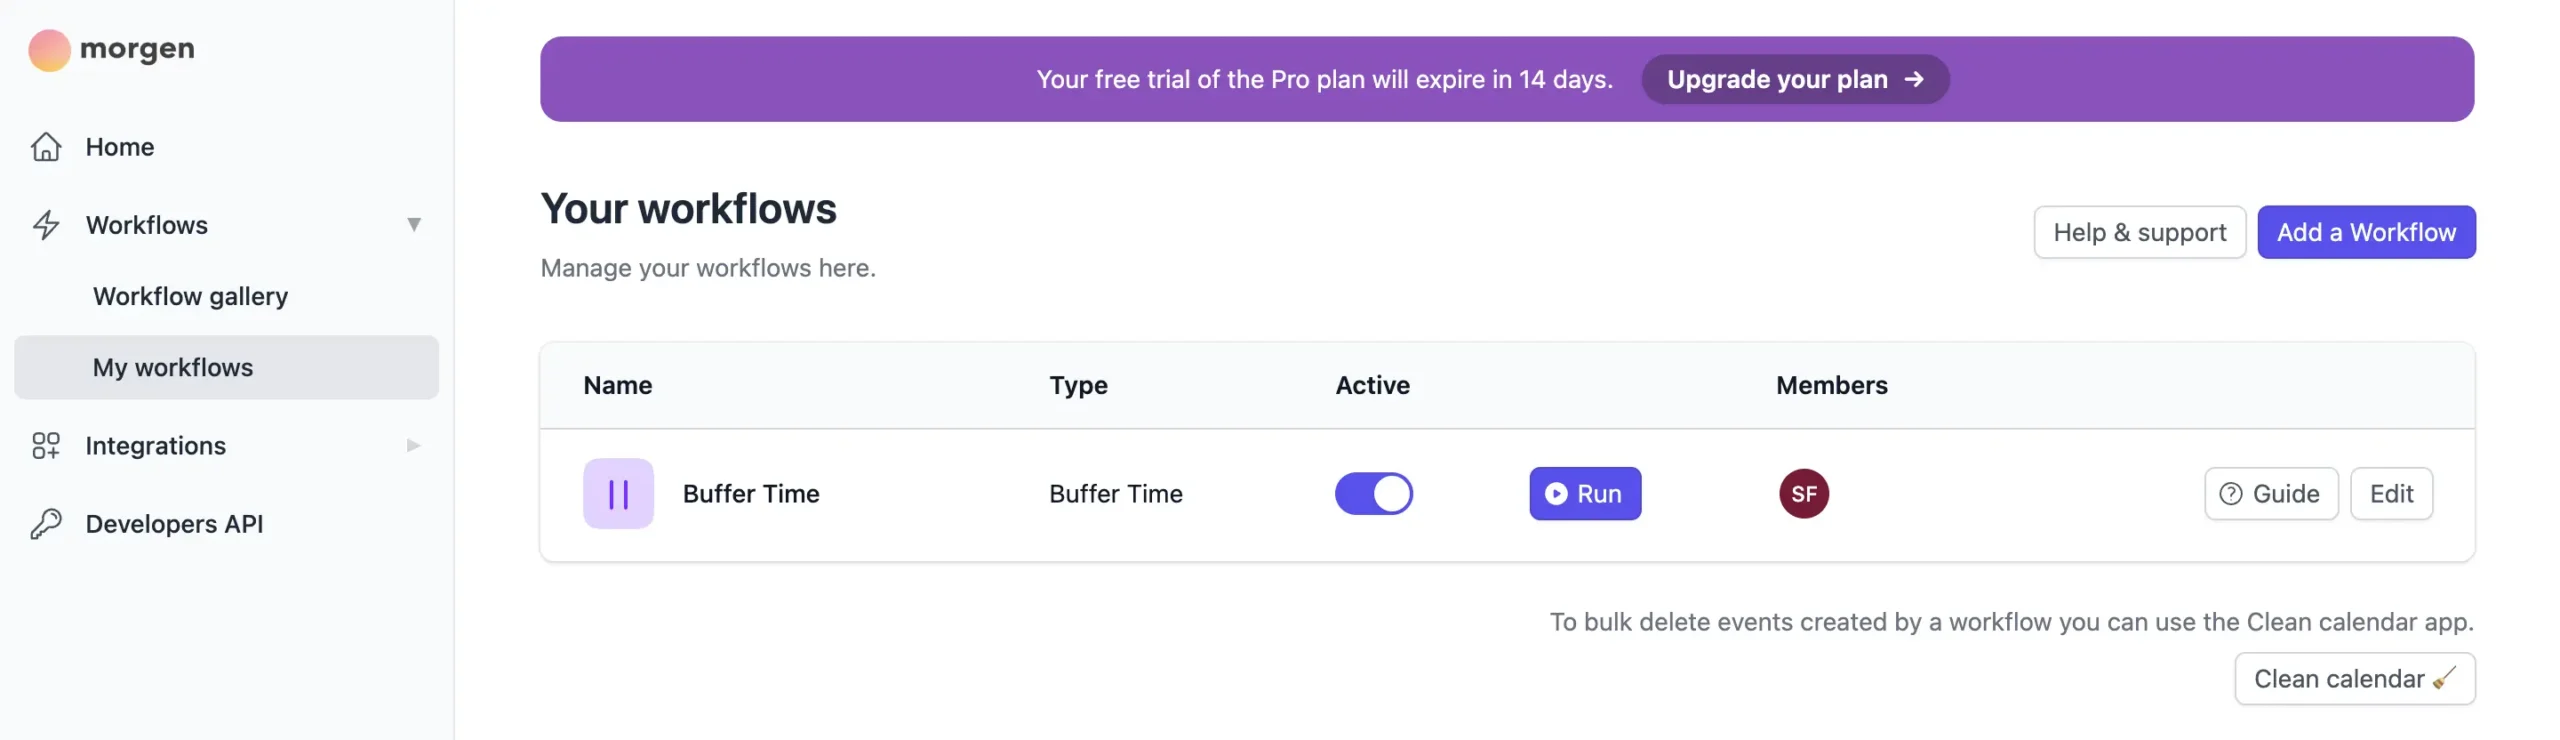
To access Workflows, click “Morgen Workflows” in the left sidebar. That opens a web page in your browser where you manage everything.
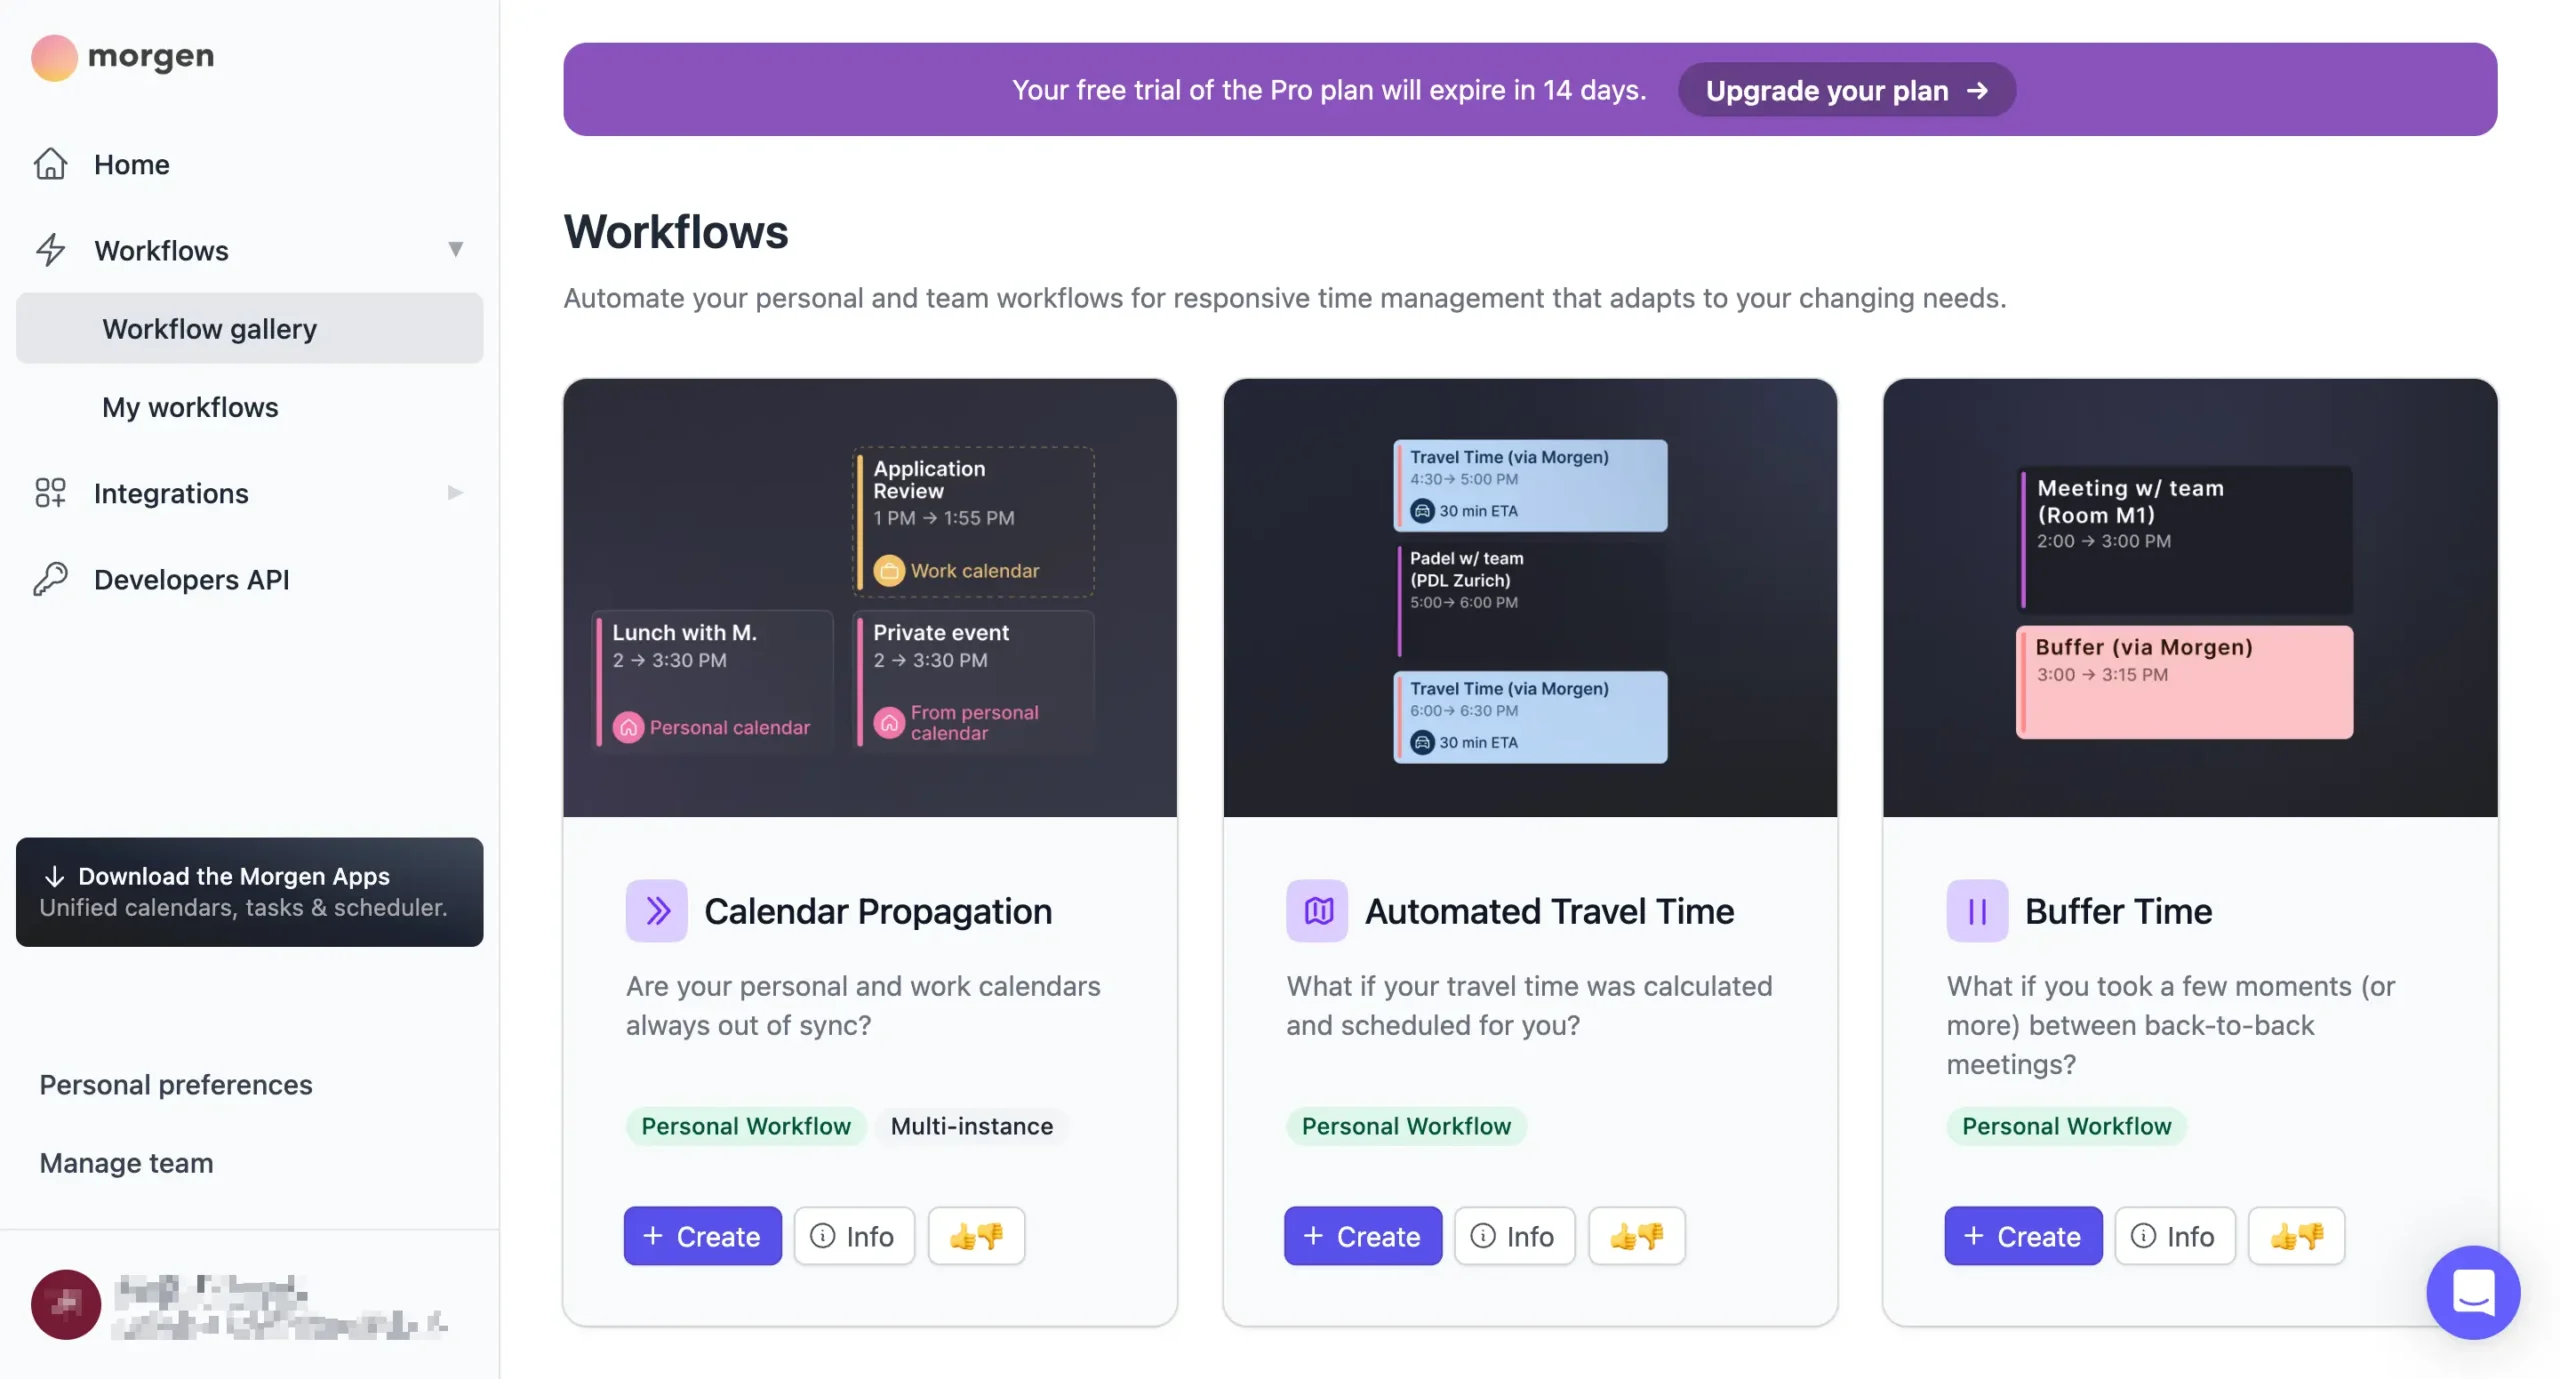
The setup is straightforward. Click “Create” on any workflow card, fill in a few settings, and it starts running.
Let me show you how “Buffer Time” works since I tested it most thoroughly.

Buffer Time came from Reclaim.ai originally (as far as I know). Simple idea. Powerful results.
It schedules extra time before or after meetings. So you can grab coffee, stretch, and mentally switch context from one meeting topic to the next.
The buffer slots are linked to events – if the event moves, the buffer moves with it. If the event gets canceled, the buffer disappears.
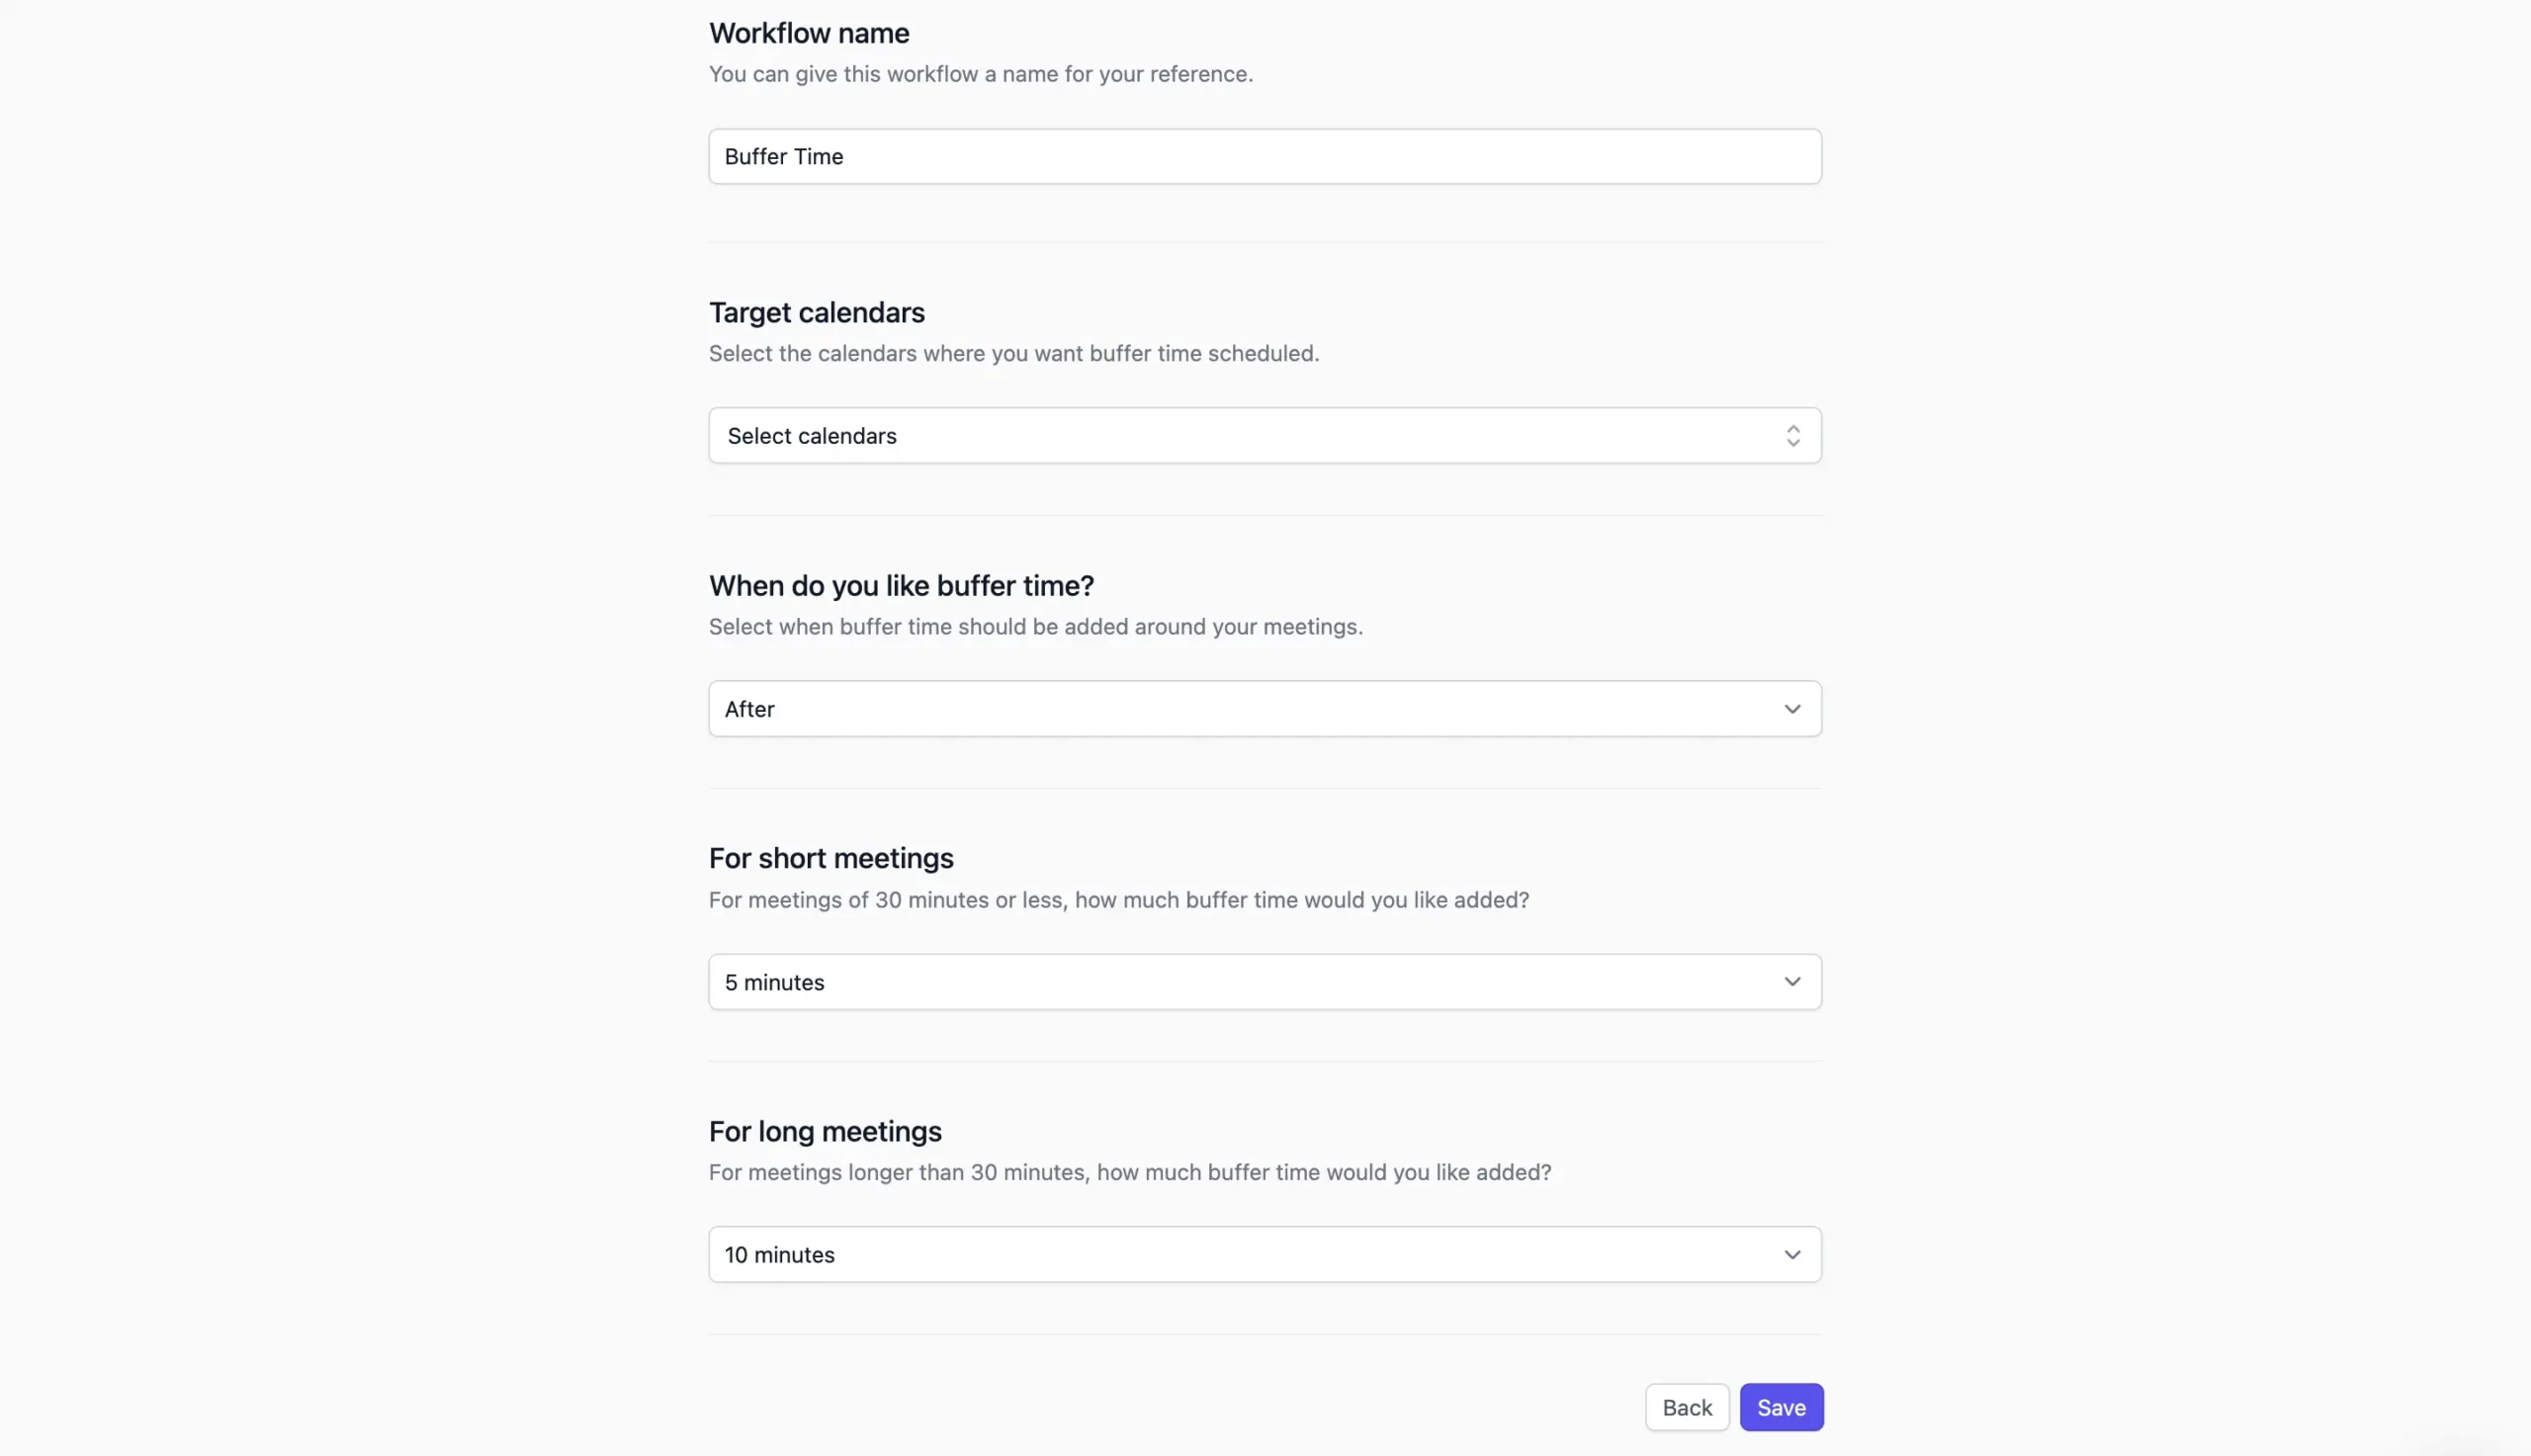
Click “Create” on the Buffer Time card. Morgen asks for a few details:
I set mine to add 5 minutes after short meetings and 10 minutes after long meetings.
Click “Save,” and the workflow activates.
Here’s what matters: Buffer time only gets added around meetings with other people. At least one other person needs to be on the invite.
Solo calendar blocks don’t trigger it. Makes sense. You don’t need buffer time between tasks you’re controlling yourself.
Once the workflow runs, you’ll see buffer blocks appear on your calendar. They’re marked as “busy” so people can’t book over them when they use your scheduling link.

Sometimes there’s a short delay between creating a meeting and seeing the buffer appear. Refresh your calendar if it doesn’t show up immediately.
The “Automated Travel Time” workflow works similarly but uses Google Maps data.
I found this genuinely useful. I scheduled a meeting across town and forgot to account for the commute. Morgen caught it and blocked an extra 45 minutes before the meeting. Saved me from being late.
“Calendar Propagation” is the third workflow. It copies events from one calendar to another.
Useful if you want your work calendar to show you’re busy during personal appointments without revealing what those appointments are. Or vice versa.
That’s it. Three workflows. All of them run continuously once you activate them.
Morgen is building more. They have a “Coming Soon” section showing what’s in development:
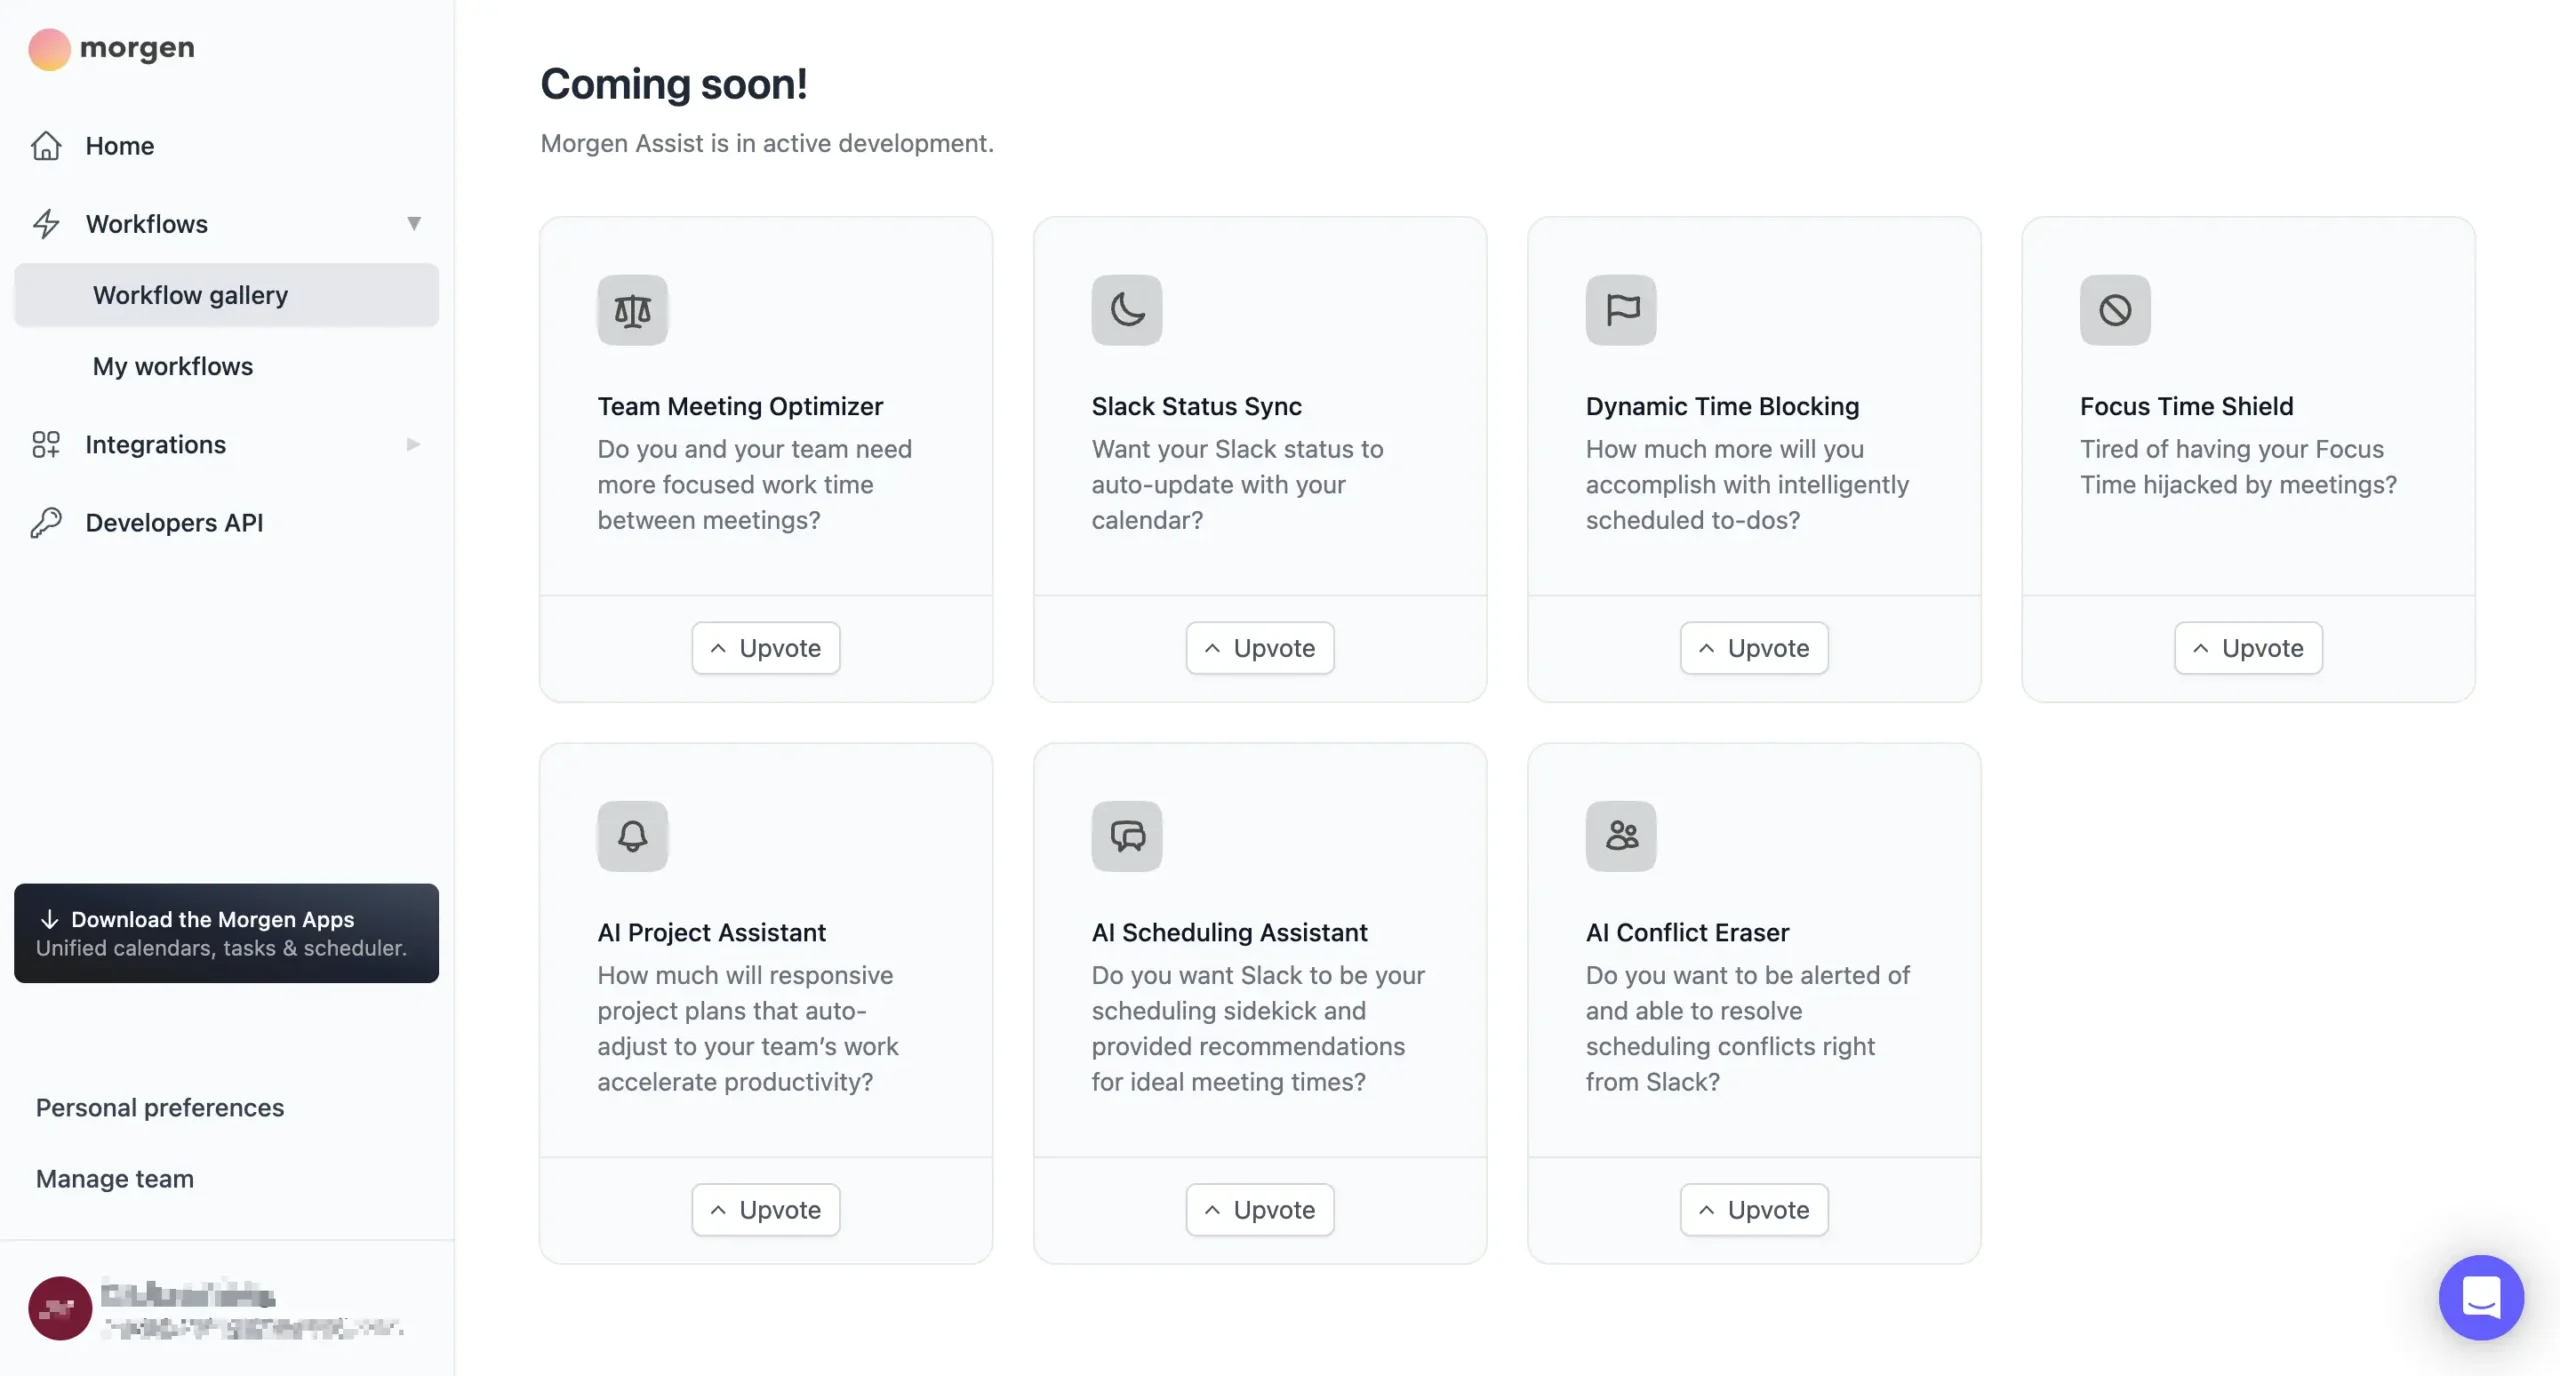
You can upvote workflows you want to see sooner. Whether that actually influences their development timeline, I don’t know. But it’s there.
Workflows aren’t revolutionary.
But they handle the small administrative tasks that accumulate throughout the week. Adding buffer time manually takes 30 seconds per meeting. Do that 15 times a week, and you’ve spent 7-8 minutes on pure administrative overhead.
The workflows eliminate that.
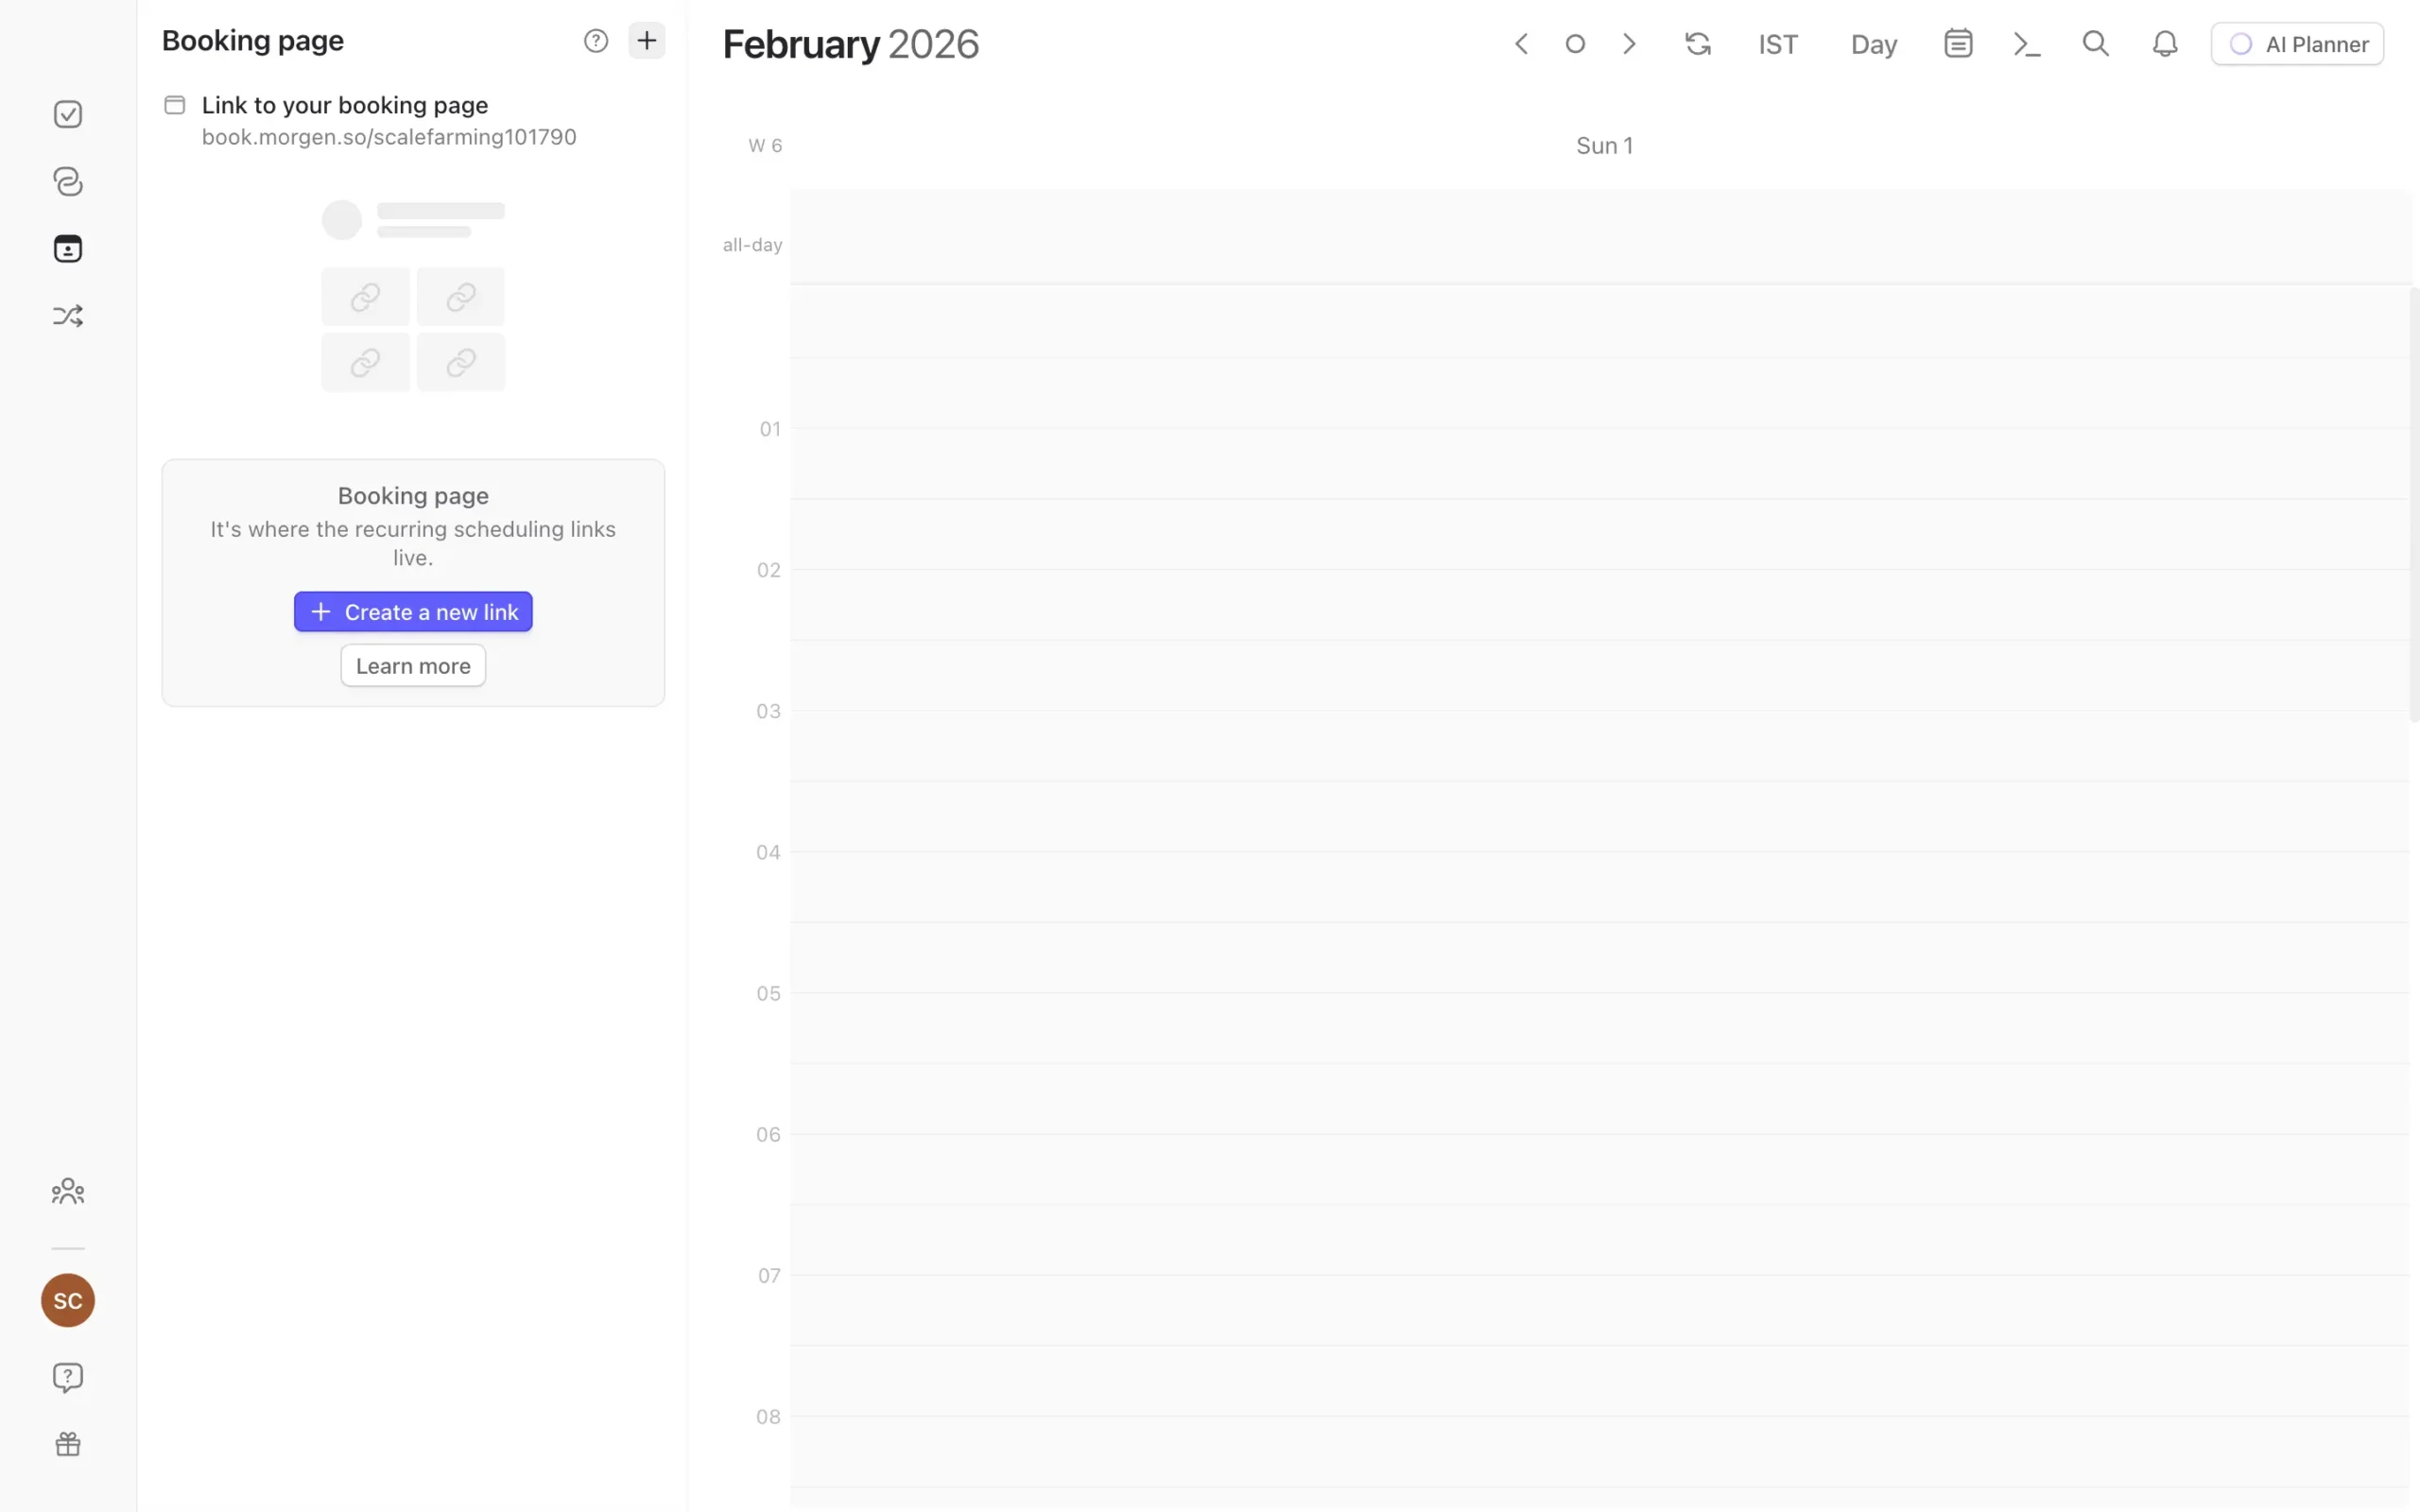
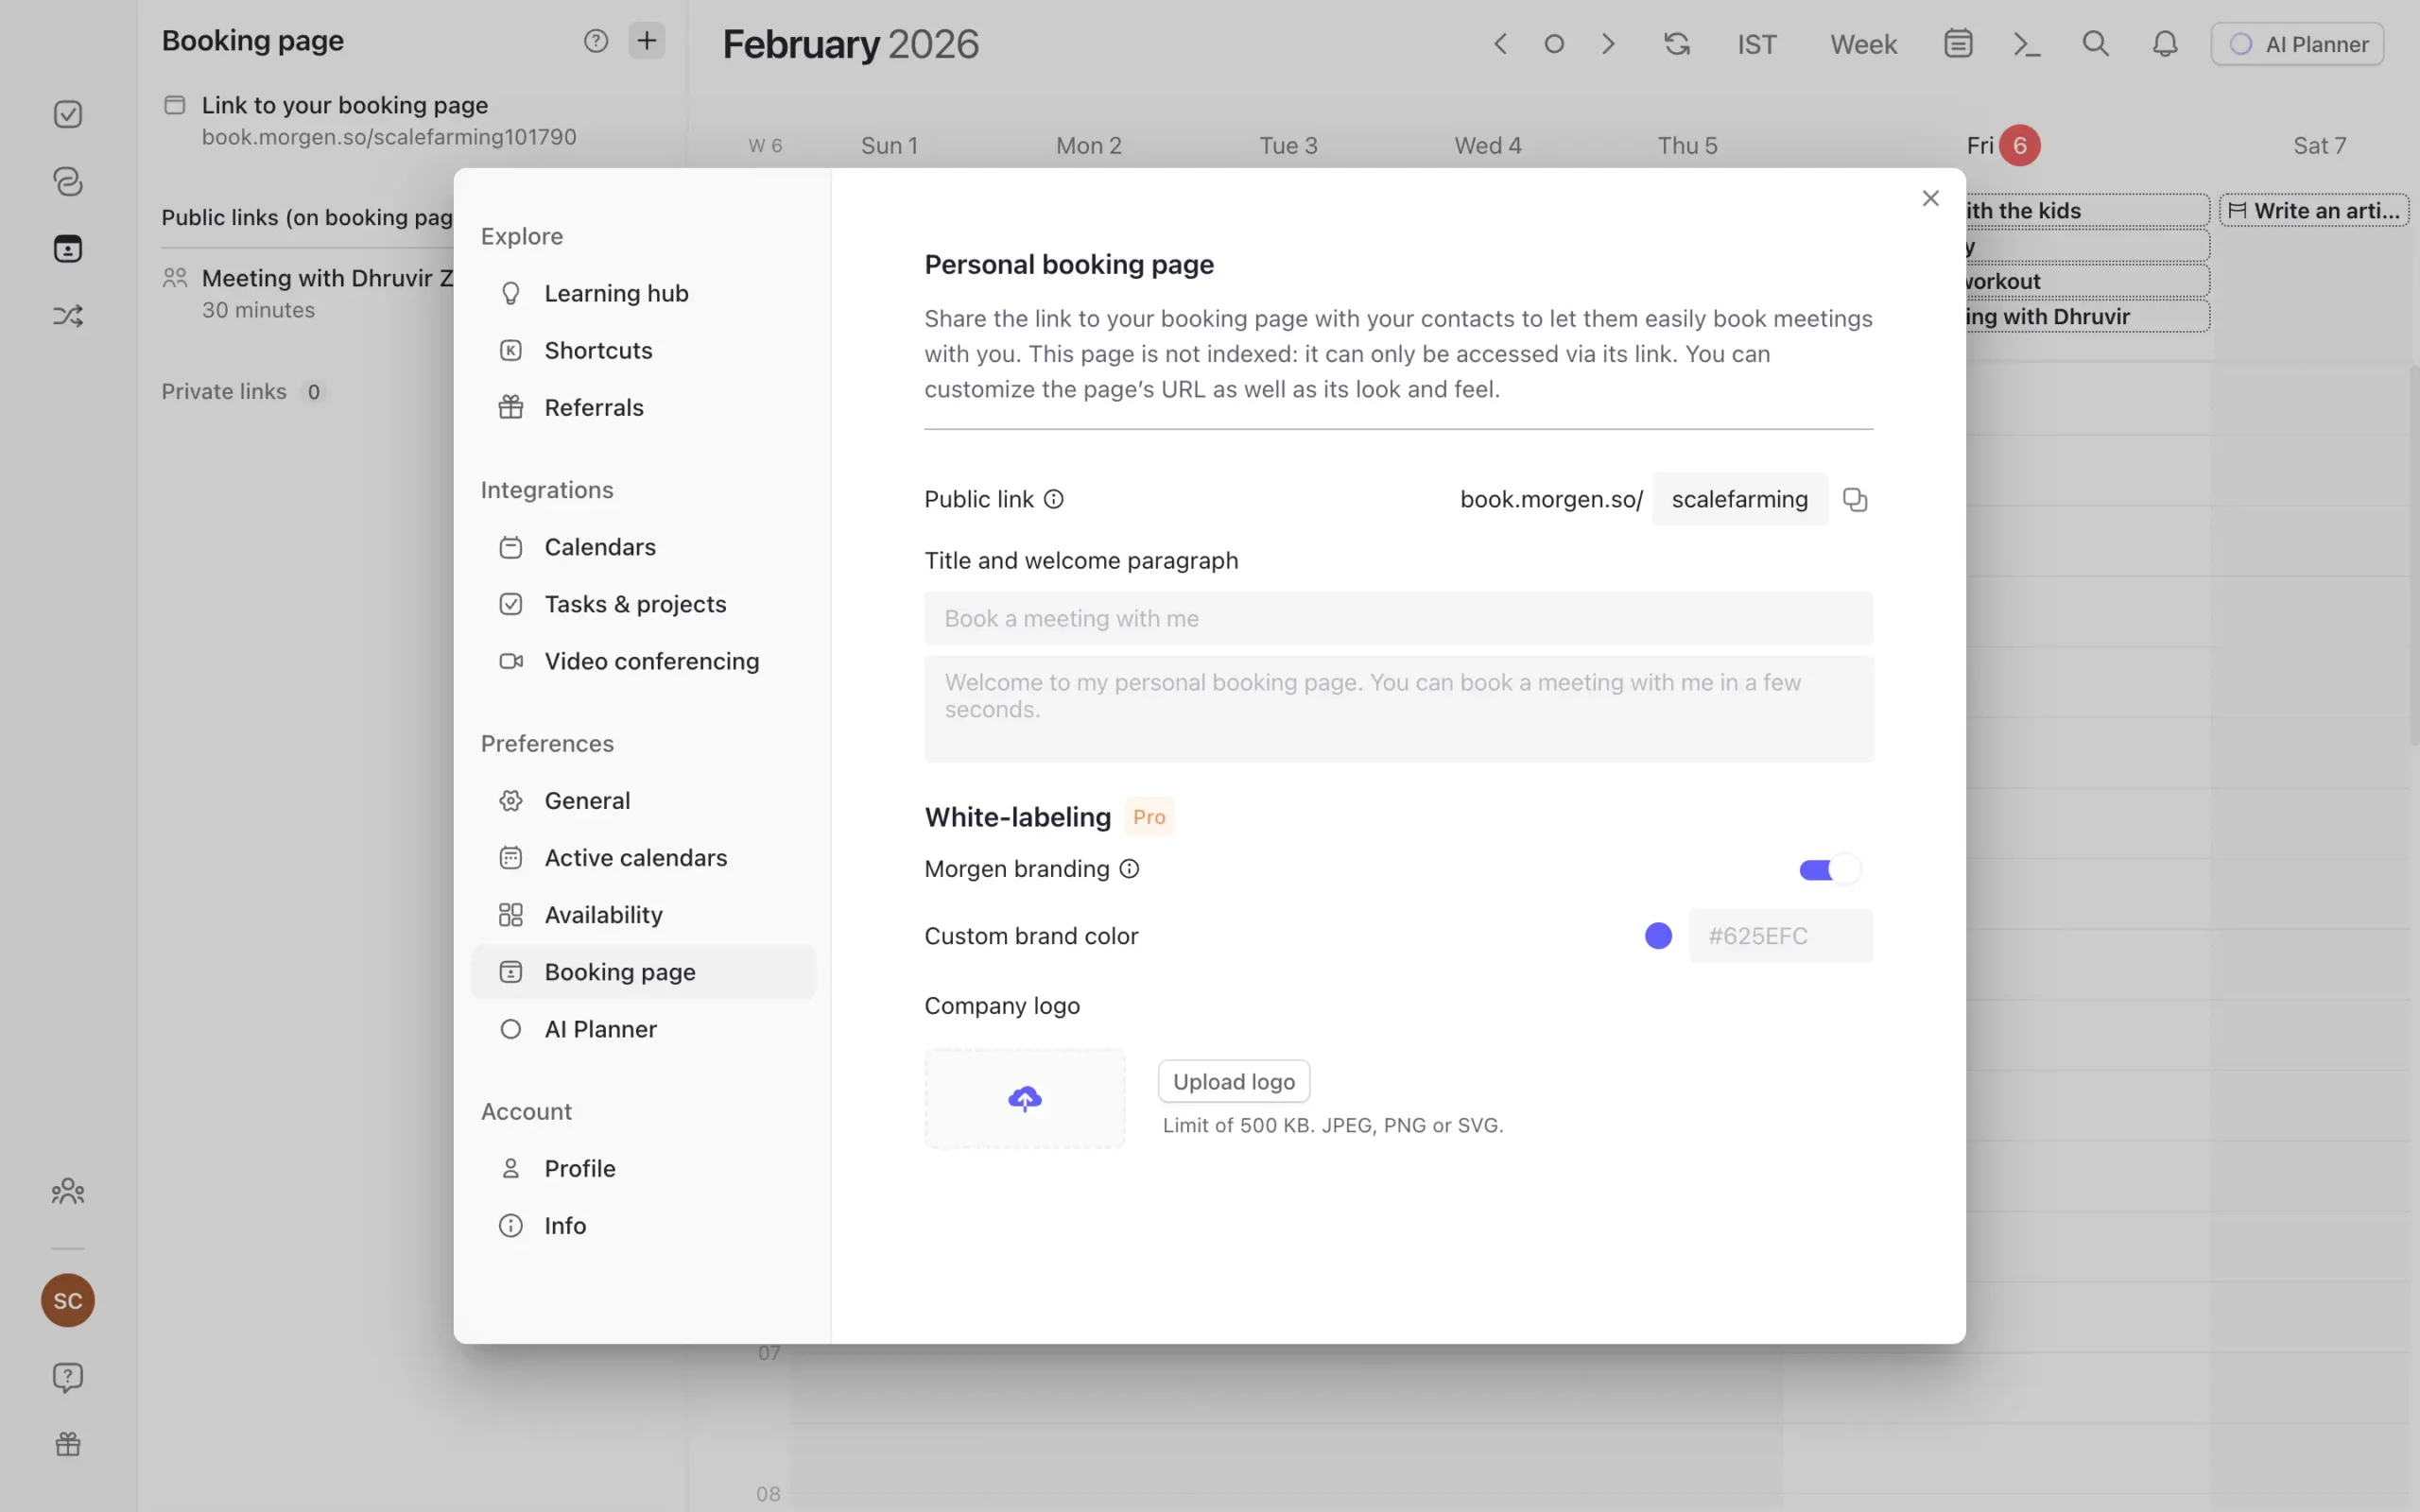
Built-in scheduling replaces your Calendly subscription
Some calendar apps make you pay extra for meeting scheduling. Calendly costs $12 per month. Cal.com is $15. Morgen includes it with Pro.
Click the Booking Page icon in the left sidebar. You get a URL. Share it, and people can book time based on your actual availability.
Morgen gives you two scheduling options: Open Invites and Scheduling Links.
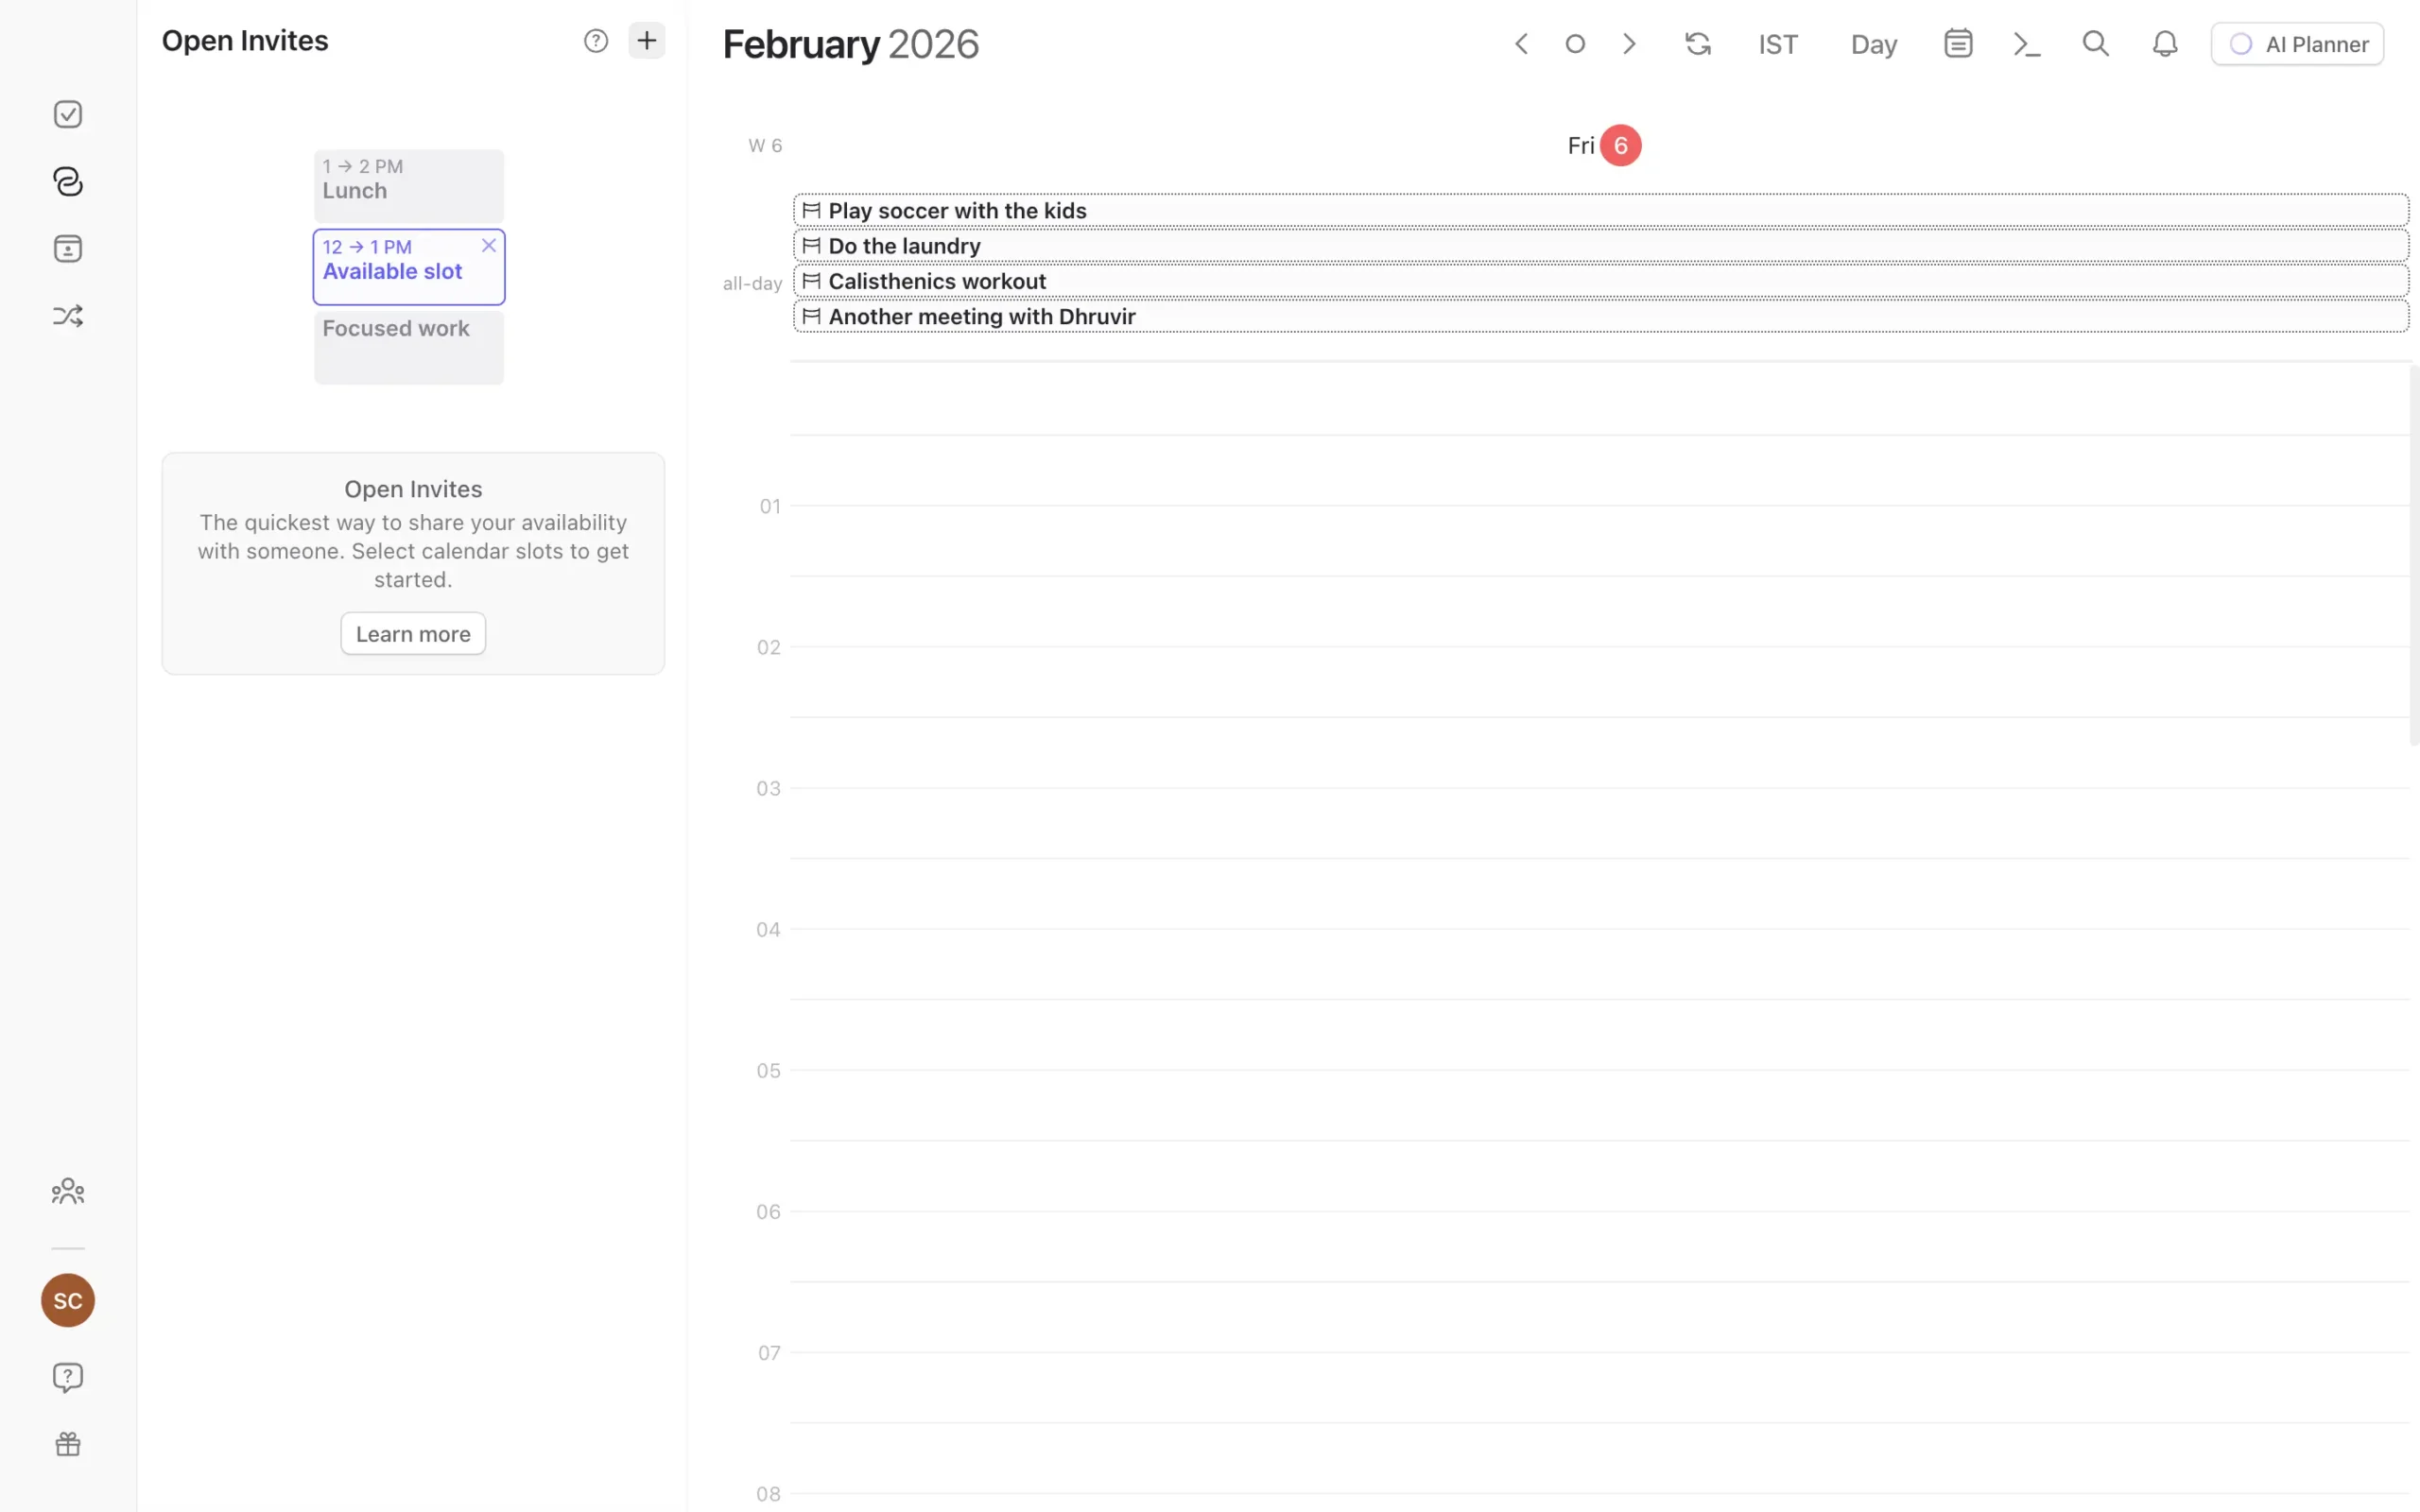
From the Booking Page tab, click the ‘+’ button.
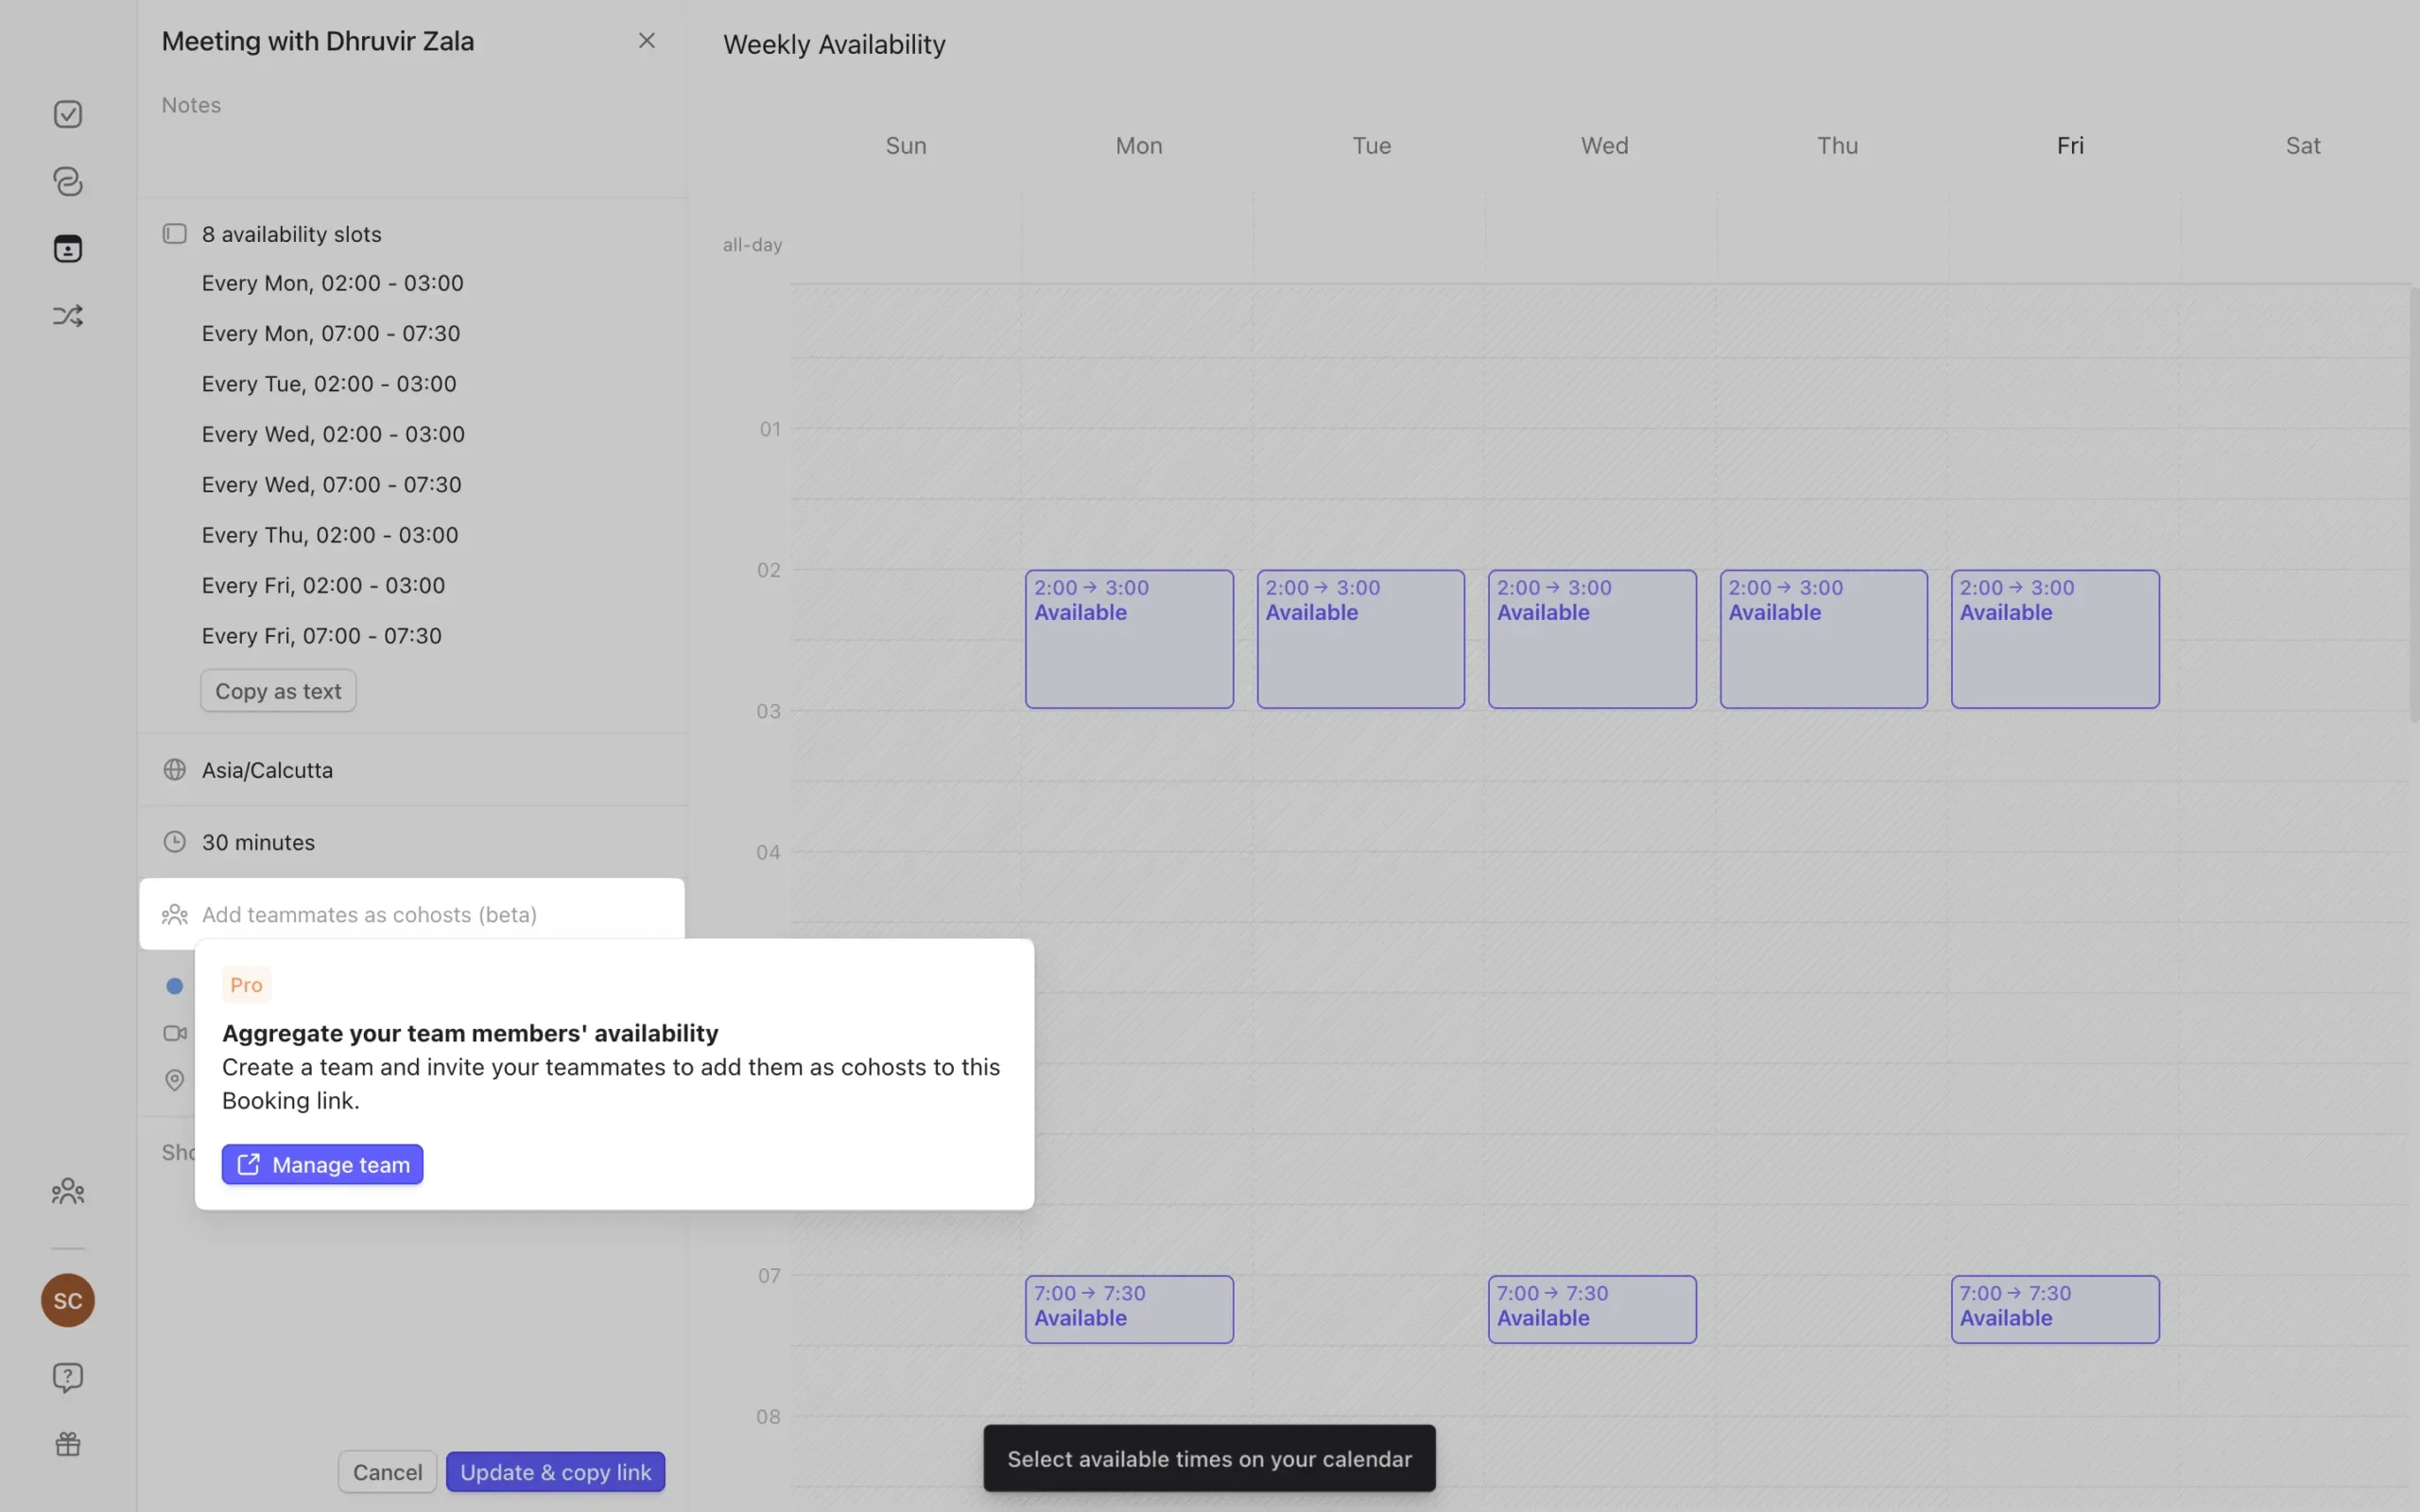
Name it. Set duration. Then select your recurring availability pattern—not specific dates, but a template. “Every Tuesday 2-5 PM” or “Weekdays 9-11 AM.”
Drag across the blank calendar grid to mark those time blocks. Add buffer time. Pick your video tool. Customize the URL.
Click “Create & Copy Link.”
Now you can either share the link directly or let it appear on your Booking Page—a single URL showing all your scheduling options at once.
To customize your Booking Page, click the three dots next to your URL, then “Customize Booking Page.” Add a title, message, logo, and brand color. Turn off Morgen branding if you want.
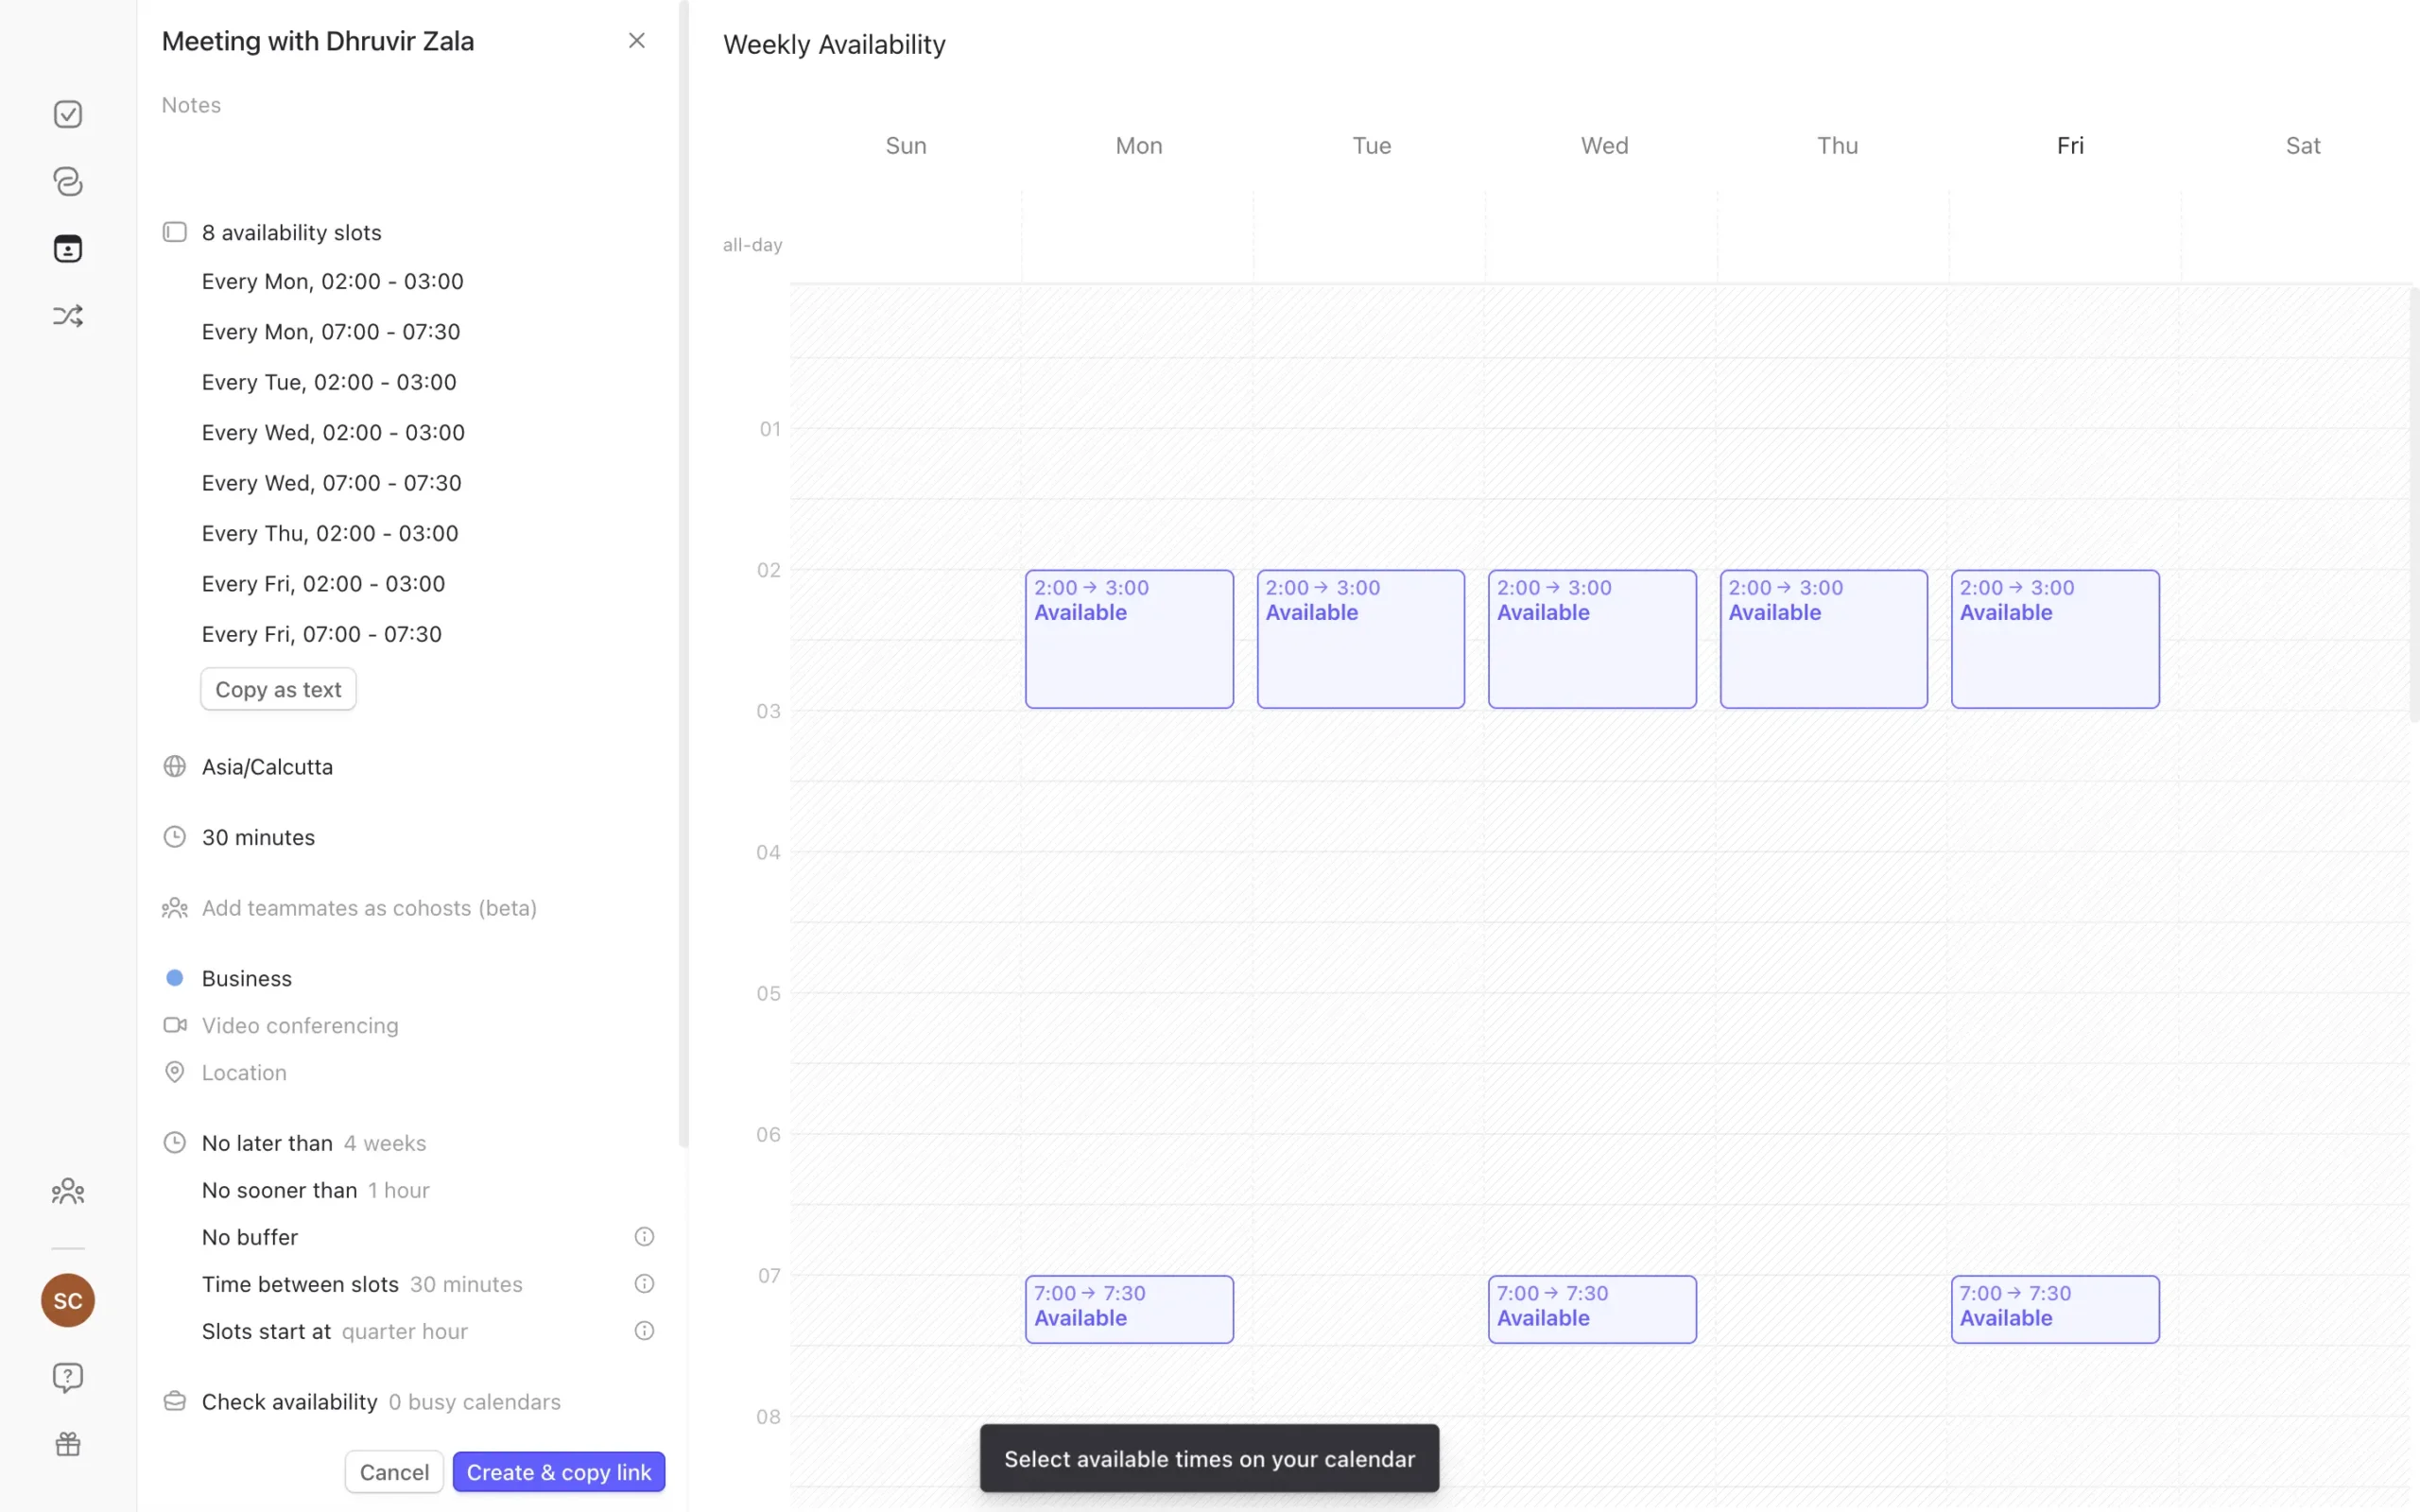
Here’s what matters: Morgen checks your availability in real time across all calendars you designate as “Busy Calendars.”
Go to Settings → Preferences → Availability.
Select which calendars to check before showing availability. Include personal calendars, work calendars, subscriptions—whatever. Morgen won’t show event details to anyone. It just marks those times as busy.
This prevents double-bookings across your entire life. Dentist appointment on personal calendar? Work meeting slots won’t overlap with it.
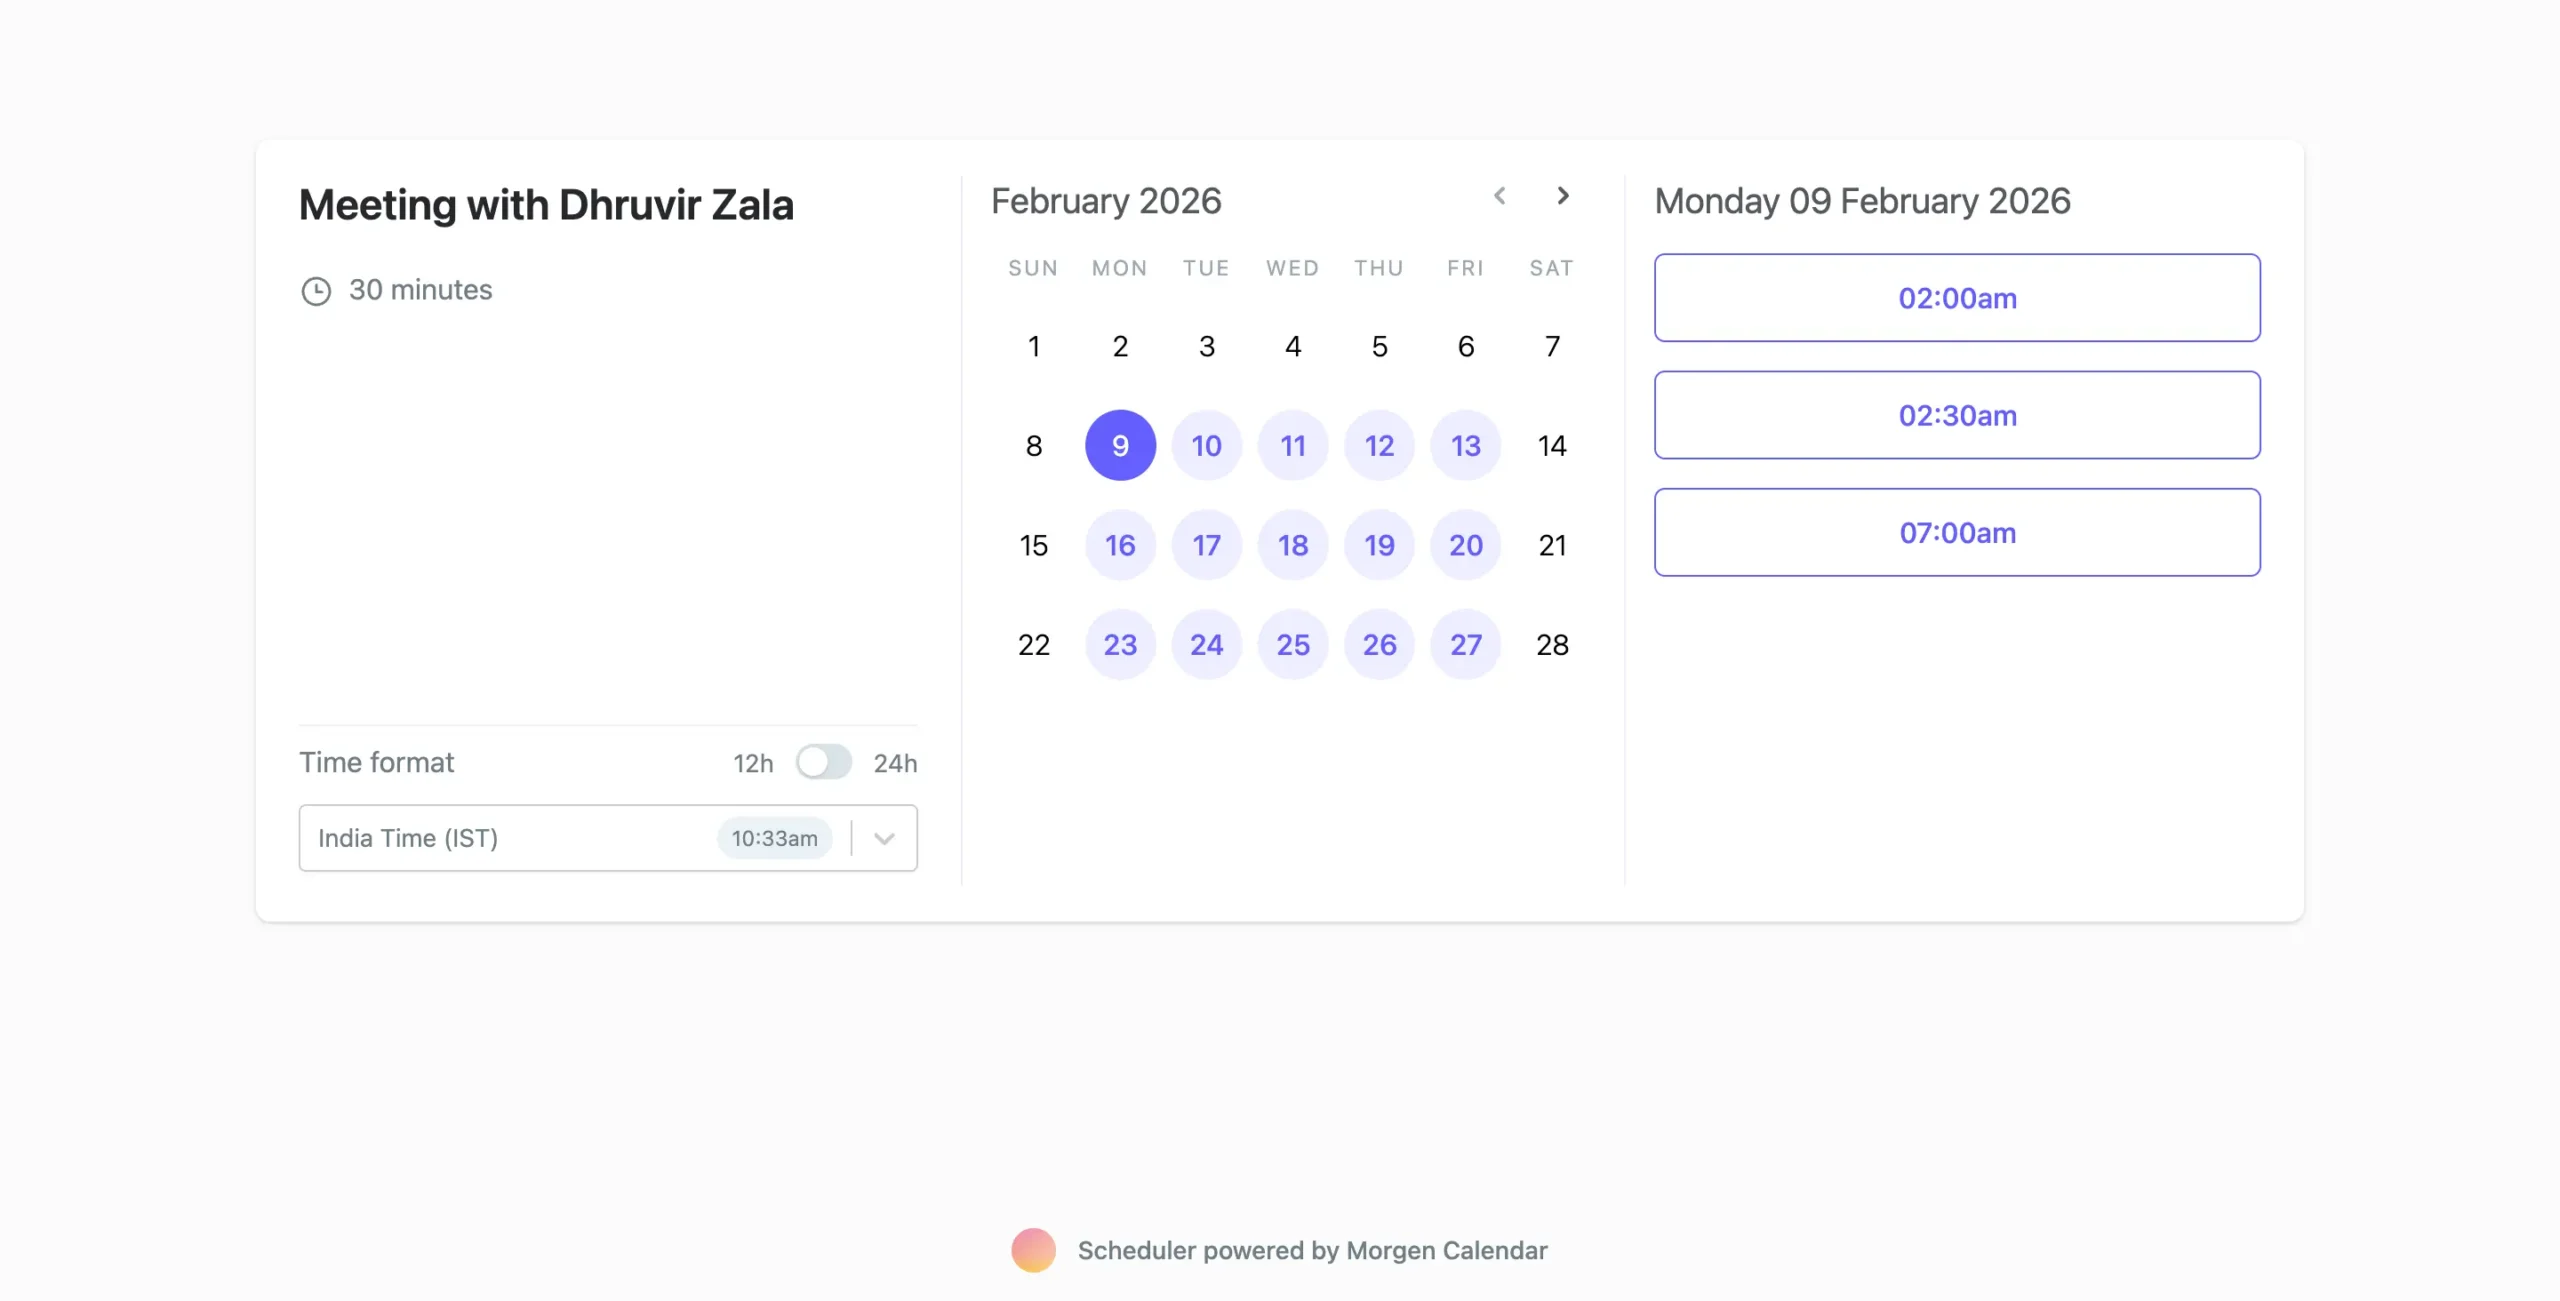
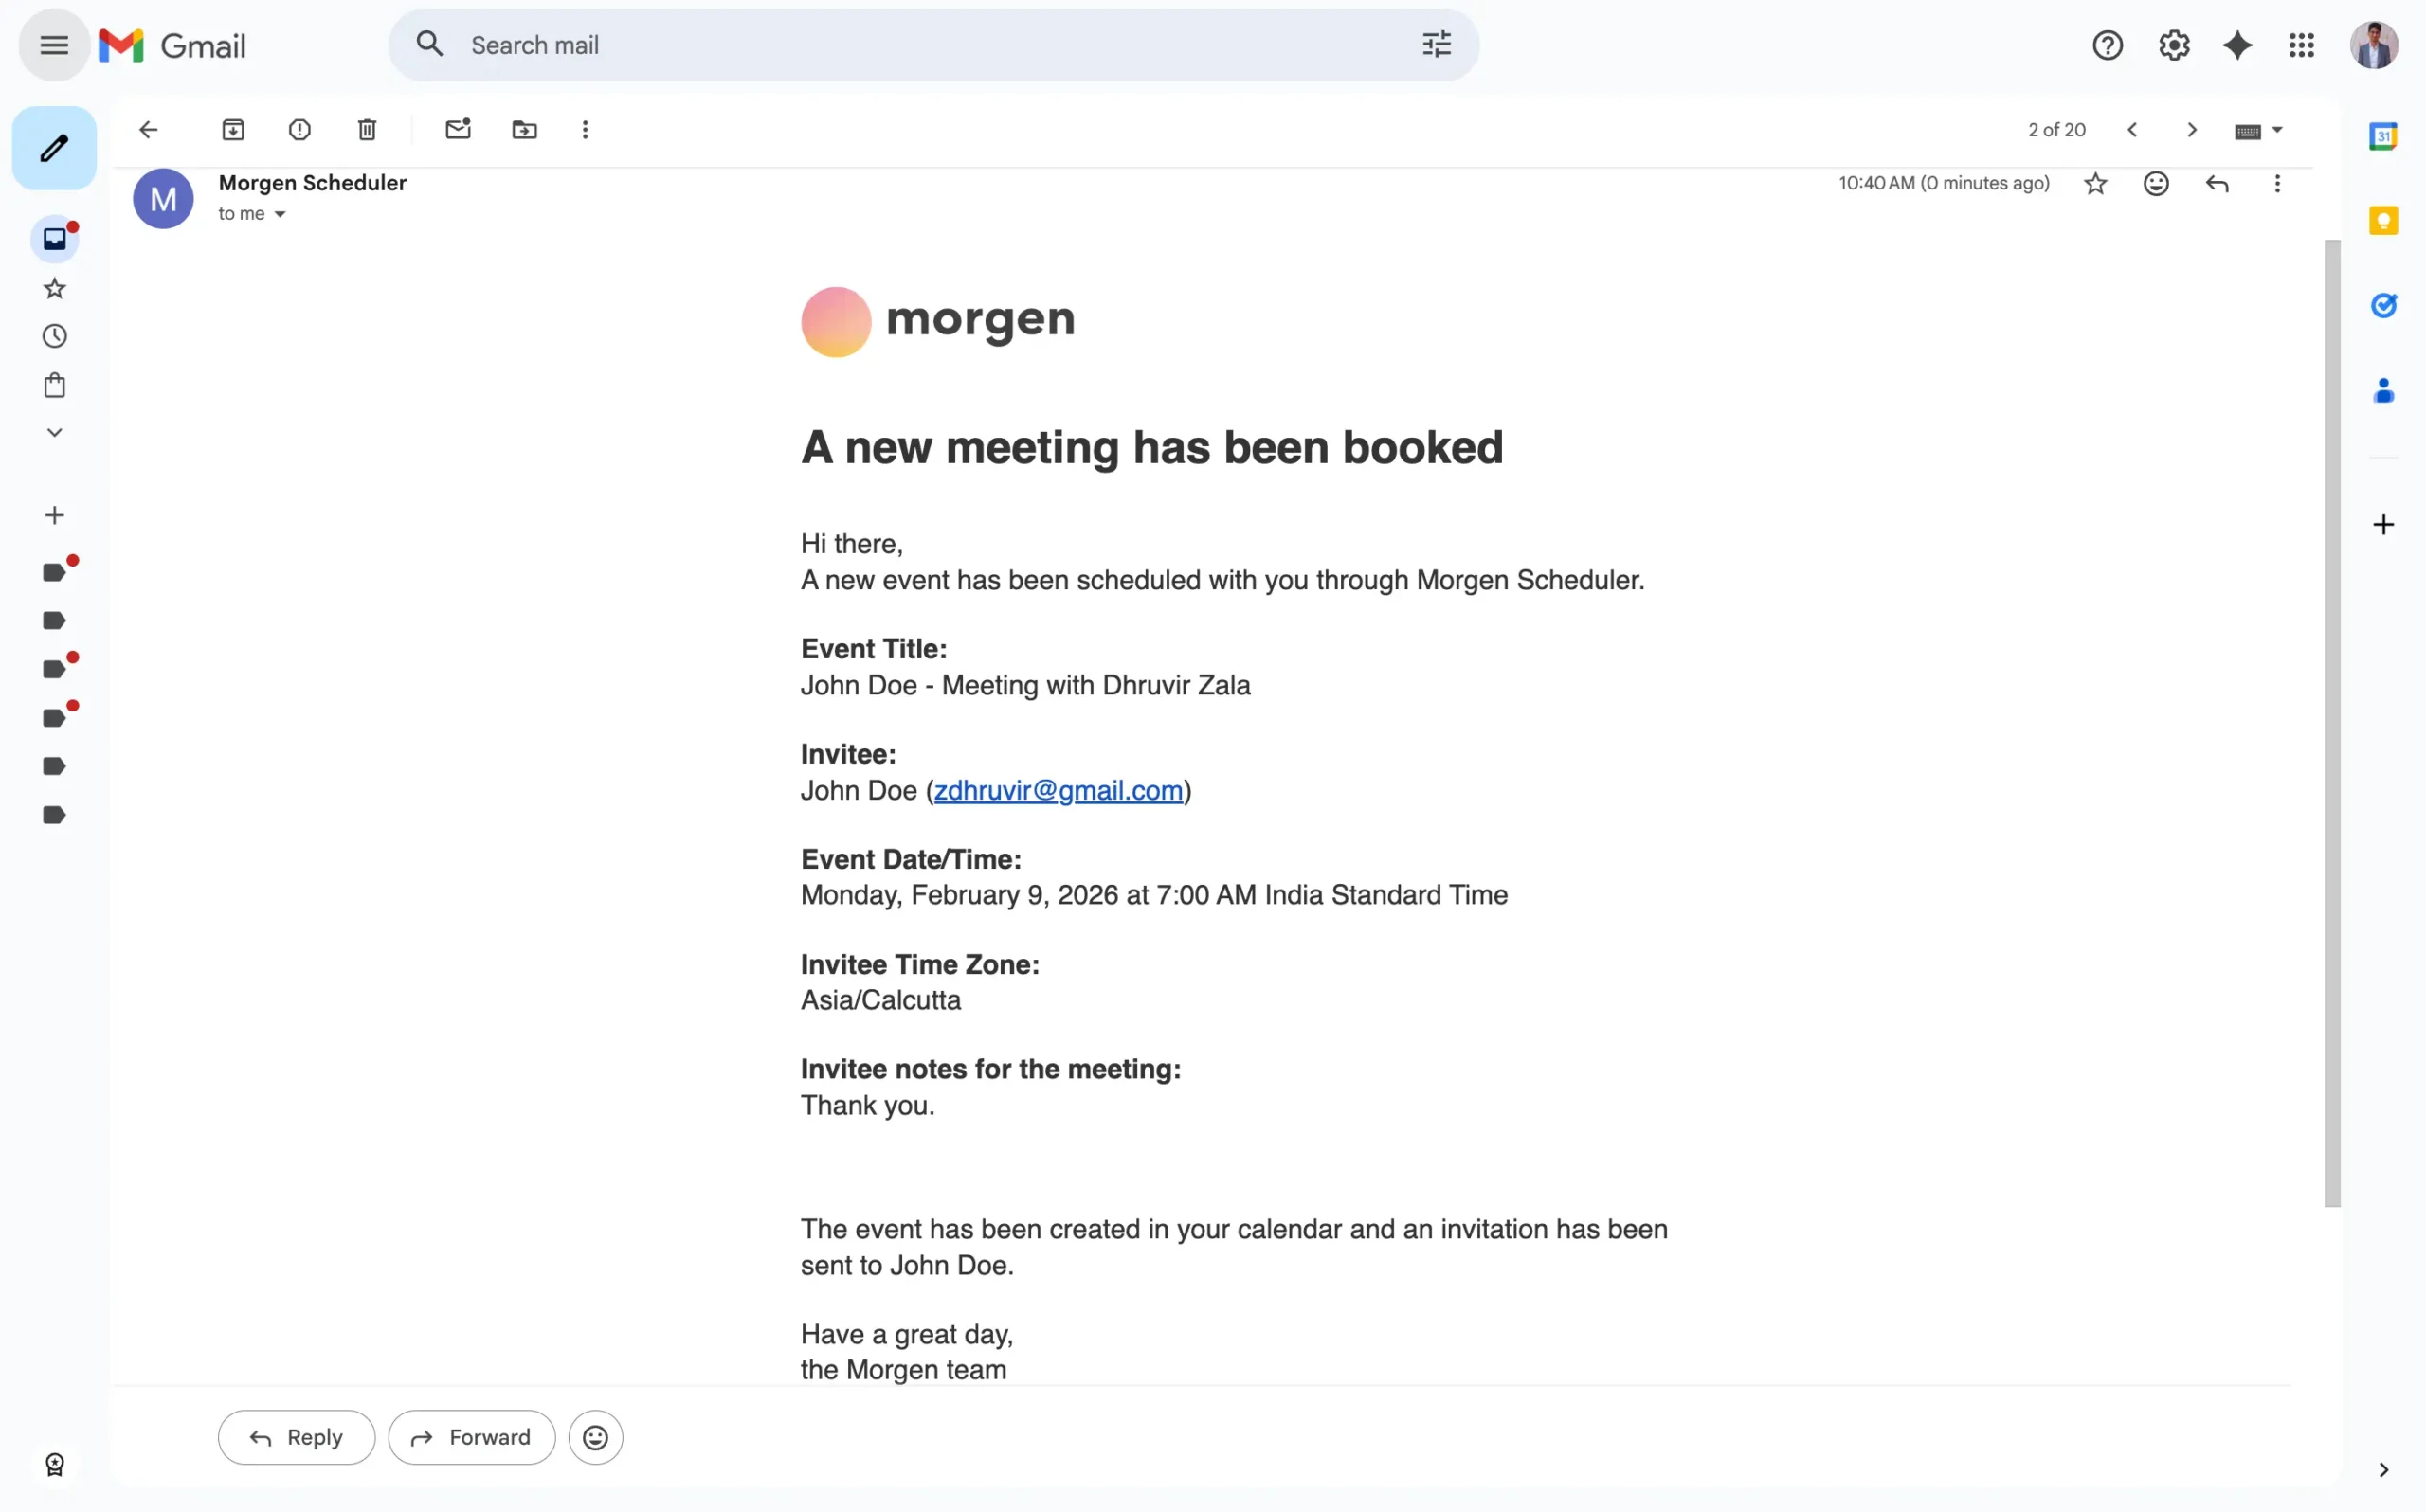
When someone books, they see highlighted days with available slots. Pick a day, pick a time, enter name and email, and optional notes. Click Confirm.
Morgen sends confirmation emails. Meeting appears in both calendars. Automatic timezone detection shows times in each person’s local timezone.
You can create multi-person scheduling links, too.
Useful when multiple team members need to attend. Add co-hosts. Morgen checks everyone’s availability and only shows times when all required attendees are free.
If your needs are simple—and most people’s are—Morgen’s scheduling works well and costs nothing extra beyond Pro.
Mobile app works well for on-the-go scheduling needs
I tested Morgen’s mobile app on my iPhone 14 Pro, expecting the usual disappointment. Instead, I found myself actually using it throughout the day.
The setup has one catch: you need to configure everything on the desktop first. The mobile app won’t even let you log in until you’ve set up your account on the web or desktop app.
Once you’re past that, the mobile experience is solid.
The calendar view is clean. No cramped grid trying to fit too much information. Scroll through days, weeks, or month views without lag.
Creating tasks and events on mobile works the same as on a desktop. Tap the blue ‘+’ button at the bottom. Create a new task, event, or routine.
The view options menu gives you surprising control for a mobile app.
Switch between day, three days, week, or agenda view. Toggle weekend visibility. Show or hide completed tasks. Change which calendars are visible.
Morgen’s task integrations work on mobile, too (except those that are desktop-only, like Obsidian).
The preferences panel on mobile is more comprehensive than most apps.
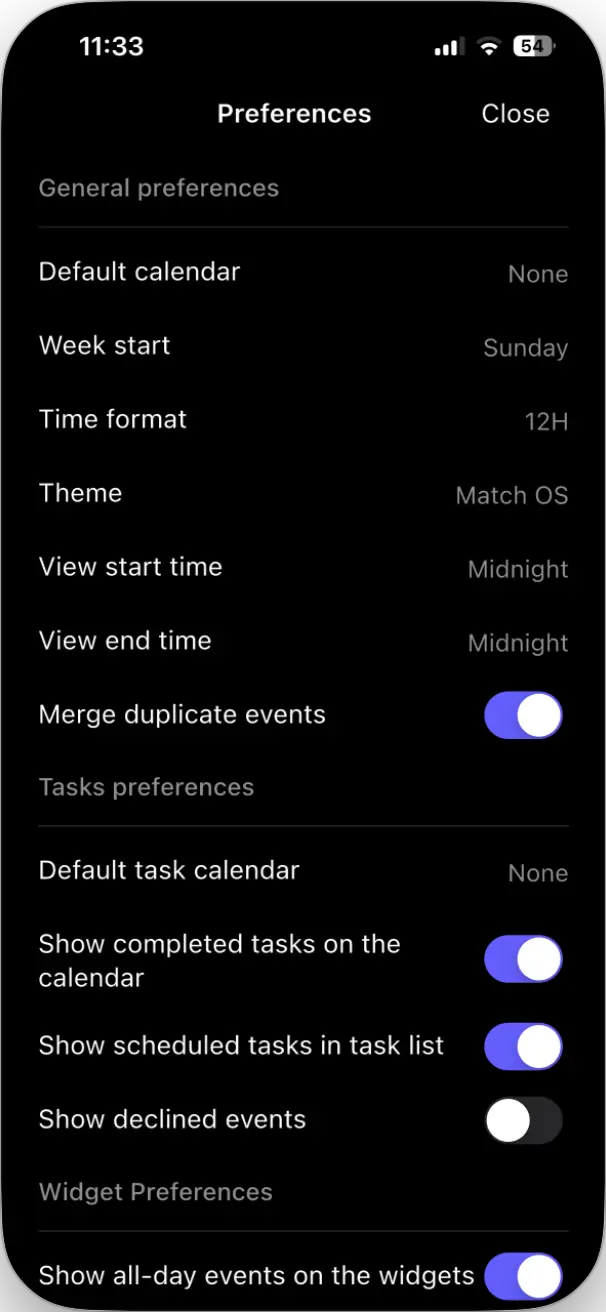
Default calendar, week start day, time format, theme, whether to merge duplicate events, task calendar settings, widget preferences—it’s all there.
What makes Morgen’s mobile app work is that it doesn’t try to cram the full desktop experience into a phone screen.
It focuses on what you actually need when you’re mobile: checking your schedule, creating quick tasks or events, and viewing what’s coming up next.
The widgets are worth enabling.
Go to your iPhone home screen, long-press to enter edit mode, tap the ‘+’ icon, search for Morgen, and you’ll see widget options.

The “Up Next” widget shows your next few tasks and events. You see what’s coming without opening the app.
I have it on my home screen. Glance at my phone, see I have a meeting in 20 minutes. That visual reminder works better than calendar notifications somehow.
The mobile app gets regular updates. I’ve seen minor improvements and bug fixes consistently over the weeks I’ve been testing.
Morgen covers essential integrations, Zapier handles the rest
We’ve already covered most of Morgen’s integrations. Calendar syncing. Task managers. Scheduling links.
But there’s one category worth explaining: video conferencing.
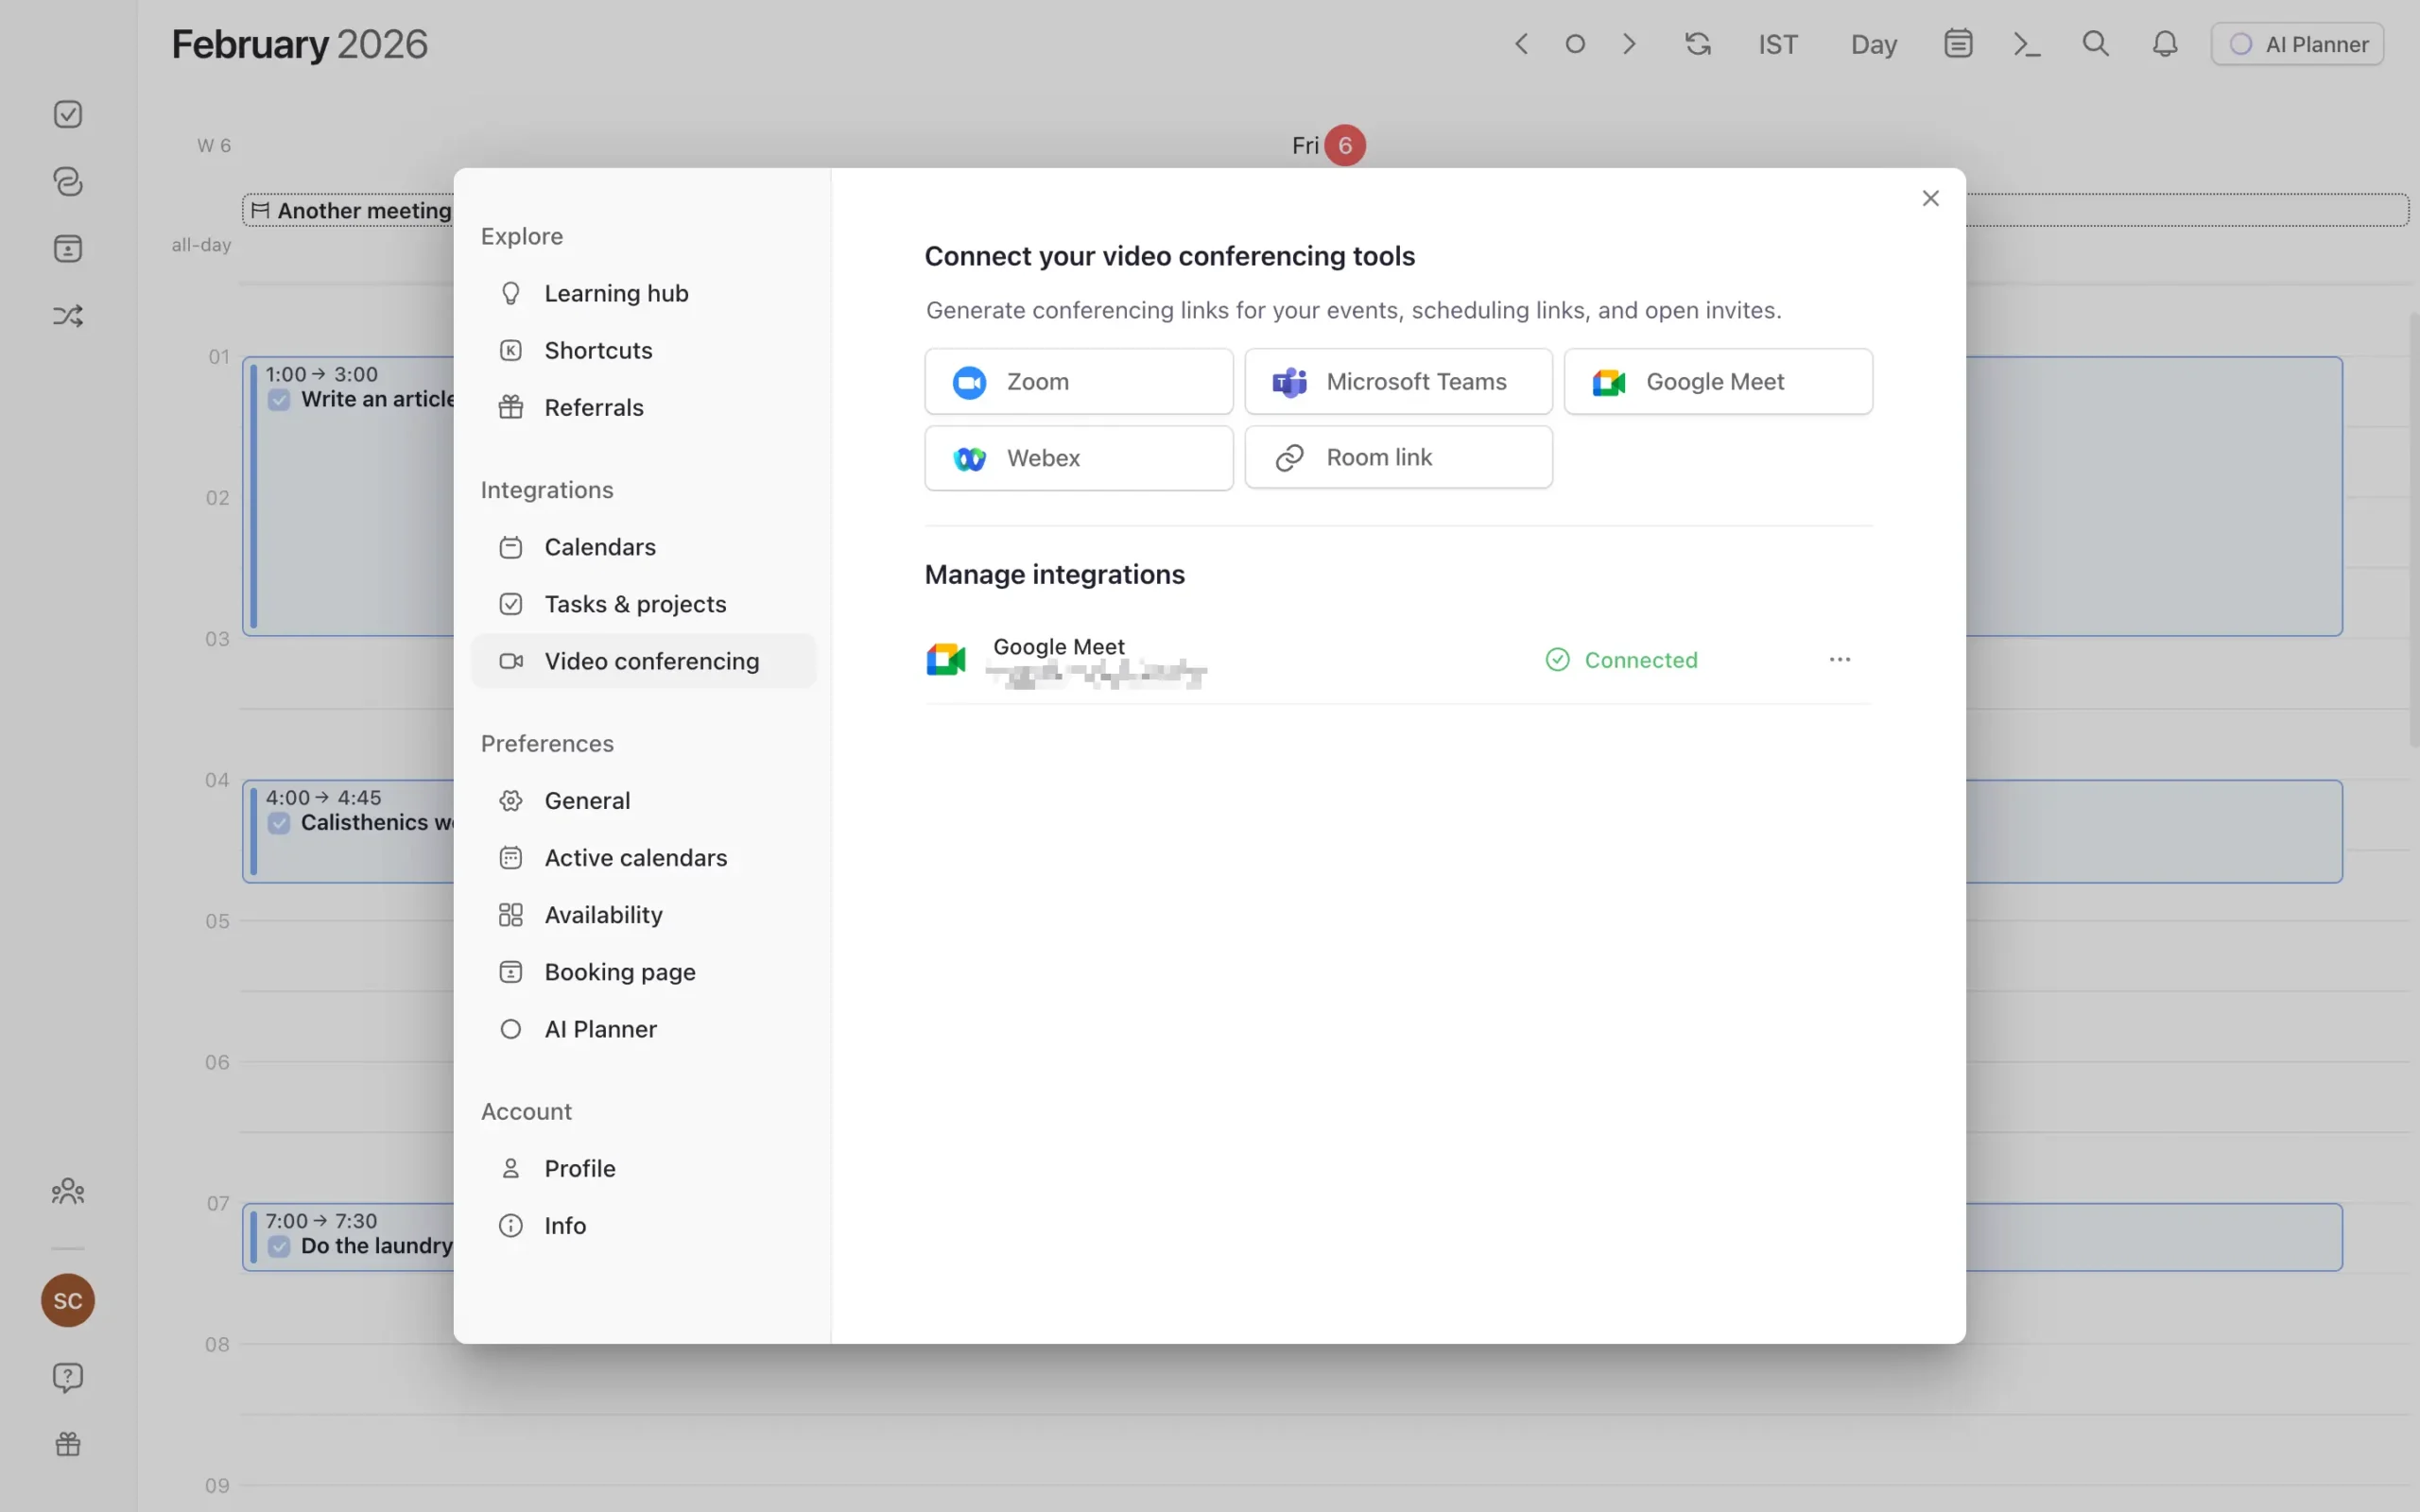
When you create a meeting in Morgen, you can automatically add a video link. Click the video icon during event creation. Pick your tool—Zoom, Google Meet, Microsoft Teams, or Webex.
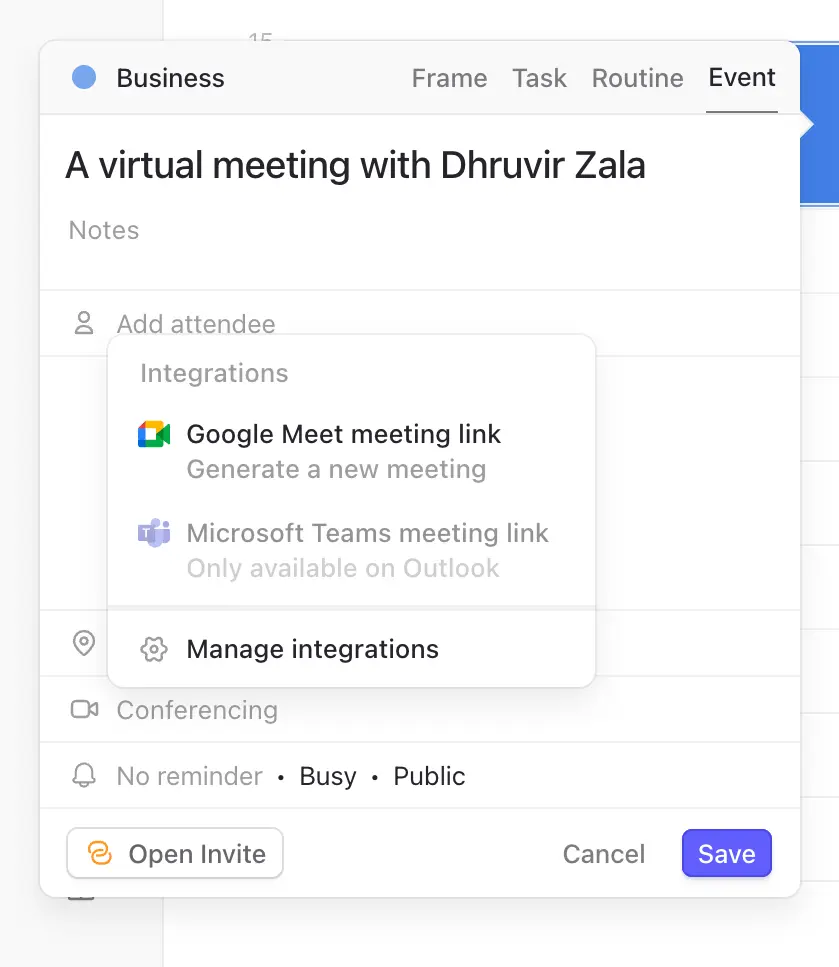
Morgen generates the meeting link and adds it to the event description. Works for your own meetings and for scheduling links.
I tested this with Google Meet. Created a meeting, selected Google Meet, and the link appeared instantly. When the other person got the calendar invite, the Meet link was already there.
The other integration worth knowing about is Zapier.
If Morgen doesn’t natively support a tool you need, Zapier probably connects it.
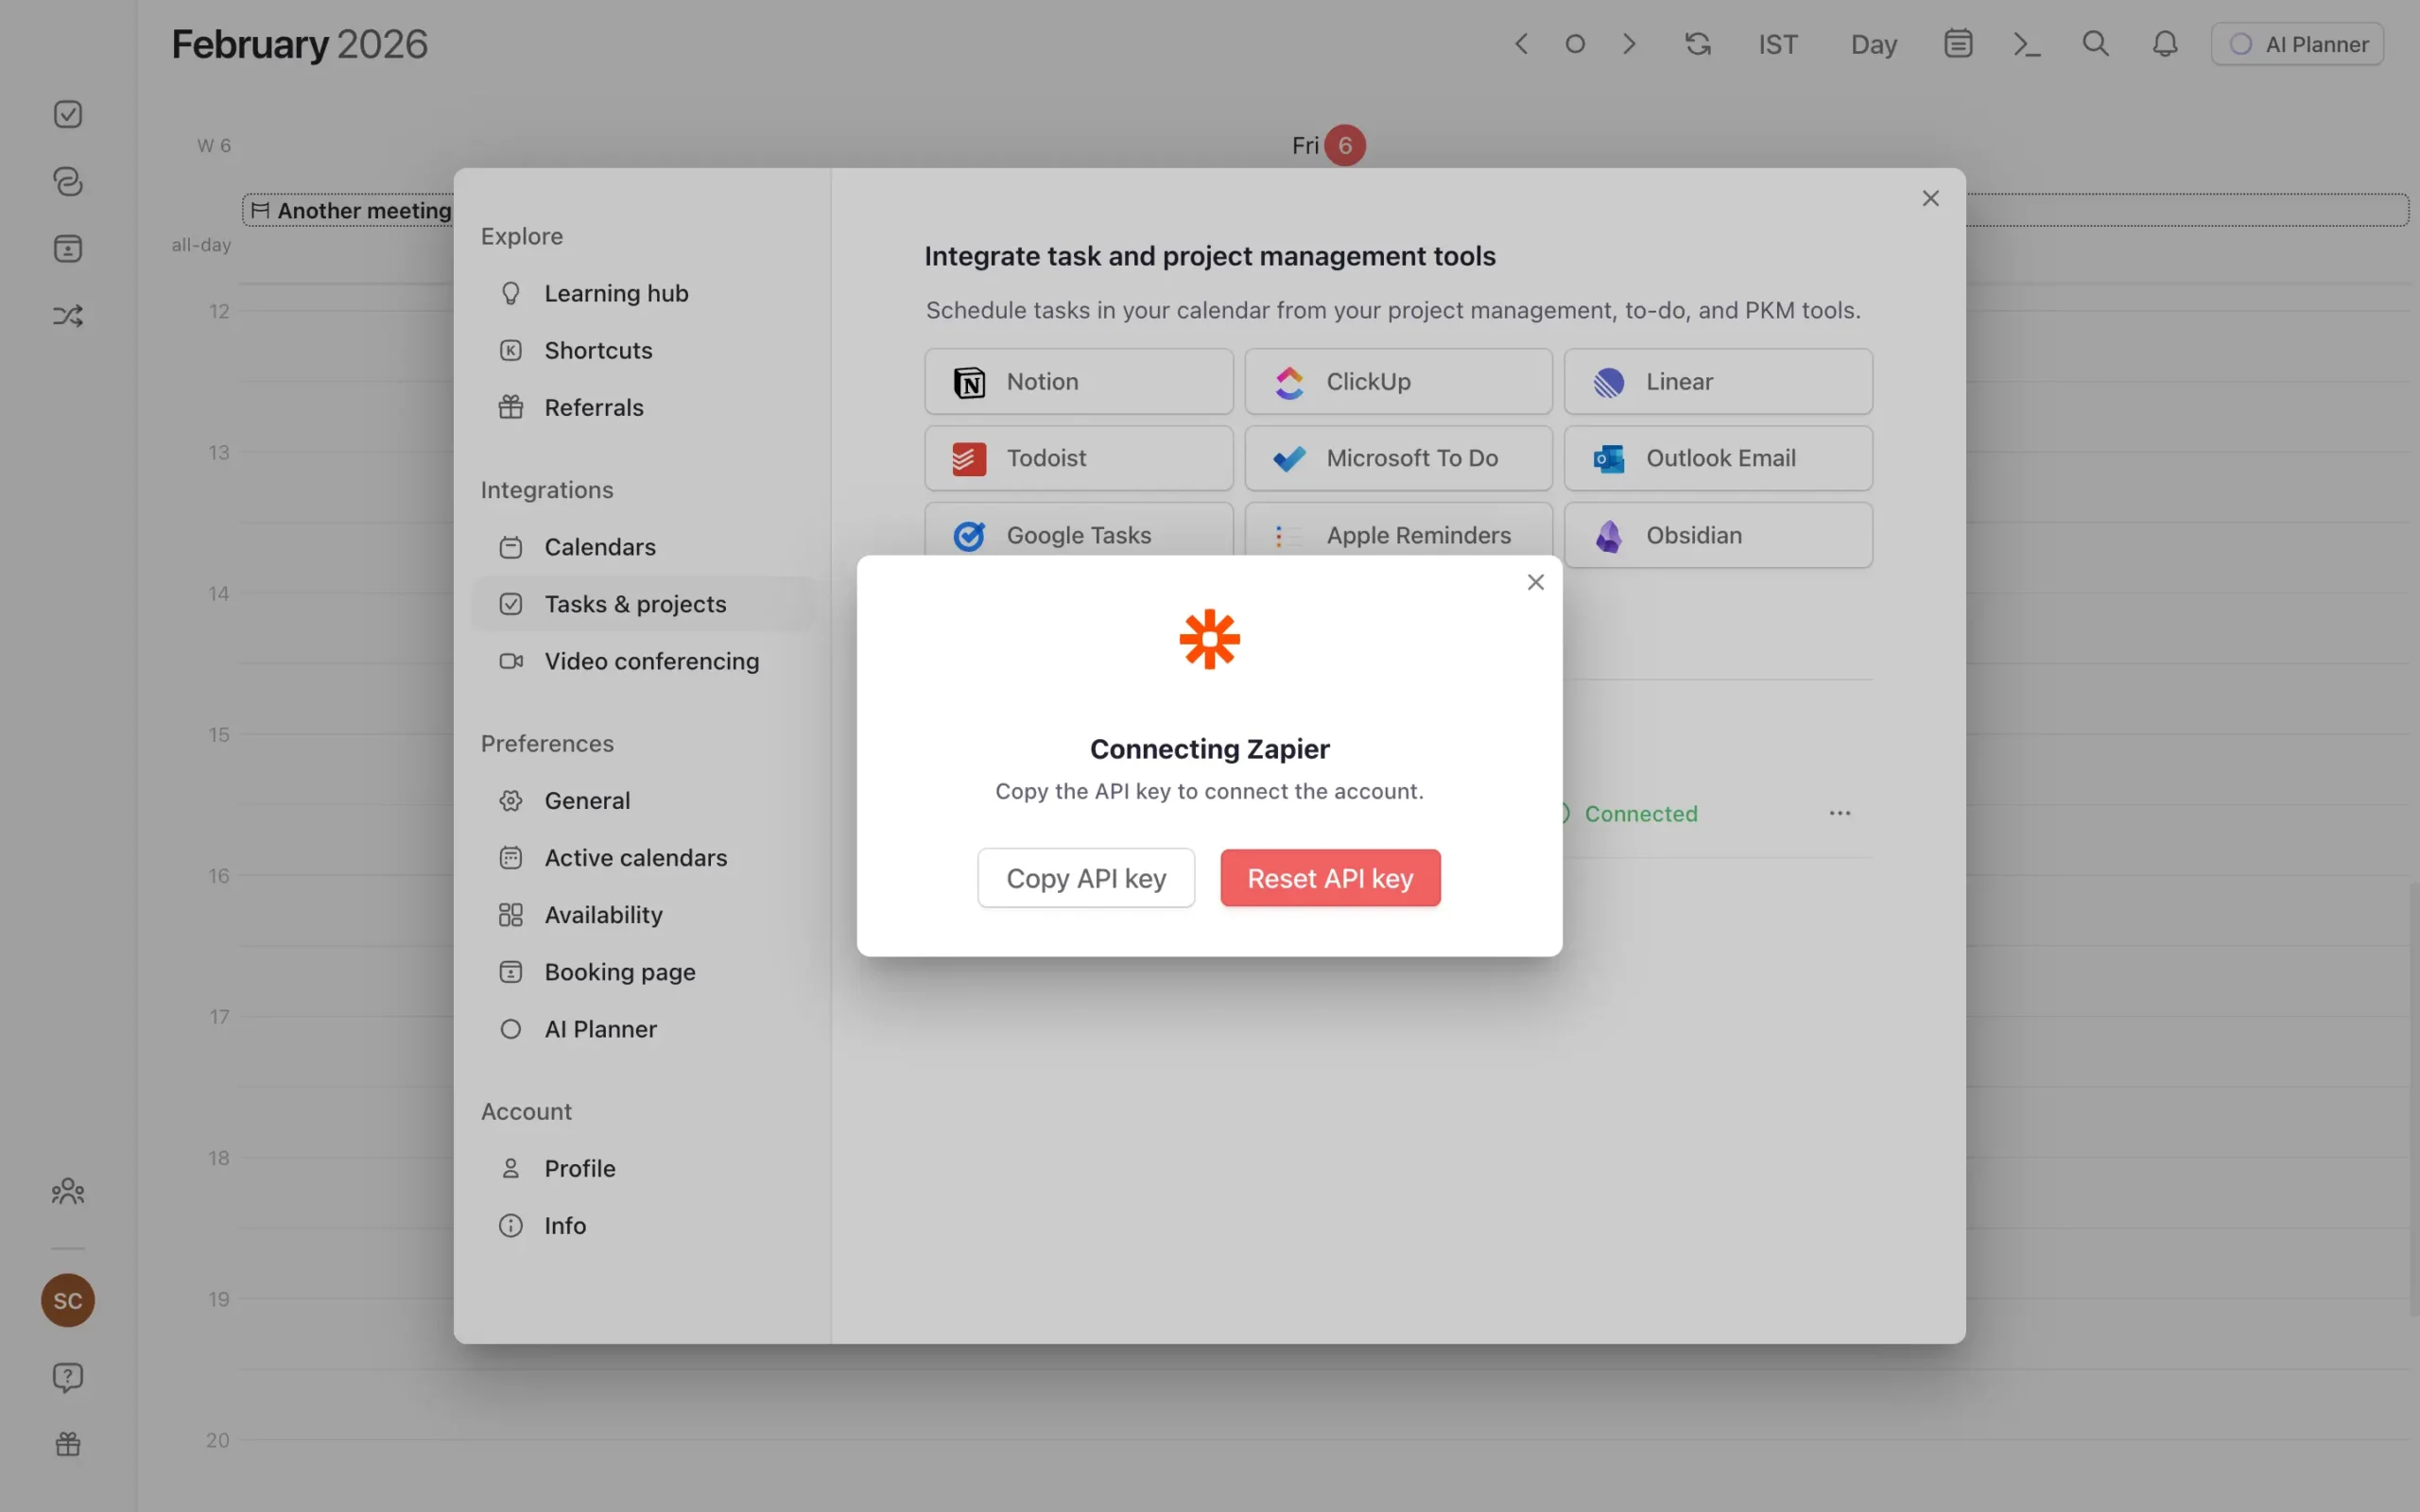
I didn’t test Zapier extensively. But it’s there if you need it.
Most people need Google Calendar, a task manager, and video conferencing. Morgen handles that. If you need more, the options exist.
How much does Morgen cost?
Morgen has two pricing tiers: Individuals and Teams, with a 14-day free trial.
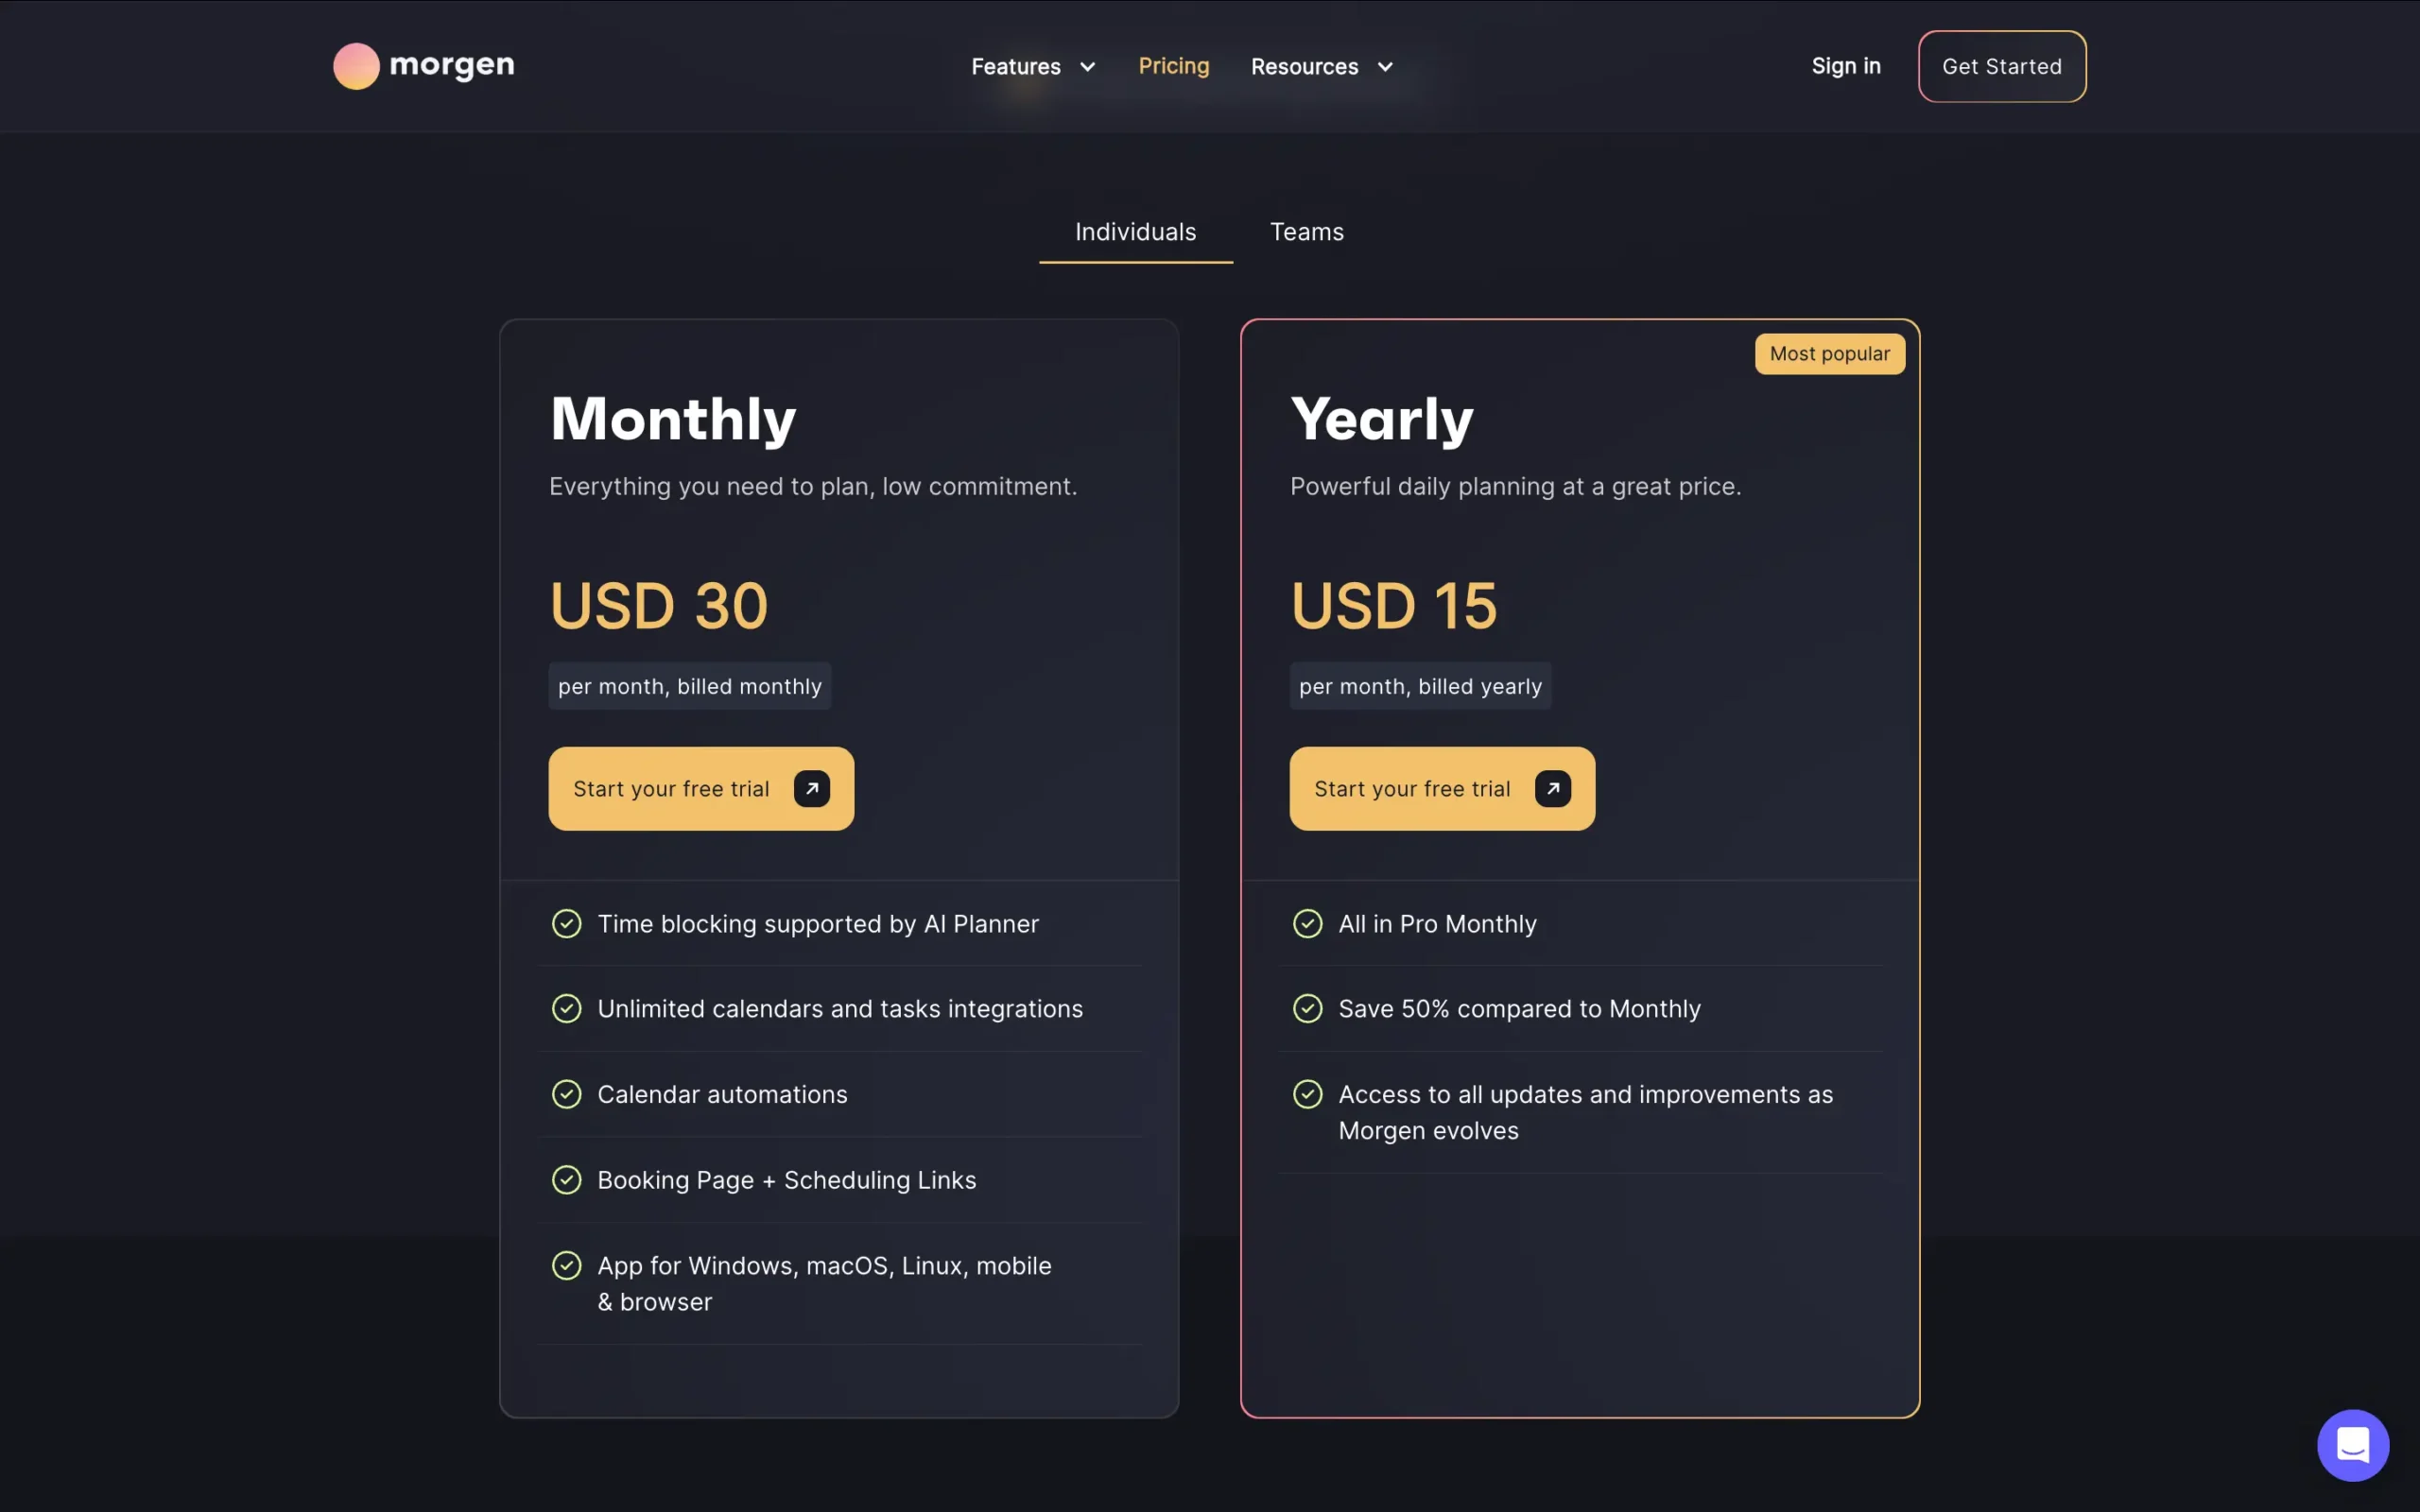
- Individuals Monthly costs $30 per month. You get everything: AI Planner, unlimited calendar and task integrations, calendar automations, booking pages, and scheduling links. All platforms included.
- Individuals Yearly costs $15 per month, billed annually. Same features as Pro Monthly. You save 50% by paying upfront. This is what most people choose.
- Team plans start at $25 per seat monthly or $10 per seat yearly (minimum two seats).
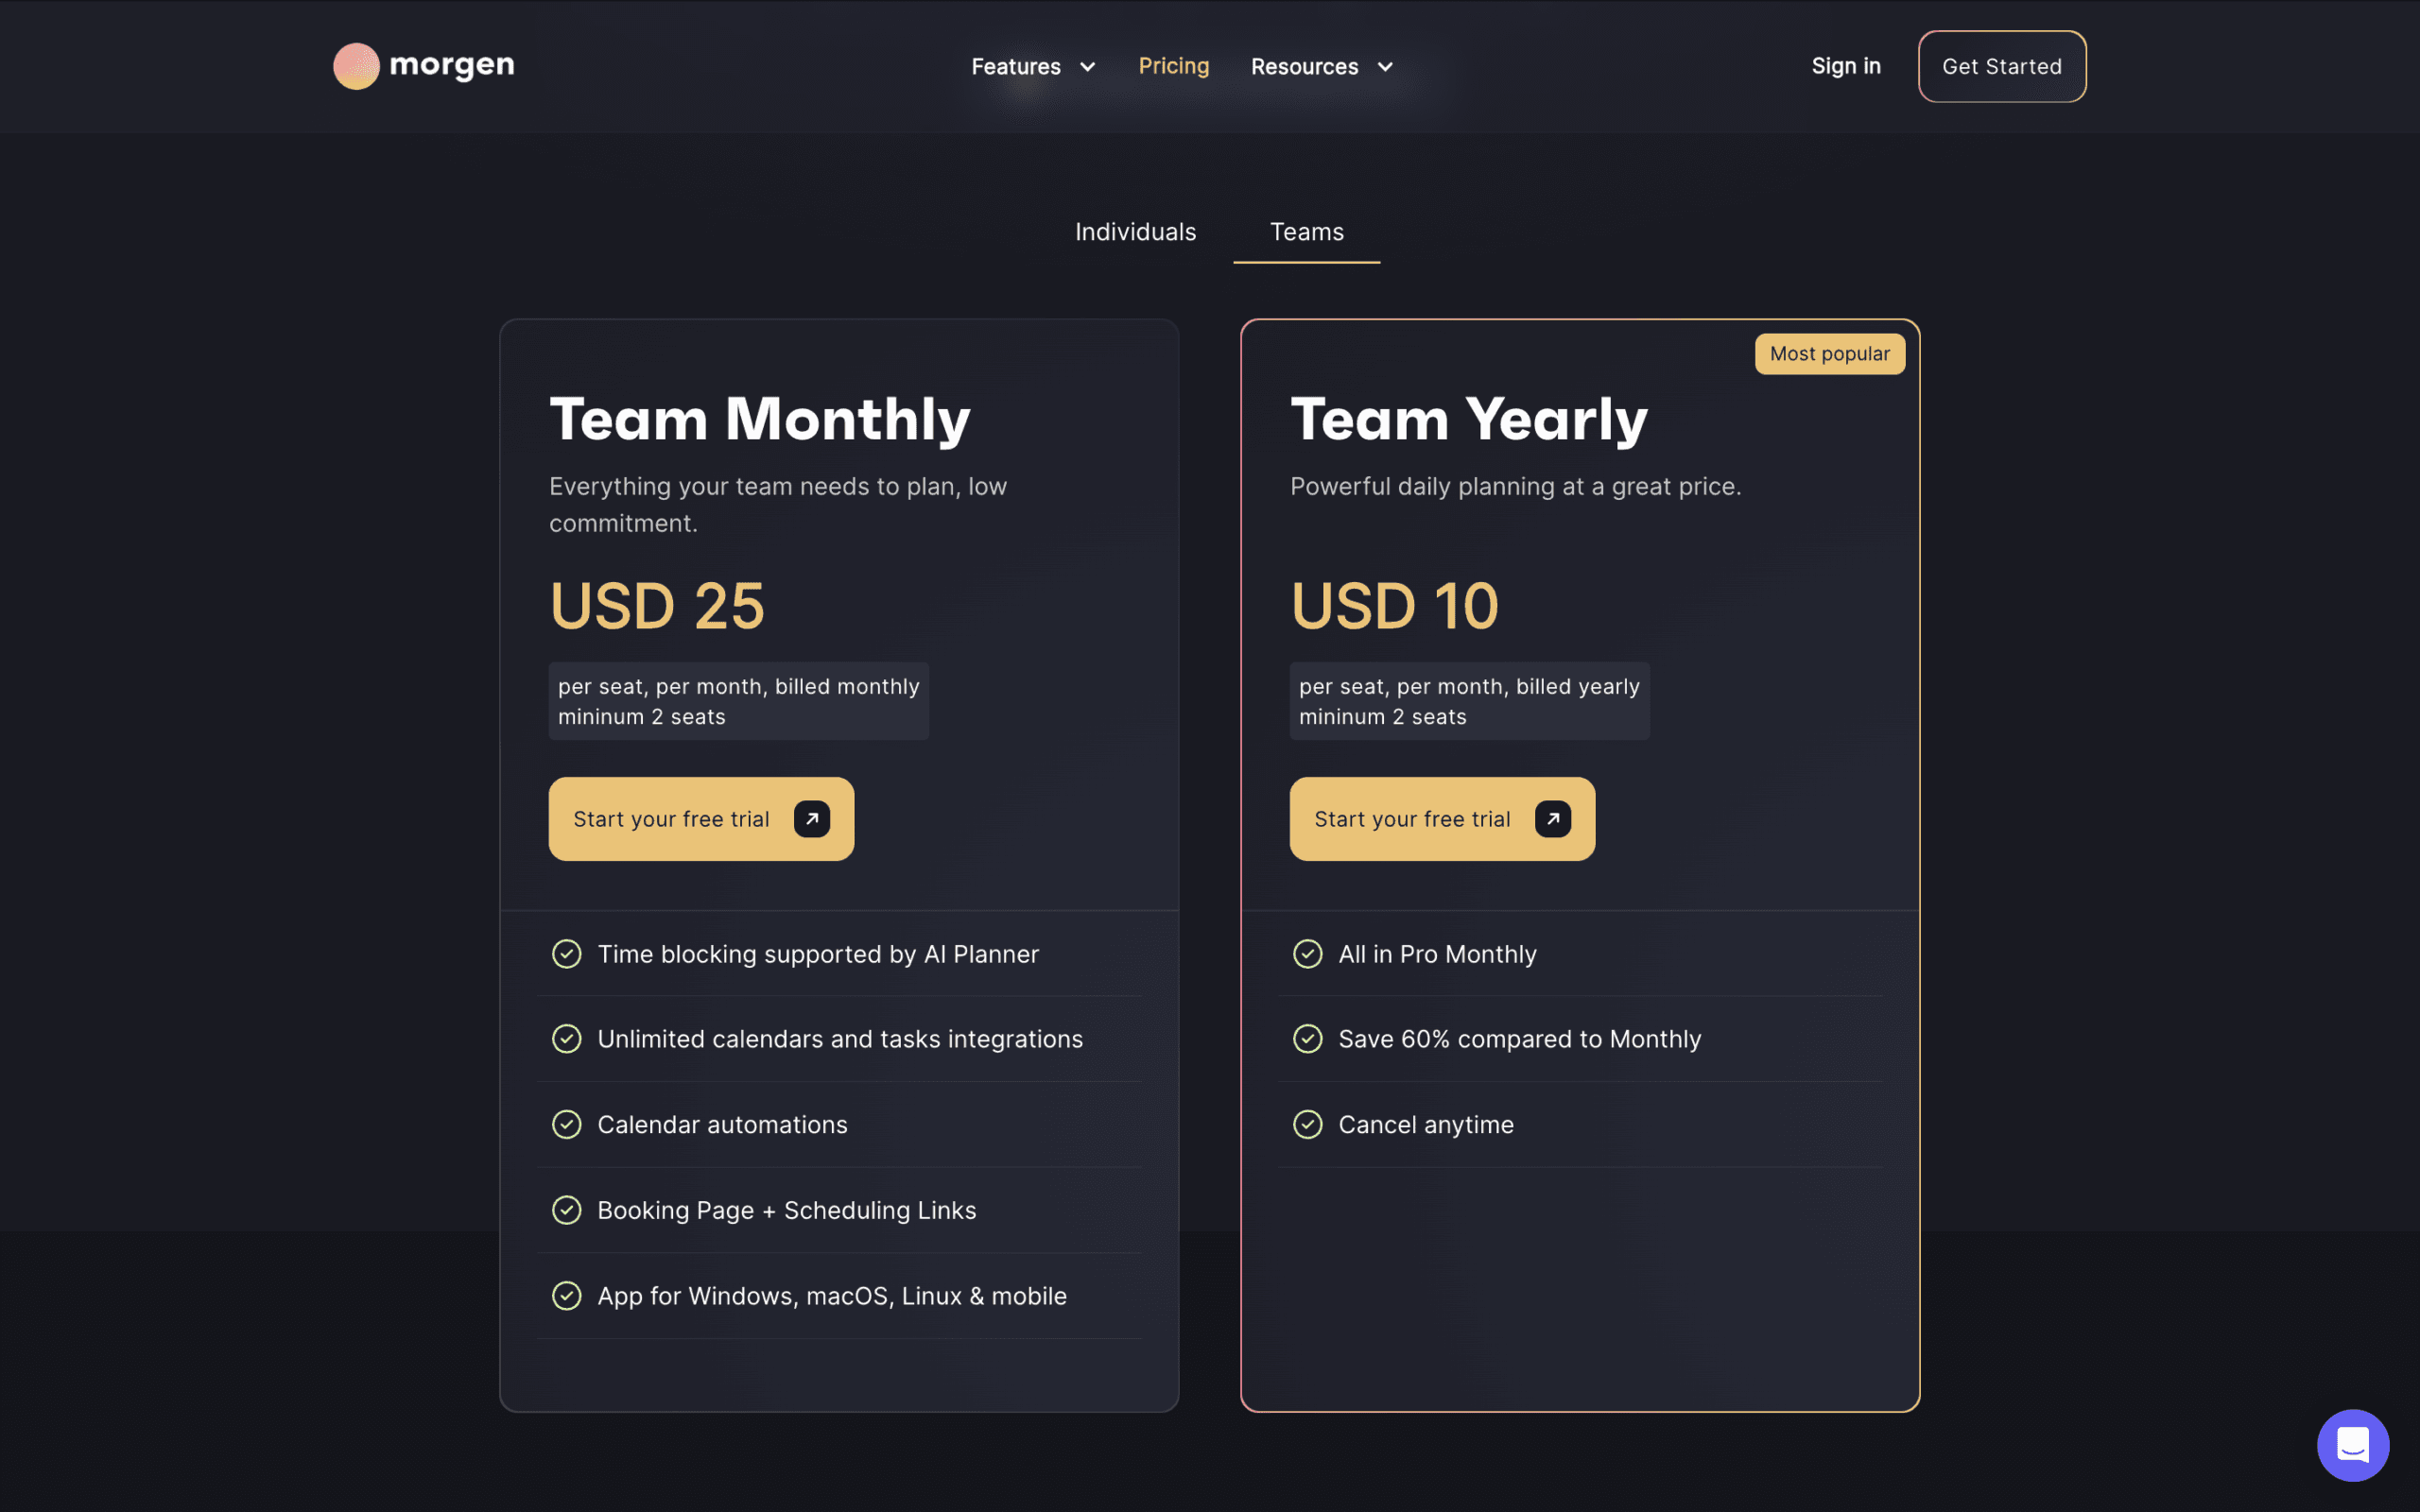
Same features as Pro, but with team collaboration tools.
My final thoughts on Morgen
Morgen solves a specific problem: you have calendars and tasks scattered across different apps, and you want AI to suggest a daily plan without taking over completely.
It’s ideal for you if you’re managing multiple calendars, paying for tools like Calendly separately, and you want planning help but refuse to surrender control to full automation.
The preview-then-approve model means you see what the AI suggests before it hits your calendar.
If you’re willing to invest an hour setting up Frames—teaching the AI when to schedule what types of work—you’ll get genuinely useful daily plans.
If Morgen fits, start your 14-day free trial today.
Further reading: Read my complete Sunsama vs Morgen comparison guide.
